Difference between revisions of "App up in 5 minutes"
| (132 intermediate revisions by 6 users not shown) | |||
| Line 1: | Line 1: | ||
== General information == | == General information == | ||
| − | |||
| − | |||
| − | === | + | === Abstract === |
| + | |||
| + | ''AppUpIn5'' is a tool-app for OSBP applications. It creates all models necessary for an OSBP app to be able: | ||
| + | * to import a CSV-file into a database | ||
| + | * to generate a complete application to process that data | ||
| + | * to export any modified data back into a CSV-file. | ||
| + | |||
| + | This is the introduction to this app. | ||
| − | + | === OSBP applications=== | |
| − | The | + | The OSBP application '''My1App''' should already have been generated before starting this app. |
| − | + | You can find the instructions [http://download.osbee.org/documentation/index.php/My_first_app here]. | |
| − | === | + | === CSV-file === |
| − | At least one | + | At least one CSV-file needs to have been prepared in advance for model expansion and data import. We use [http://download.osbee.org/downloads/samples/App_up_in_5_minutes/Articles.csv Articles.csv] |
| − | + | as the example. Please remember where you've saved your CSV-file, as it will be used to create the models and import the data. | |
| − | + | Here is an example of a vlaid CSV-file: | |
| − | |||
| − | |||
EAN;Artikelnummer;Bezeichnung_1;Bezeichnung_2;Mengeneinheit VK;Preiseinheit;Verkaufspreis;Einkaufspreis;Lieferant;LieferantenArtNr;Sortimentsbereich;Warengruppe;Grundpreis ME;Grundpreis Inhalt;Markencode;Gewichtsartikel;PLU | EAN;Artikelnummer;Bezeichnung_1;Bezeichnung_2;Mengeneinheit VK;Preiseinheit;Verkaufspreis;Einkaufspreis;Lieferant;LieferantenArtNr;Sortimentsbereich;Warengruppe;Grundpreis ME;Grundpreis Inhalt;Markencode;Gewichtsartikel;PLU | ||
2328310000007;100000;Allgäuer Wildkräuterkäse;;KILO;1;2,89;1,65;70000;104556;SBV-KÄSE;114;GRAMM;100;BAA;True; | 2328310000007;100000;Allgäuer Wildkräuterkäse;;KILO;1;2,89;1,65;70000;104556;SBV-KÄSE;114;GRAMM;100;BAA;True; | ||
| Line 64: | Line 67: | ||
4033977401002;100042;Haarpflegebürste schmal;;STÜCK;1;14,90;8,51;202515;48356;KOSMETIK;764;STÜCK;1;KKA;False; | 4033977401002;100042;Haarpflegebürste schmal;;STÜCK;1;14,90;8,51;202515;48356;KOSMETIK;764;STÜCK;1;KKA;False; | ||
| − | + | == ''AppUpIn5'' == | |
| − | + | <br> | |
| − | == | + | |
| − | + | ||
=== Preparation === | === Preparation === | ||
| − | Before starting the | + | <br>Before starting the app, you need to perform the following steps from within ''Eclipse'':<br><br> |
| − | + | # Change the '''Text file encoding''' to <code>UTF-8</code> in '''Preferences''' -> '''General''' -> '''Workspace'''. Click on '''Apply'''.<br><br>[[File:Aui5m_Preparation01.png|600px]]<br><br><br><br> | |
| − | + | # In '''Preferences''' -> '''OSBP Application Configuration''', change the '''Product Configuration''' from <code>workspace</code> to the name of the OSBP project which you want to use, in this case <code>org.osbp.my1app.product</code>. Please note that your entry will not be saved. You will need to perform this step every time you reopen '''Preferences'''.<br><br>[[File:Aui5m_Preparation02.png|600px]]<br><br><br><br> | |
| − | + | # In '''Preferences''' -> '''OSBP Application Configuration''' -> '''PersistenceUnits''', copy to the clipboard the '''PersistenceUnit''' name associated with your CSV-file, in this case <code>businessdata</code>.<br><br>[[File:Aui5m_Preparation03.png|600px]]<br><br><br><br>Paste this value into the field '''Persistence unit to use in entity''' in '''Preferences''' -> '''OSBP CSV2APP'''.<br><br>[[File:Aui5m_Preparation04.png|600px]]<br><br><br><br> | |
| − | + | # Configure all DSL model paths which will be modified after running this app. These models can be found in the '''model''' directory of the OSBP Project, in this case '''org.osbp.my1app.model.*/models/:'''.<br><br> | |
| − | + | #* We shall use the '''Entity model''' as the example:<br><br> | |
| − | + | #*# Click on '''Browse...'''<br><br>[[File:Aui5m_Preparation05.png|600px]]<br><br>The '''Entity model''' is the file '''my1app.entity''', which can be found in '''org.osbp.my1app.model.core/models/'''.<br><br>[[File:Aui5m_Preparation06.png|600px]]<br><br>[[File:Aui5m_Preparation07.png|600px]]<br><br><br><br> | |
| − | + | #*# Click on the file name and then click on '''Open'''.<br><br>The configuration of the '''Entity model''' is now complete.<br><br>[[File:Aui5m_Preparation09.png|600px]]<br><br><br><br> | |
| − | + | #* All other models can be configured in the same way as the '''Entity model''':<br> | |
| − | + | #** the '''DTO model''' is the file '''my1app.dto''', which can be found in '''org.osbp.my1app.model.core/models/'''.<br> | |
| − | ** < | + | #** the '''DataInterchange model''' is the file '''my1app.data''', which can be found in '''org.osbp.my1app.model.datainterchange/models/'''.<br> |
| − | * | + | #** the '''Datamart model''' is the file '''my1app.datamart''', which can be found in '''org.osbp.my1app.model.datamart/models/'''.<br> |
| − | ** | + | #** the '''Table model''' is the file '''my1app.table''', which can be found in '''org.osbp.my1app.model.table/models/'''.<br> |
| − | ** | + | #** the '''UI model''' is the file '''my1app.ui''', which can be found in '''org.osbp.my1app.model.ui/models/'''.<br> |
| − | ** | + | #** the '''Dialog model''' is the file '''my1app.dialog''', which can be found in '''org.osbp.my1app.model.dialog/models/'''.<br> |
| − | ** | + | #** the '''Perspective model''' is the file '''my1app.perspective''', which can be found in '''org.osbp.my1app.model.perspective/models/'''.<br> |
| − | ** | + | #** the '''Menu model''' is the file '''my1app.menu''', which can be found in '''org.osbp.my1app.model.menu/models/'''.<br> |
| − | ** | + | #** the '''Action model''' is the file '''my1app.action''', which can be found in '''org.osbp.my1app.model.action/models/'''.<br> |
| − | ** | + | #** the '''Authorization model''' is the file '''my1app.authorization''', which can be found in '''org.osbp.my1app.model.authorization/models/'''.<br><br> |
| − | ** | + | #* The configuration of all models is now complete. Click on '''Apply'''.<br><br>[[File:Aui5m_Preparation08.png|600px]]<br><br><br><br> |
| − | ** | + | # Change the '''delimiter to use''' as is appropriate for your CSV-file. Click on '''Apply''' to confirm. In this example, we change it to <code>;</code>.<br><br>[[File:Aui5m_Preparation10.png|600px]]<br><br><br><br> |
| − | <br><br>[[File: | + | # Click on '''OK''' to close the '''Preferences''' window.<br><br> |
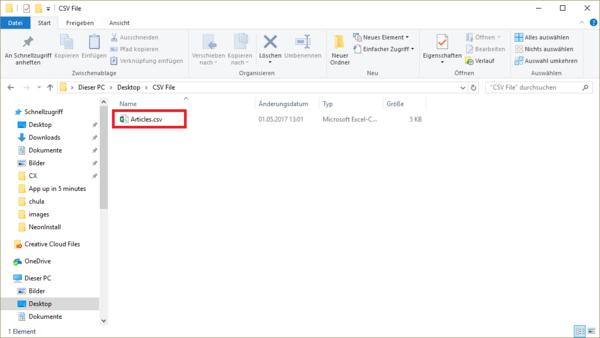
| − | + | # Find your CSV-file, click on it and drag it to the ''Eclipse'' workspace.<br><br>[[File:Aui5m_Preparation11.png|600px]]<br><br><br><br> | |
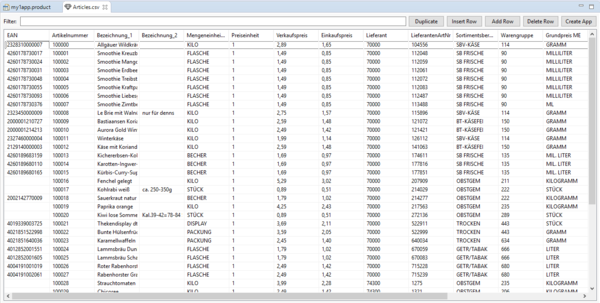
| − | + | #* The CSV-file looks like this in ''Eclipse'':<br><br>[[File:Aui5m_Preparation12.png|600px]]<br><br><br><br> | |
| − | + | ||
| − | + | ||
=== Create DSL models === | === Create DSL models === | ||
| + | <br> | ||
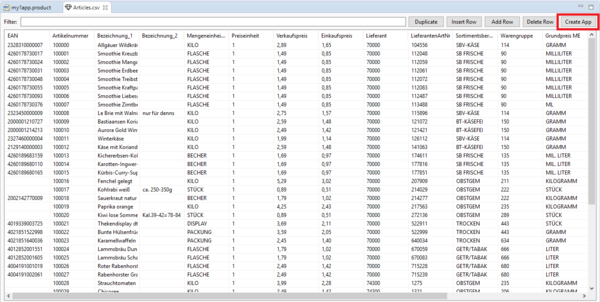
| + | # At the top-right corner of the CSV-file, there is a button '''Create App'''. All DSL models based on this CSV-file are automatically generated by clicking on this button.<br><br>[[File:Aui5m_Create01.png||600px]]<br><br><br><br> | ||
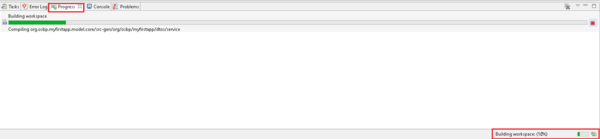
| + | #* When you click on the '''Create App''' button, no status indicator is displayed. If you want to know the progress of the model-creation operation, please check the bottom-right corner of ''Eclipse'', or open the '''Progress''' window.<br><br> | ||
| + | #* Please note that no data are automatically imported, only data models are created in this step.<br><br>[[File:C2a 11 ca bw.png||600px]]<br><br><br><br> | ||
| + | # When the workspace has finished being built, you can check the models that were configured in the previous step. They should all have been modified according to the CSV-file.<br><br> | ||
| + | #* In the <code>entity</code> model, the new entity <code>Articles</code> is generated. The entity name is the name of the CSV-file, and all attributes are defined according to the column names contained in the CSV-file.<br><br>[[File:Aui5m_Create02.png||600px]]<br><br><br><br> | ||
| + | #* In the <code>dto</code> model, a new dto, <code>ArticlesDto</code>, is generated based on the new entity.<br><br>[[File:Aui5m_Create03.png||600px]]<br><br><br><br> | ||
| + | #* In the <code>ui</code> model, a new ui, <code>Articles</code>, is generated based on the new dto.<br><br>[[File:C2a 12 ca ui.png||600px]]<br><br><br><br> | ||
| + | #* In the <code>action</code> model, two new toolbars, <code>Articles_dialog</code> and <code>Articles_table</code>, are generated. They will be used in the new dialog and table.<br><br>[[File:Aui5m_Create04.png||600px]]<br><br><br><br> | ||
| + | #* In the <code>datamart</code> model, a new datamart, <code>Articles</code>, is generated for the new entity.<br><br>[[File:Aui5m_Create05.png||600px]]<br><br><br><br> | ||
| + | #* In the <code>table</code> model, a new table, <code>Articles</code>, is generated for the new datamart.<br><br>[[File:Aui5m_Create06.png||600px]]<br><br><br><br> | ||
| + | #* In the <code>dialog</code> model, a new dialog, <code>Articles</code>, is generated based on the <code>ui</code> and <code>action</code> models.<br><br>[[File:Aui5m_Create07.png||600px]]<br><br><br><br> | ||
| + | #* In the <code>authorization</code> model, a new row is added for the new entity.<br><br>[[File:Aui5m_Create08.png||600px]]<br><br><br><br> | ||
| + | #* In the <code>perspective</code> model, a new perspective, <code>Articles</code>, is generated for the new table and new dialog.<br><br>[[File:Aui5m_Create09.png||600px]]<br><br><br><br> | ||
| + | #* In the <code>menu</code> model, a new menu, <code>Applications</code>, is generated in which entry <code>Articles</code> is defined for the new perspective.<br><br>[[File:Aui5m_Create10.png||600px]]<br><br><br><br> | ||
| + | #* In the <code>datainterchange</code> model, a new datainterchange, <code>Articles</code>, is defined. The path to the CSV-file is saved here, which is very important for the data import. If you move the CSV-file to a different location, please do not forget to change the path here, as well.<br><br>[[File:Aui5m_Create11.png||600px]]<br><br><br><br> | ||
| − | + | === Import data === | |
| − | + | <br>Data can be imported once the OSBP application has started.<br><br> | |
| − | + | # Start ''My1App'' in ''Eclipse''.([http://download.osbee.org/documentation/index.php/My_first_app#How_to_start_MyFirstApp How to start ''My1App'']).<br><br> | |
| − | + | # Copy this URL into your browser:<br><code>http://localhost:8081/my1app</code><br><br> | |
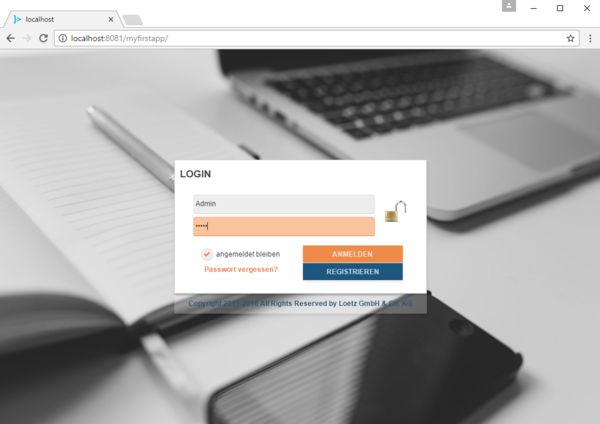
| − | + | # Enter the user name and password on the '''Login''' screen, e.g., Admin, Admin, choose to remain logged in and then click on '''Login'''.<br><br>[[File:C2a 14 web.png||600px]]<br><br><br><br> | |
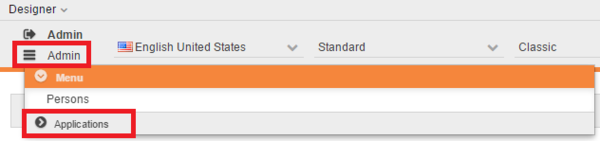
| − | + | # Click on the menu list. You can see at the end of the list that a new entry, '''Applications''', has been generated.<br><br>[[File:Aui5m_Import01.png||600px]]<br><br><br><br> | |
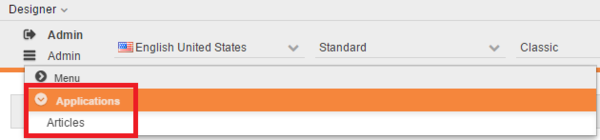
| − | + | # Expand this entry and click on '''Articles'''.<br><br>[[File:Aui5m_Import02.png||600px]]<br><br><br><br> | |
| − | + | # Near the top-left of the window, click on the first button to import the data.<br><br>[[File:Aui5m_Import03.png||600px]]<br><br><br><br> | |
| − | + | # Wait for a few seconds; you can then see that all data in the CSV-file have been imported.<br><br>[[File:C2a 15 web import finish.png]]<br><br><br><br> | |
| − | + | ||
| − | + | ||
| − | + | ||
| − | + | ||
| − | + | ||
| − | + | ||
| − | |||
| − | + | == Extensions 1.0 == | |
| + | <br>In this section we describe the new functionalities we are currently working on, which will be available up to the next release version. | ||
| − | + | Although it is possible to read and import data from csv files, the reading process doesn’t yet consider possible existing relations between the data contained in those files. With the next release version, it will be possible to enrich csv files with the metadata information needed, to highlight the presence of relations between the flat data contained in a bundle of different csv files. Thus, giving users the means to set up information over more complex structures.<br> | |
| − | + | You can find more information about it [[AppUpIn5Extensions|here]].<br><br> | |
| − | + | ||
| − | + | == Copyright Notice == | |
| − | + | {{Copyright Notice}} | |
| − | + | ||
| − | + | ||
| − | + | ||
| − | + | == License information == | |
| − | + | {{License information}} | |
Latest revision as of 15:38, 17 January 2018
Contents
General information
Abstract
AppUpIn5 is a tool-app for OSBP applications. It creates all models necessary for an OSBP app to be able:
- to import a CSV-file into a database
- to generate a complete application to process that data
- to export any modified data back into a CSV-file.
This is the introduction to this app.
OSBP applications
The OSBP application My1App should already have been generated before starting this app. You can find the instructions here.
CSV-file
At least one CSV-file needs to have been prepared in advance for model expansion and data import. We use Articles.csv as the example. Please remember where you've saved your CSV-file, as it will be used to create the models and import the data.
Here is an example of a vlaid CSV-file:
EAN;Artikelnummer;Bezeichnung_1;Bezeichnung_2;Mengeneinheit VK;Preiseinheit;Verkaufspreis;Einkaufspreis;Lieferant;LieferantenArtNr;Sortimentsbereich;Warengruppe;Grundpreis ME;Grundpreis Inhalt;Markencode;Gewichtsartikel;PLU
2328310000007;100000;Allgäuer Wildkräuterkäse;;KILO;1;2,89;1,65;70000;104556;SBV-KÄSE;114;GRAMM;100;BAA;True;
4260178730017;100001;Smoothie Kreuzbeere; ;FLASCHE;1;1,49;0,85;70000;112048;SB FRISCHE;90;MILLILITER;240;PVT;False;
4260178730024;100002;Smoothie Mango-Maracuja; ;FLASCHE;1;1,49;0,85;70000;112059;SB FRISCHE;90;MILLILITER;240;PVT;False;
4260178730031;100003;Smoothie Erdbeer-Banane; ;FLASCHE;1;1,49;0,85;70000;112061;SB FRISCHE;90;MILLILITER;240;PVT;False;
4260178730048;100004;Smoothie Treibstoff; ;FLASCHE;1;1,49;0,85;70000;112072;SB FRISCHE;90;MILLILITER;240;PVT;False;
4260178730055;100005;Smoothie Kraftpaket; ;FLASCHE;1;1,49;0,85;70000;112083;SB FRISCHE;90;MILLILITER;240;PVT;False;
4260178730093;100006;Smoothie Liebesgruß; ;FLASCHE;1;1,49;0,85;70000;112487;SB FRISCHE;90;MILLILITER;240;PVT;False;
4260178730376;100007;Smoothie Zimtbeerchen; ;FLASCHE;1;1,49;0,85;70000;113488;SB FRISCHE;90;ML;145;PVT;False;
2323450000009;100008;Le Brie mit Walnüssen;nur für denns;KILO;1;2,75;1,57;70000;115896;SBV-KÄSE;114;GRAMM;100;ÖMA;True;
2000001210727;100009;Bastiaansen Koriander;;KILO;1;2,59;1,48;70000;121072;BT-KÄSEFEI;150;GRAMM;100;BAS;True;
2000001214213;100010;Aurora Gold Winterkäse;;KILO;1;2,49;1,42;70000;121421;BT-KÄSEFEI;150;GRAMM;100;AUR;True;
2327460000004;100011;Winterkäse;;KILO;1;1,99;1,14;70000;126112;SBV-KÄSE;114;GRAMM;100;DAG;True;
2129140000003;100012;Käse mit Koriander;;KILO;1;2,59;1,48;70000;141063;BT-KÄSEFEI;150;GRAMM;100;SÖB;True;
4260189683159;100013;Kichererbsen-Kokos-Suppe;;BECHER;1;1,69;0,97;70000;174611;SB FRISCHE;135;MIL. LITER;400;RBF;False;
4260189680110;100014;Karotten-Ingwer-Suppe;;BECHER;1;1,69;0,97;70000;177816;SB FRISCHE;135;MIL. LITER;400;RBF;False;
4260189680165;100015;Kürbis-Curry-Suppe;;BECHER;1;1,69;0,97;70000;177851;SB FRISCHE;135;MIL. LITER;400;RBF;False;
;100016;Fenchel gelegt;;KILO;1;5,29;3,02;70000;207909;OBSTGEM;211;KILOGRAMM;1;;True;3271
;100017;Kohlrabi weiß;ca. 250-350g;STÜCK;1;0,89;0,51;70000;214029;OBSTGEM;222;STÜCK;1;;False;3385
2002142770009;100018;Sauerkraut natur 500g;;BECHER;1;1,79;1,02;70000;214277;OBSTGEM;222;KILOGRAMM;1;;False;3398
;100019;Paprika orange;;KILO;1;4,25;2,43;70000;217563;OBSTGEM;235;KILOGRAMM;1;;True;3551
;100020;Kiwi lose Sommerkiwi;Kal.39-42=78-84 St;STÜCK;1;0,89;0,51;70000;272136;OBSTGEM;289;STÜCK;1;;False;3901
4019339003725;100021;Thekendisplay dt.Hülsenfrüchte;;DISPLAY;1;3,69;2,11;70000;522911;TROCKEN;443;STÜCK;12;DAT;False;
4021851522998;100022;Bunte Hülsenfrüchte;;PACKUNG;1;3,59;2,05;70000;522999;TROCKEN;443;GRAMM;500;DEE;False;
4021851640036;100023;Karamellwaffeln;;PACKUNG;1;2,45;1,40;70000;640034;TROCKEN;634;GRAMM;315;DEE;False;
4012852001551;100024;Lammsbräu Dunkle Weiße;;FLASCHE;1;1,79;1,02;70000;670059;GETR/TABAK;666;LITER;1;NEU;False;
4012852001605;100025;Lammsbräu Schankbier;;FLASCHE;1;1,79;1,02;70000;670083;GETR/TABAK;666;LITER;1;NEU;False;
4004191001019;100026;Roter Rabenhorster;;FLASCHE;1;2,49;1,42;70000;715228;GETR/TABAK;680;LITER;1;RBT;False;
4004191002061;100027;Rabenhorster Granatapfel;;FLASCHE;1;2,49;1,42;70000;715239;GETR/TABAK;680;LITER;1;RBT;False;
;100028;Strauchtomaten;;KILO;1;3,99;2,28;74300;1275;OBSTGEM;235;KILOGRAMM;1;ÖFI;True;3539
;100029;Chicoree;;KILO;1;2,49;1,42;74300;1321;OBSTGEM;206;KILOGRAMM;1;ÖFI;True;3340
2137550000001;100030;Ziegencamembert natur;;KILO;1;2,59;1,48;202104;11000;BT-KÄSEFEI;150;GRAMM;100;KÄL;True;
2195010000008;100031;Ziegencamembert natur;;KILO;1;2,59;1,48;202104;11000;BT-KÄSEFEI;150;GRAMM;100;KÄL;True;
2195970000001;100032;Ziegencamembert Gewürz-;rädle;KILO;1;2,59;1,48;202104;11001;SB FRISCHE;104;GRAMM;100;KÄL;True;
2461380000000;100033;Putenschnitzel;ca.300 g;KILO;1;9,89;5,65;202195;6138;SB FLEISCH;121;GRAMM;100;ALM;True;
2023074031129;100034;Rabenhorst Weizengras;;FLASCHE;1;2,49;1,42;202307;403112;GETR/TABAK;680;LITER;1;RBN;False;
;100035;Nagellack sharp rosé;;FLASCHE;1;3,15;1,80;202515;40194;KOSMETIK;795;MILLILITER;9;BEN;False;
;100036;Nagellack delicious viole;;FLASCHE;1;3,15;1,80;202515;40195;KOSMETIK;795;MILLILITER;9;BEN;False;
;100037;Nagellack spicy chocolate;;FLASCHE;1;3,15;1,80;202515;40196;KOSMETIK;795;MILLILITER;9;BEN;False;
;100038;Nagellack vintage red;;FLASCHE;1;3,15;1,80;202515;40197;KOSMETIK;795;MILLILITER;9;BEN;False;
;100039;Nagellack wild orchid;;FLASCHE;1;3,15;1,80;202515;40198;KOSMETIK;795;MILLILITER;9;BEN;False;
4033977402009;100040;Haarpflegebürste,oval;;STÜCK;1;14,90;8,51;202515;48210;KOSMETIK;764;STÜCK;1;KKA;False;
4033977403006;100041;Haarpflegebürste,ergon;;STÜCK;1;14,90;8,51;202515;48211;KOSMETIK;764;STÜCK;1;KKA;False;
4033977401002;100042;Haarpflegebürste schmal;;STÜCK;1;14,90;8,51;202515;48356;KOSMETIK;764;STÜCK;1;KKA;False;
AppUpIn5
Preparation
Before starting the app, you need to perform the following steps from within Eclipse:
- Change the Text file encoding to
UTF-8in Preferences -> General -> Workspace. Click on Apply.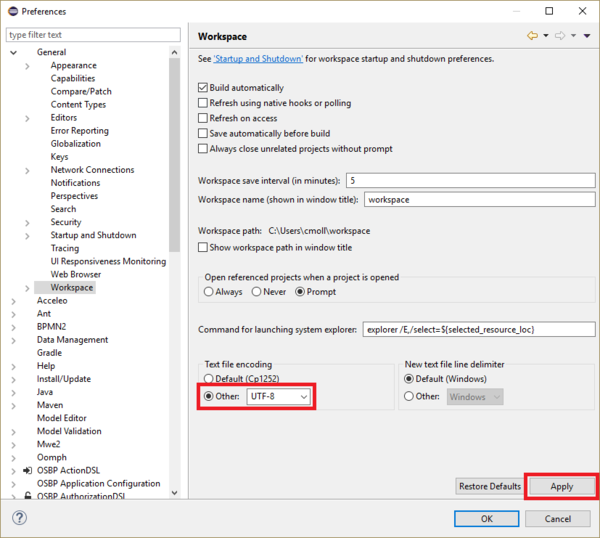
- In Preferences -> OSBP Application Configuration, change the Product Configuration from
workspaceto the name of the OSBP project which you want to use, in this caseorg.osbp.my1app.product. Please note that your entry will not be saved. You will need to perform this step every time you reopen Preferences.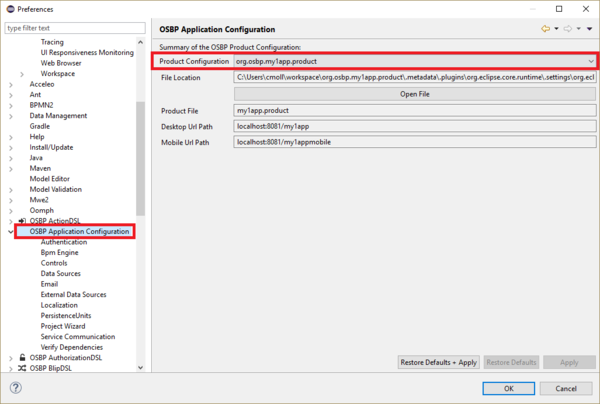
- In Preferences -> OSBP Application Configuration -> PersistenceUnits, copy to the clipboard the PersistenceUnit name associated with your CSV-file, in this case
businessdata.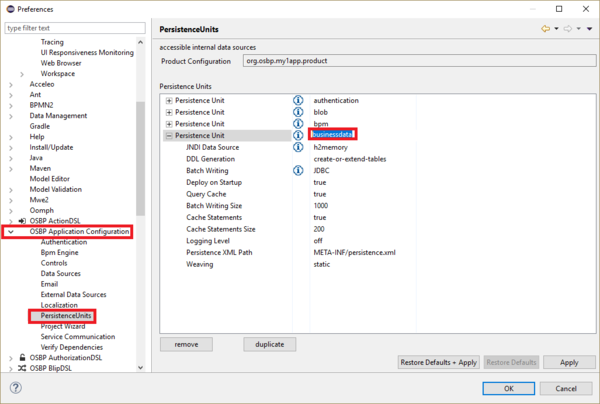
Paste this value into the field Persistence unit to use in entity in Preferences -> OSBP CSV2APP.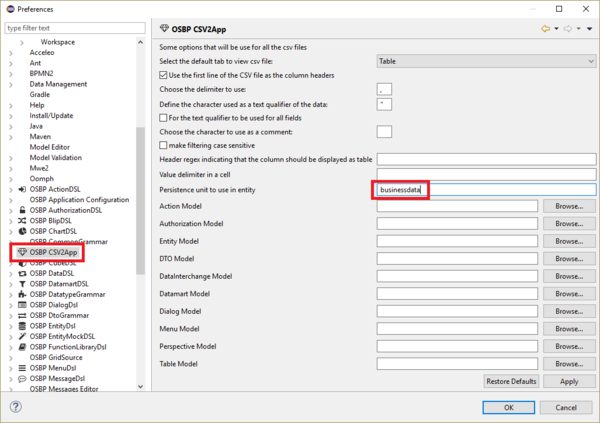
- Configure all DSL model paths which will be modified after running this app. These models can be found in the model directory of the OSBP Project, in this case org.osbp.my1app.model.*/models/:.
- We shall use the Entity model as the example:
- Click on Browse...

The Entity model is the file my1app.entity, which can be found in org.osbp.my1app.model.core/models/.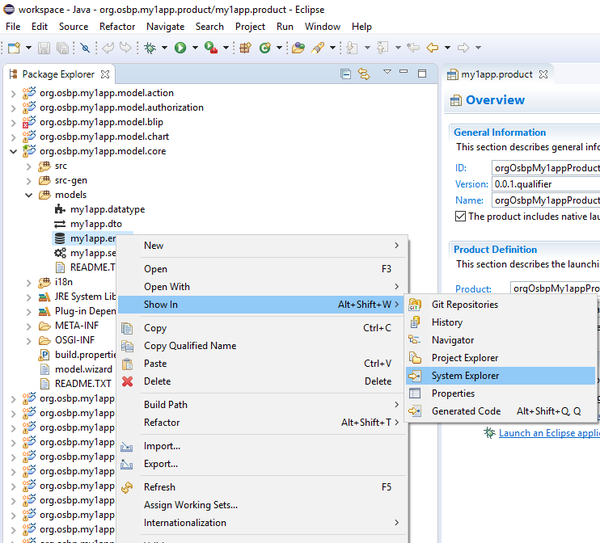

- Click on the file name and then click on Open.
The configuration of the Entity model is now complete.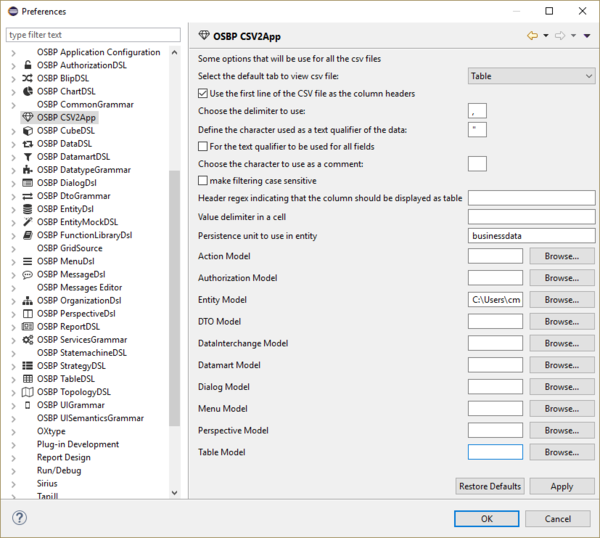
- Click on Browse...
- All other models can be configured in the same way as the Entity model:
- the DTO model is the file my1app.dto, which can be found in org.osbp.my1app.model.core/models/.
- the DataInterchange model is the file my1app.data, which can be found in org.osbp.my1app.model.datainterchange/models/.
- the Datamart model is the file my1app.datamart, which can be found in org.osbp.my1app.model.datamart/models/.
- the Table model is the file my1app.table, which can be found in org.osbp.my1app.model.table/models/.
- the UI model is the file my1app.ui, which can be found in org.osbp.my1app.model.ui/models/.
- the Dialog model is the file my1app.dialog, which can be found in org.osbp.my1app.model.dialog/models/.
- the Perspective model is the file my1app.perspective, which can be found in org.osbp.my1app.model.perspective/models/.
- the Menu model is the file my1app.menu, which can be found in org.osbp.my1app.model.menu/models/.
- the Action model is the file my1app.action, which can be found in org.osbp.my1app.model.action/models/.
- the Authorization model is the file my1app.authorization, which can be found in org.osbp.my1app.model.authorization/models/.
- the DTO model is the file my1app.dto, which can be found in org.osbp.my1app.model.core/models/.
- The configuration of all models is now complete. Click on Apply.

- We shall use the Entity model as the example:
- Change the delimiter to use as is appropriate for your CSV-file. Click on Apply to confirm. In this example, we change it to
;.
- Click on OK to close the Preferences window.
- Find your CSV-file, click on it and drag it to the Eclipse workspace.
- The CSV-file looks like this in Eclipse:
- The CSV-file looks like this in Eclipse:


Create DSL models
- At the top-right corner of the CSV-file, there is a button Create App. All DSL models based on this CSV-file are automatically generated by clicking on this button.
- When you click on the Create App button, no status indicator is displayed. If you want to know the progress of the model-creation operation, please check the bottom-right corner of Eclipse, or open the Progress window.
- Please note that no data are automatically imported, only data models are created in this step.
- When you click on the Create App button, no status indicator is displayed. If you want to know the progress of the model-creation operation, please check the bottom-right corner of Eclipse, or open the Progress window.
- When the workspace has finished being built, you can check the models that were configured in the previous step. They should all have been modified according to the CSV-file.
- In the
entitymodel, the new entityArticlesis generated. The entity name is the name of the CSV-file, and all attributes are defined according to the column names contained in the CSV-file.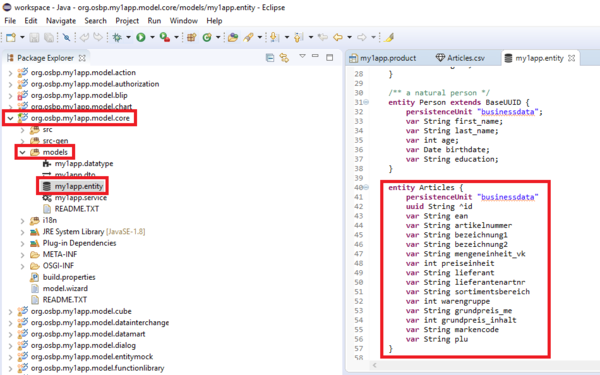
- In the
dtomodel, a new dto,ArticlesDto, is generated based on the new entity.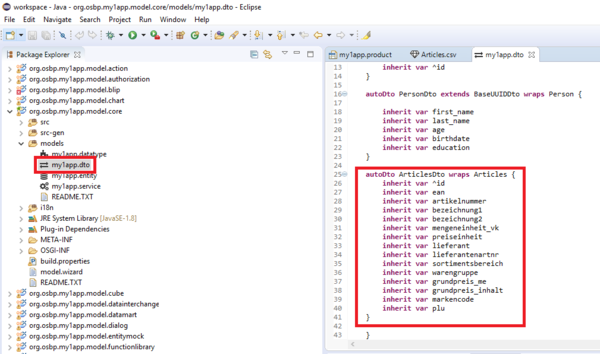
- In the
uimodel, a new ui,Articles, is generated based on the new dto.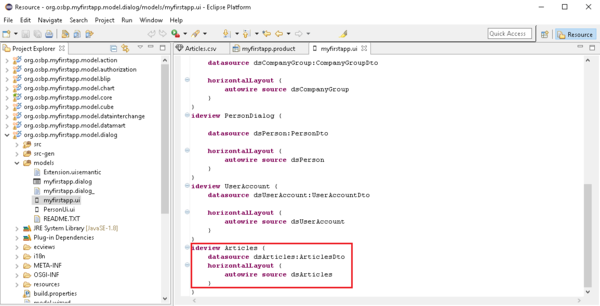
- In the
actionmodel, two new toolbars,Articles_dialogandArticles_table, are generated. They will be used in the new dialog and table.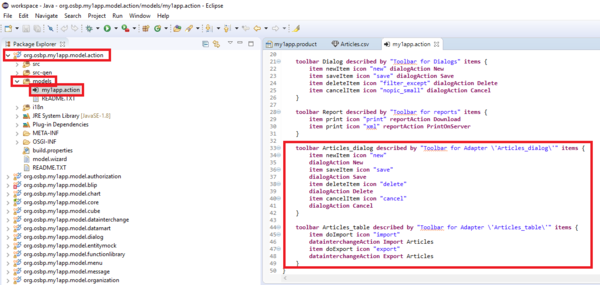
- In the
datamartmodel, a new datamart,Articles, is generated for the new entity.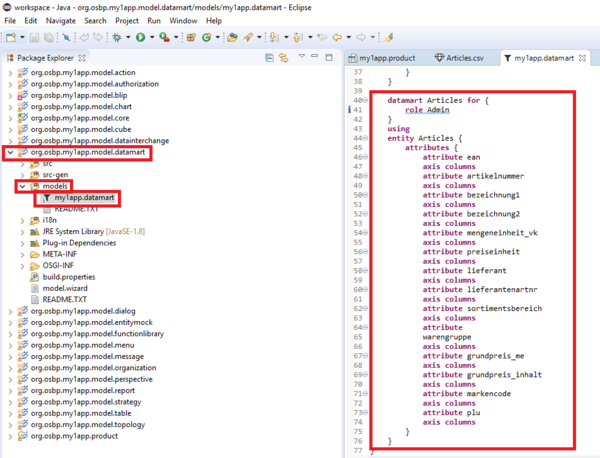
- In the
tablemodel, a new table,Articles, is generated for the new datamart.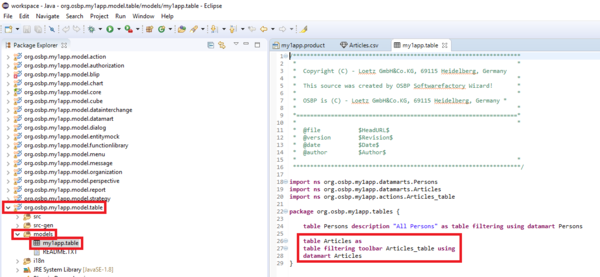
- In the
dialogmodel, a new dialog,Articles, is generated based on theuiandactionmodels.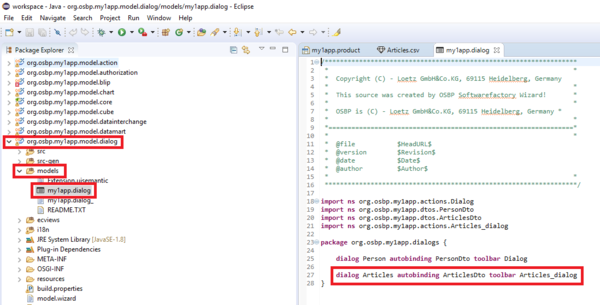
- In the
authorizationmodel, a new row is added for the new entity.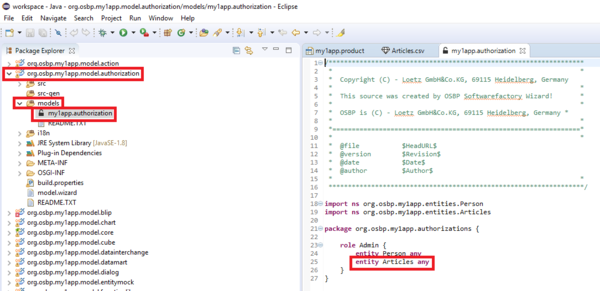
- In the
perspectivemodel, a new perspective,Articles, is generated for the new table and new dialog.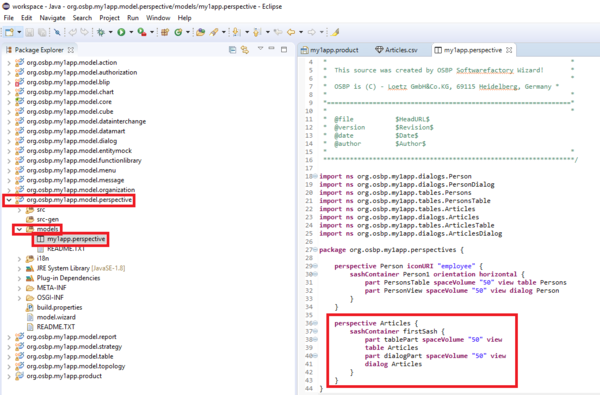
- In the
menumodel, a new menu,Applications, is generated in which entryArticlesis defined for the new perspective.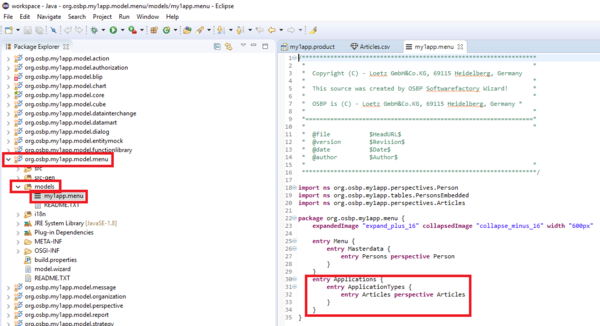
- In the
datainterchangemodel, a new datainterchange,Articles, is defined. The path to the CSV-file is saved here, which is very important for the data import. If you move the CSV-file to a different location, please do not forget to change the path here, as well.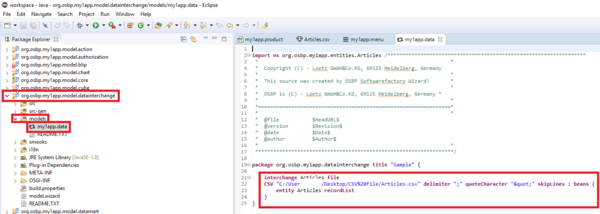
- In the


Import data
Data can be imported once the OSBP application has started.
- Start My1App in Eclipse.(How to start My1App).
- Copy this URL into your browser:
http://localhost:8081/my1app - Enter the user name and password on the Login screen, e.g., Admin, Admin, choose to remain logged in and then click on Login.
- Click on the menu list. You can see at the end of the list that a new entry, Applications, has been generated.
- Expand this entry and click on Articles.
- Near the top-left of the window, click on the first button to import the data.
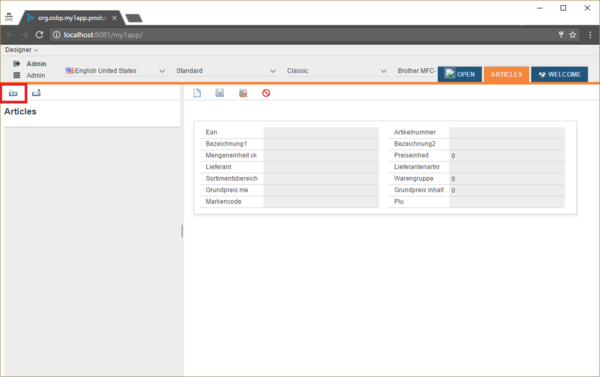
- Wait for a few seconds; you can then see that all data in the CSV-file have been imported.


Extensions 1.0
In this section we describe the new functionalities we are currently working on, which will be available up to the next release version.
Although it is possible to read and import data from csv files, the reading process doesn’t yet consider possible existing relations between the data contained in those files. With the next release version, it will be possible to enrich csv files with the metadata information needed, to highlight the presence of relations between the flat data contained in a bundle of different csv files. Thus, giving users the means to set up information over more complex structures.
You can find more information about it here.
Copyright Notice
All rights are reserved by Compex Systemhaus GmbH. In particular, duplications, translations, microfilming, saving and processing in electronic systems are protected by copyright. Use of this manual is only authorized with the permission of Compex Systemhaus GmbH. Infringements of the law shall be punished in accordance with civil and penal laws. We have taken utmost care in putting together texts and images. Nevertheless, the possibility of errors cannot be completely ruled out. The Figures and information in this manual are only given as approximations unless expressly indicated as binding. Amendments to the manual due to amendments to the standard software remain reserved. Please note that the latest amendments to the manual can be accessed through our helpdesk at any time. The contractually agreed regulations of the licensing and maintenance of the standard software shall apply with regard to liability for any errors in the documentation. Guarantees, particularly guarantees of quality or durability can only be assumed for the manual insofar as its quality or durability are expressly stipulated as guaranteed. If you would like to make a suggestion, the Compex Team would be very pleased to hear from you.
(c) 2016-2026 Compex Systemhaus GmbH
License information
The OS.bee Software Factory is distributed under a commercial license.
The product itself is based on the OSBP Software Factory which is an Eclipse project. In addition, the software depends on several other open source projects, and the entire list of licenses used can be found here.