Difference between revisions of "My smart shop"
(→How to generate MySmartShop) |
(→How to generate MySmartShop) |
||
| Line 23: | Line 23: | ||
# Now you start the generation window for MySmartShop. Select <code>My Smart Shop project</code>:<br><br>[[File:Mss 03 inst p1.png]]<br><br><br><br> | # Now you start the generation window for MySmartShop. Select <code>My Smart Shop project</code>:<br><br>[[File:Mss 03 inst p1.png]]<br><br><br><br> | ||
#* The Theme of UI can be changed. We use the default value <code>osbp - Classic - Classic</code> in this case. <br><br>[[File:Mss 03 inst p2.png]]<br><br><br><br> | #* The Theme of UI can be changed. We use the default value <code>osbp - Classic - Classic</code> in this case. <br><br>[[File:Mss 03 inst p2.png]]<br><br><br><br> | ||
| − | #* Click Next.<br><br><br><br> | + | #* Click Next.<br><br>[[File:Mss 03 inst p3.png]]<br><br><br><br> |
# The JDNI Data Source could be set up on this page. Click Next.<br><br> | # The JDNI Data Source could be set up on this page. Click Next.<br><br> | ||
#* The default value is h2memory, which save all data in memory.<br><br> | #* The default value is h2memory, which save all data in memory.<br><br> | ||
| − | #* | + | #* You can also change it to othe JDNI Data Sources, e.g. MySQL, Oracle, etc. Please configure them before start the app: [http://download.osbee.org/documentation/index.php/My_first_app#How_to_configure_MyFirstApp How to configure MyFirstApp]. <br><br>[[File:Mss 03 inst p4 1.png]]<br><br><br><br> |
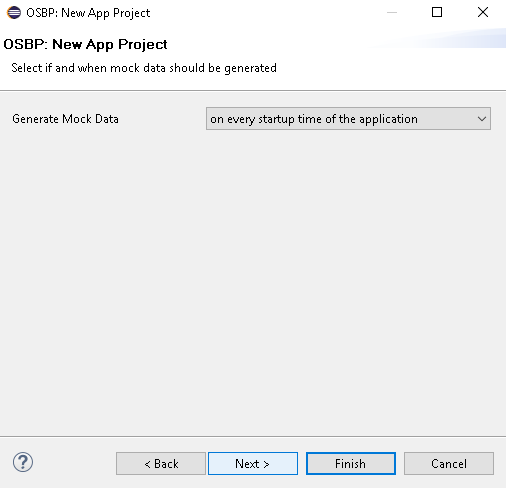
| − | # Set for the Mock Data generation. Click Next.<br><br>[[File:Mss 03 inst | + | # Set for the Mock Data generation. Click Next.<br><br>[[File:Mss 03 inst p5.png]]<br><br><br><br> |
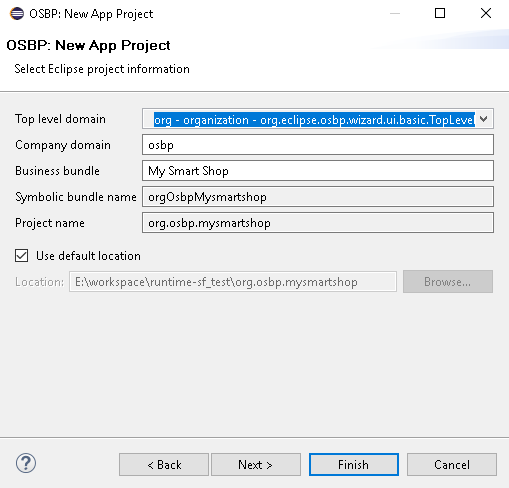
# Choose which location you would lick to save the files of MySmartShop.<br><br> | # Choose which location you would lick to save the files of MySmartShop.<br><br> | ||
| − | #* You can use the default directory:<br><br>[[File:Mss 03 inst | + | #* You can use the default directory:<br><br>[[File:Mss 03 inst p6 1.png]]<br><br><br><br> |
| − | #* or your own directory:<br><br>[[File:Mss 03 inst | + | #* or your own directory:<br><br>[[File:Mss 03 inst p6 2.png]]<br><br><br><br> |
#* Click Next.<br><br><br> | #* Click Next.<br><br><br> | ||
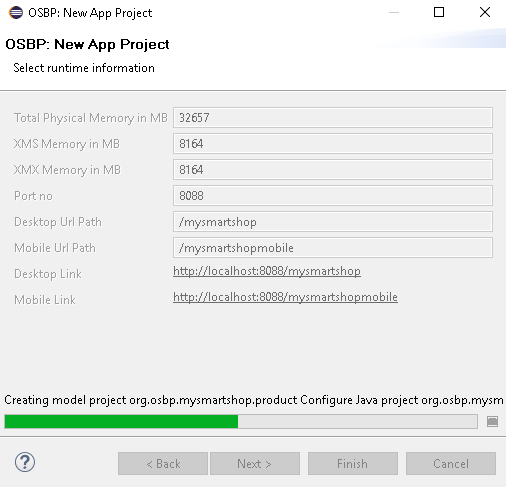
| − | # The XMS Memory is usually ¼ of total physical memory. The desktop link which will be used late by starting app could be also find here.<br><br>[[File:Mss 03 inst | + | # The XMS Memory is usually ¼ of total physical memory. The desktop link which will be used late by starting app could be also find here.<br><br>[[File:Mss 03 inst p7.png]]<br><br><br><br> |
#* Click Finish to start the generation step.<br><br>[[File:Mss 03 inst run.png]]<br><br><br><br> | #* Click Finish to start the generation step.<br><br>[[File:Mss 03 inst run.png]]<br><br><br><br> | ||
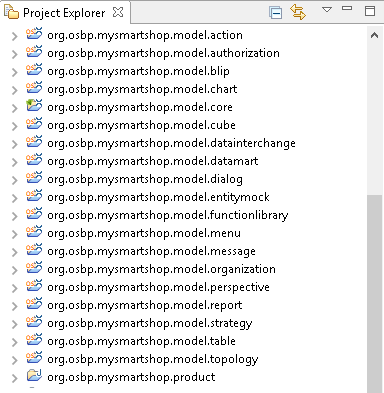
# When the window disappears, you could see in Project Explorer, all projects of MySmartShop are established.<br><br>[[File:Mss 04 inst pe.png]]<br><br><br><br> | # When the window disappears, you could see in Project Explorer, all projects of MySmartShop are established.<br><br>[[File:Mss 04 inst pe.png]]<br><br><br><br> | ||
#* Please '''notice''' till now the progress is '''not''' complete finish, normally it's still building workspace (see the right bottom corner), wait until it completed.<br><br>[[File:Mss 05 inst bw.png]]<br><br><br><br> | #* Please '''notice''' till now the progress is '''not''' complete finish, normally it's still building workspace (see the right bottom corner), wait until it completed.<br><br>[[File:Mss 05 inst bw.png]]<br><br><br><br> | ||
# When the <code>Building Workspace</code> symbol disappears, the generation of MySmartShop is finish. Project Explorer should be looked like this:<br><br>[[File:Mss 06 inst pe finish.png]]<br><br><br><br> | # When the <code>Building Workspace</code> symbol disappears, the generation of MySmartShop is finish. Project Explorer should be looked like this:<br><br>[[File:Mss 06 inst pe finish.png]]<br><br><br><br> | ||
Revision as of 10:30, 1 December 2016
Contents
General information
Copyright Notice
All rights are reserved by Compex Systemhaus GmbH. In particular, duplications, translations, microfilming, saving and processing in electronic systems are protected by copyright. Use of this manual is only authorized with the permission of Compex Systemhaus GmbH. Infringements of the law shall be punished in accordance with civil and penal laws. We have taken utmost care in putting together texts and images. Nevertheless, the possibility of errors cannot be completely ruled out. The Figures and information in this manual are only given as approximations unless expressly indicated as binding. Amendments to the manual due to amendments to the standard software remain reserved. Please note that the latest amendments to the manual can be accessed through our helpdesk at any time. The contractually agreed regulations of the licensing and maintenance of the standard software shall apply with regard to liability for any errors in the documentation. Guarantees, particularly guarantees of quality or durability can only be assumed for the manual insofar as its quality or durability are expressly stipulated as guaranteed. If you would like to make a suggestion, the Compex Team would be very pleased to hear from you.
(c) 2016-2024 Compex Systemhaus GmbH
License information
The OS.bee Software Factory is distributed under a commercial license.
The product itself is based on the OSBP Software Factory which is an "Eclipse Project". In addition, there are many other open source projects combined and the whole bunch of license used is listed "here".
OS.bee Software Factory
Please install OS.bee Software Factory first. Introduction of installation could be found here.
How to generate MySmartShop
MySmartShop could be generated from Eclipse.
- In Project Explorer, right click the mouse -> New -> Other.
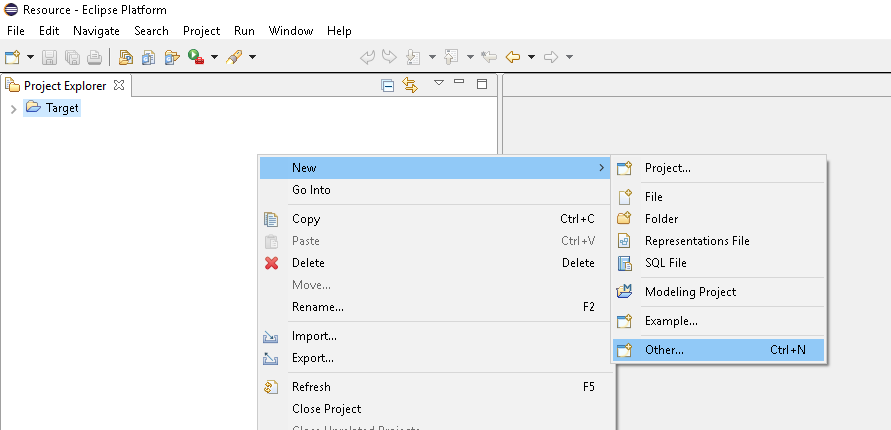
- Select OSBP Projects -> My First App -> Next.

- Now you start the generation window for MySmartShop. Select
My Smart Shop project: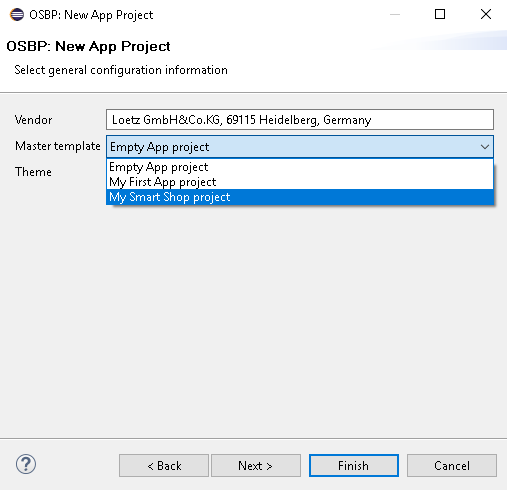
- The Theme of UI can be changed. We use the default value
osbp - Classic - Classicin this case.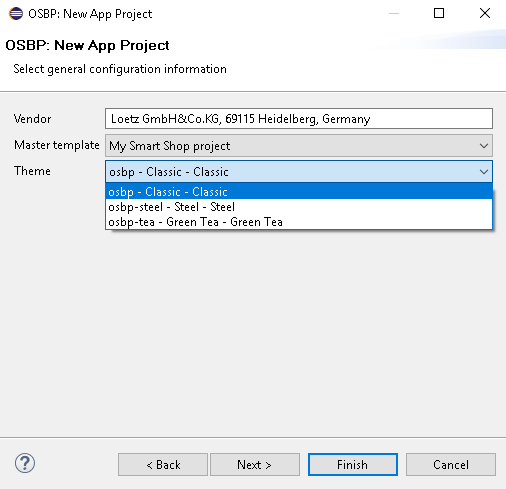
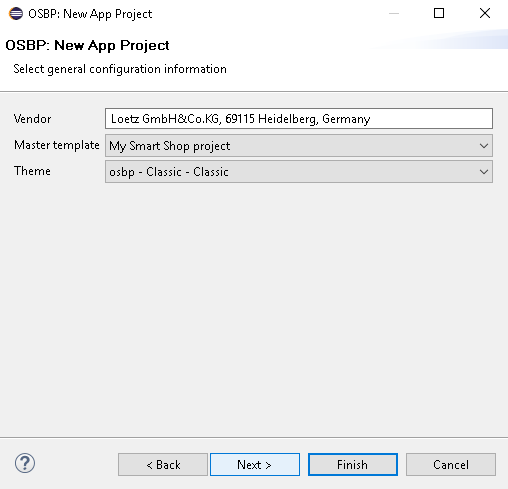
- Click Next.
- The Theme of UI can be changed. We use the default value
- The JDNI Data Source could be set up on this page. Click Next.
- The default value is h2memory, which save all data in memory.
- You can also change it to othe JDNI Data Sources, e.g. MySQL, Oracle, etc. Please configure them before start the app: How to configure MyFirstApp.
File:Mss 03 inst p4 1.png
- The default value is h2memory, which save all data in memory.
- Set for the Mock Data generation. Click Next.
- Choose which location you would lick to save the files of MySmartShop.
- You can use the default directory:
- or your own directory:
- Click Next.
- You can use the default directory:
- The XMS Memory is usually ¼ of total physical memory. The desktop link which will be used late by starting app could be also find here.

- Click Finish to start the generation step.
- Click Finish to start the generation step.
- When the window disappears, you could see in Project Explorer, all projects of MySmartShop are established.
- Please notice till now the progress is not complete finish, normally it's still building workspace (see the right bottom corner), wait until it completed.
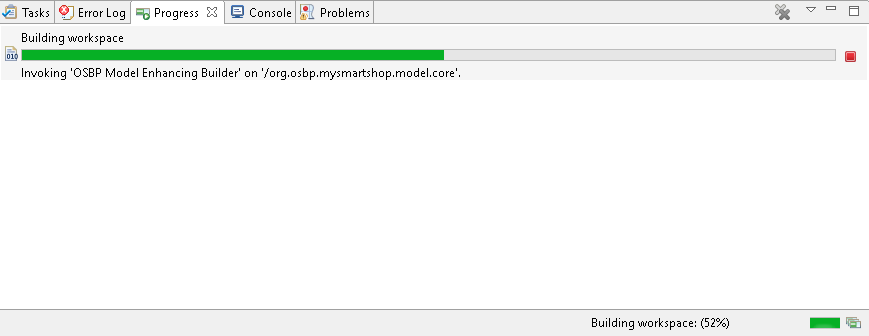
- Please notice till now the progress is not complete finish, normally it's still building workspace (see the right bottom corner), wait until it completed.
- When the
Building Workspacesymbol disappears, the generation of MySmartShop is finish. Project Explorer should be looked like this: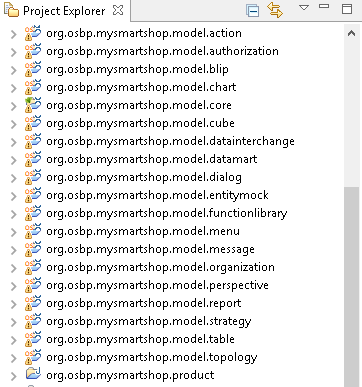


