Difference between revisions of "OS.bee Software Factory Installation Neon"
(Created page with "== General information == === Copyright Notice === {{Copyright Notice}} === License information === {{License information}} == Installation of the Software Factory == ===...") |
(→Java Version) |
||
| (86 intermediate revisions by 5 users not shown) | |||
| Line 1: | Line 1: | ||
| − | |||
| − | |||
| − | |||
| − | |||
| − | |||
| − | |||
| − | |||
| − | |||
== Installation of the Software Factory == | == Installation of the Software Factory == | ||
=== Before you start === | === Before you start === | ||
| − | ==== Java Version ==== | + | ==== ''Java'' Version ==== |
| − | To be able to use the OS.bee Software Factory, you need to have the right Java version installed. | + | To be able to use the ''OS.bee Software Factory'', you need to have the right ''Java'' version installed. |
| − | + | You can find the appropriate Java 8 version [https://adoptium.net/de/temurin/releases/?version=8&os=windows&package=jdk here] | |
| − | + | If you have ''Java'' installed, there is generally a ''Java'' icon on the control panel which will enable you to find out the current version. | |
| − | + | ==== ''Eclipse'' Version ==== | |
| − | + | ||
| − | + | ||
| − | To be able to | + | To be able to use the ''OS.bee Software Factory'', you need to have the correct ''Eclipse Neon'' version installed. |
| + | You can use [https://www.eclipse.org/downloads/download.php?file=/technology/epp/downloads/release/neon/3/eclipse-java-neon-3-win32-x86_64.zip ''Eclipse'' Neon 3 Java Developers]. | ||
| + | Download and extract it to a folder location of your choosing. On Windows, we recommend '''C:\'''. This results in the installation folder '''C:\eclipse'''. This will be the assumed ''Eclipse'' installation folder for the rest of this document. | ||
| − | Make the following | + | To be able to launch ''Eclipse'' easily, create a shortcut on the computer's desktop to the program '''C:\eclipse\eclipse.exe'''. Be sure to add the parameter <code>-data /path/to/your/workspace</code> to the shortcut's invocation of ''Eclipse'' in order to start in the correct workspace in the future. Otherwise, you will be prompted to specify a workspace each time you start ''Eclipse''. <br> |
| + | |||
| + | Make the following change to the '''eclipse.ini''' file found in the '''C:\eclipse''' folder: | ||
<blockquote> | <blockquote> | ||
| − | + | -Xmx4096m | |
| − | -Xmx4096m | + | |
| − | + | ||
| − | + | ||
</blockquote> | </blockquote> | ||
| − | + | This line allocates extra memory for ''Eclipse'' to use. | |
A resulting '''eclipse.ini''' file for a Windows installation might look like this:<br> | A resulting '''eclipse.ini''' file for a Windows installation might look like this:<br> | ||
| − | + | <existing lines above> | |
| − | + | ||
| − | + | ||
| − | + | ||
| − | + | ||
| − | + | ||
| − | + | ||
| − | + | ||
| − | + | ||
| − | + | ||
| − | + | ||
| − | + | ||
| − | + | ||
| − | + | ||
| − | + | ||
| − | + | ||
| − | + | ||
| − | + | ||
| − | + | ||
-Xms128m | -Xms128m | ||
-Xmx4096m | -Xmx4096m | ||
| Line 60: | Line 33: | ||
==== OS.bee P2 Repository ==== | ==== OS.bee P2 Repository ==== | ||
| − | + | === Installation of the ''OS.bee Software Factory'' === | |
| − | + | # Start the new ''Eclipse'' installation and select or define a workspace in the Menu under File/Switch Workspace. It is important that each ''Eclipse'' installation is assigned to its own workspace.<br><br>[[File:Workspace1.png|600px]]<br><br> | |
| + | # Go to the menu bar and select '''Help''' -> '''Install New Software...'''.<br><br>[[File:NeonOsbeeInstall01.png|600px]]<br><br> | ||
| + | # Get the link to the repository from the [http://www.osbee.org/free-download/ download page], activate the checkbox if you agree to our '''Terms of Service and Use''' and if you '''are not a consumer'''. Click on one of the subsequently enabled buttons, copy the link and paste it into the field labeled '''Work with:'''. Then, press '''Enter''' to make ''Eclipse'' load the content of the repository.<br> <br>[[File:OSbeeInstall05.PNG|600px]] <br><br> | ||
| + | # Expand the '''OS.bee Software Factory''' group, select the '''OS.bee Software Factory''' and click on '''Next'''.<br><br>[[File:NeonOsbeeInstall02.png|600px]] <br><br> | ||
| + | # In the installation dialog, confirm the software to be installed by clicking on '''Next'''.<br><br>[[File:NeonOsbeeInstall03.png|600px]] <br><br> | ||
| + | # Accept the terms of the license agreement after reading them carefully, and then confirm the dialog by clicking on '''Finish'''.<br><br>[[File:NeonOsbeeInstall04.png|600px]]<br><br> | ||
| + | # The installation will now begin. This may take a while, depending on your Internet connection speed and your hardware.<br><br>[[File:NeonOsbeeInstall05.png|600px]] <br><br> | ||
| + | # After the software has been downloaded, confirm the "Security Warning" dialog by clicking on '''OK'''.<br><br>[[File:InstallUnsignedCodeWarning.png|600px]]<br><br> | ||
| + | # The following question will arise:<br><br>[[File:Softwarefactory_Target_Installation_Trust_Question.png|600px]]<br><br>Select all checkboxes and click '''OK''' to continue. | ||
| + | # You will then be prompted to '''restart''' ''Eclipse''. Please do so.<br><br>[[File:NeonOsbeeInstall06.png|600px]]<br><br> | ||
| + | # After the restart of Eclipse, you might be asked to allow Eclipse to communicate to various networks. Please allow at least the private networks. <br><br>[[File:installFirewall.PNG|400px]]<br><br> | ||
| + | # The next question is about JBoss Tools usage statistics. You can give your preferred answer. <br><br>[[File:InstallJBossQuestion.PNG]]<br><br> | ||
| − | + | === Set the Target Platform for the ''OS.bee Software Factory''=== | |
| − | + | ||
| − | + | ||
| − | + | # Check if the workspace you are using is the one you selected above when first opening ''Eclipse''. If not, open the right one.<br><br> | |
| + | # Set the target platform here: '''Menu''' -> '''Window''' -> '''Preferences'''. Then go to '''Plug-in Development''' -> '''Target Platform'''.<br>You can use "Target" as the filter text.<br> | ||
| + | # Click on '''Add...''' to add a new target definition.<br><br>[[File:NeonOsbeeInstall07.png|600px]]<br><br> | ||
| + | # Select "Default: ..." and click on '''Next'''.<br><br>[[File:NeonOsbeeInstall08.png|600px]]<br><br> | ||
| + | # Click on '''Add...''' to add content, select '''Software Site''' and click on '''Next'''.<br><br>[[File:NeonOsbeeInstall09.png|600px]]<br><br> | ||
| + | # For the '''Software Site''', use the same URL that was previously saved to the clipboard and press enter.<br><br> | ||
| + | # Select '''OS.bee Softwarefactory - Target''',<br>'''uncheck''' the '''Include required software''' checkbox and click on '''Finish'''.<br><br>[[File:NeonOsbeeInstall10.png|600px]]<br><br> | ||
| + | # '''Do not forget to activate your newly created target definition! '''<br><br>[[File:NeonOsbeeInstall12.png|600px]]<br><br> | ||
| + | # Restart ''Eclipse''. You can use '''Menu''' -> '''File''' -> '''Restart''' to do so.<br><br> | ||
| − | === | + | === Setting preferences in ''Eclipse'' === |
| + | ==== Git settings ==== | ||
| + | In case you're using git, be sure to uncheck the automatic git-ignore for derived files, otherwise generated files will not be checked in: | ||
| + | <br> [[File:Git-Preferences.png|600px]]<br><br> | ||
| − | # | + | ==== DS Annotations ==== |
| − | # Go to | + | # It is neccessary to activate the generation of descriptors based on DS Annotations.<br> |
| − | + | # Go to '''Window''' -> '''Preferences''' in your ''Eclipse'' IDE, enter <code>ds</code> in the filter field and then click on '''DS Annotations'''.<br> | |
| − | + | # Activate the '''Generate descriptors from annotated sources''' checkbox.<br><br>[[File:NeonOsbeeInstall13.png|600px]]<br><br> | |
| − | + | <br> | |
| − | + | ||
| − | # | + | |
| − | + | ||
| − | + | ||
| − | === | + | ==== JDK Settings ==== |
| + | Please check the JDK settings in case you have multiple Java versions installed on your machine. | ||
| + | # Go to '''Window''' -> '''Preferences''' in your ''Eclipse'' IDE, enter <code>java</code> in the filter field, click on '''Installed JREs''' and then click on '''Search...'''.<br><br>[[File:NeonOsbeeInstall14.png|600px]]<br><br> | ||
| + | # Locate your JDK 1.8 (on Windows it's usually under <code>C:\Program Files\Java\...</code>) and click '''OK'''.<br><br>[[File:NeonOsbeeInstall15.png|600px]]<br><br> | ||
| + | # Select the newly added JDK and click on '''Apply''', then on '''OK'''.<br><br>[[File:NeonOsbeeInstall16.png|600px]]<br><br> | ||
| + | ==== Java Settings ==== | ||
| + | Please ensure that the java Compiler Building settings are as follows: | ||
| + | <br><br>[[File:javacompilersetting.PNG|600px]]<br><br> | ||
| − | + | ==== Maven Settings ==== | |
| − | + | ||
| − | + | '''For developers only!''' | |
| − | + | ||
| − | + | Maven requires some settings in a file called '''settings.xml'''. The file is usually expected by ''Eclipse'' to be located in the '''m2''' folder in the user's home folder. | |
| − | + | ||
| − | + | # You can start with the following content of the '''settings.xml''' file (don't forget to replace the '''xxxx''' with the appropriate repo names):<syntaxhighlight lang="xml"> | |
| − | + | <?xml version="1.0" encoding="UTF-8"?> | |
| − | + | ||
| − | # | + | <settings xmlns="http://maven.apache.org/SETTINGS/1.0.0" |
| + | xmlns:xsi="http://www.w3.org/2001/XMLSchema-instance" | ||
| + | xsi:schemaLocation="http://maven.apache.org/SETTINGS/1.0.0 http://maven.apache.org/xsd/settings-1.0.0.xsd"> | ||
| + | <!-- TODO: adapt the local path to your personal favourite --> | ||
| + | <localRepository>c:/maven/.m2/repository</localRepository> | ||
| + | |||
| + | <mirrors> | ||
| + | <!-- mirror | Specifies a repository mirror site to use instead of a given | ||
| + | repository. The repository that | this mirror serves has an ID that matches | ||
| + | the mirrorOf element of this mirror. IDs are used | for inheritance and direct | ||
| + | lookup purposes, and must be unique across the set of mirrors. | <mirror> | ||
| + | <id>mirrorId</id> <mirrorOf>repositoryId</mirrorOf> <name>Human Readable | ||
| + | Name for this Mirror.</name> <url>http://my.repository.com/repo/path</url> | ||
| + | </mirror> --> | ||
| + | |||
| + | <!-- not working mirrors p2: Gemini DBaccess maven: central.maven.org, --> | ||
| + | <mirror> | ||
| + | <id>Apache Mirror</id> | ||
| + | <mirrorOf>apache-nexus-snapshots</mirrorOf> | ||
| + | <url>http://www-eu.apache.org/dist/</url> | ||
| + | </mirror> | ||
| + | |||
| + | </mirrors> | ||
| + | |||
| + | <!-- profiles | This is a list of profiles which can be activated in a variety | ||
| + | of ways, and which can modify | the build process. Profiles provided in the | ||
| + | settings.xml are intended to provide local machine- | specific paths and | ||
| + | repository locations which allow the build to work in the local environment. | ||
| + | | | For example, if you have an integration testing plugin - like cactus | ||
| + | - that needs to know where | your Tomcat instance is installed, you can provide | ||
| + | a variable here such that the variable is | dereferenced during the build | ||
| + | process to configure the cactus plugin. | | As noted above, profiles can | ||
| + | be activated in a variety of ways. One way - the activeProfiles | section | ||
| + | of this document (settings.xml) - will be discussed later. Another way essentially | ||
| + | | relies on the detection of a system property, either matching a particular | ||
| + | value for the property, | or merely testing its existence. Profiles can also | ||
| + | be activated by JDK version prefix, where a | value of '1.4' might activate | ||
| + | a profile when the build is executed on a JDK version of '1.4.2_07'. | Finally, | ||
| + | the list of active profiles can be specified directly from the command line. | ||
| + | | | NOTE: For profiles defined in the settings.xml, you are restricted to | ||
| + | specifying only artifact | repositories, plugin repositories, and free-form | ||
| + | properties to be used as configuration | variables for plugins in the POM. | ||
| + | | | --> | ||
| + | <profiles> | ||
| + | |||
| + | <profile> | ||
| + | <id>osbp-dev</id> | ||
| + | <activation> | ||
| + | <activeByDefault>true</activeByDefault> | ||
| + | </activation> | ||
| + | <properties> | ||
| + | <osbp.build.ignore.license>false</osbp.build.ignore.license> | ||
| + | <osbp.build.verbose.license>true</osbp.build.verbose.license> | ||
| + | |||
| + | <osbp.skip.javadoc>false</osbp.skip.javadoc> | ||
| + | <osbp.javadoc.failOnError>false</osbp.javadoc.failOnError> | ||
| + | |||
| + | <osbp.skip.test>true</osbp.skip.test> | ||
| + | |||
| + | <osbp.build.branch>latest</osbp.build.branch> | ||
| + | <osbp.developer.home>C:${file.separator}osbee${file.separator}downloads${file.separator}</osbp.developer.home> | ||
| + | |||
| + | |||
| + | <osbee.build.ignore.license>false</osbee.build.ignore.license> | ||
| + | <osbee.build.verbose.license>true</osbee.build.verbose.license> | ||
| + | |||
| + | <osbee.developer.home>${osbp.developer.home}</osbee.developer.home> | ||
| + | <osbee.build.branch>${osbp.build.branch}</osbee.build.branch> | ||
| + | |||
| + | <distribution.server.baseurl>http://my.own.nexus.local</distribution.server.baseurl> | ||
| + | <!-- where to deploy the release artifacts --> | ||
| + | <distribution.repository.release.url>${distribution.server.baseurl}:8086/nexus/content/repositories/developer-releases/</distribution.repository.release.url> | ||
| + | <!-- where to deploy the snapshot artifacts --> | ||
| + | <distribution.repository.snapshot.url>${distribution.server.baseurl}:8086/nexus/content/repositories/developer-snapshots/</distribution.repository.snapshot.url> | ||
| + | <osbp.p2>http://download.osbee.org/downloads/p2/osbp/neon/xxxx</osbp.p2> | ||
| + | <org.osbee.p2>http://download.osbee.org/downloads/p2/osbee/neon/xxxx</org.osbee.p2> | ||
| + | <net.osbee.p2>http://download.osbee.org/downloads/p2/osbee/neon/xxxx</net.osbee.p2> | ||
| + | |||
| + | <osbee.helpdesk.product.download.folder>${osbp.developer.home}products${file.separator}helpdesk</osbee.helpdesk.product.download.folder> | ||
| + | |||
| + | |||
| + | </properties> | ||
| + | |||
| + | <pluginRepositories> | ||
| + | <pluginRepository> | ||
| + | <id>compex-nexus-release</id> | ||
| + | <name>Compex Nexus Release</name> | ||
| + | <url>http://download.osbee.org:8086/nexus/content/repositories/osbp-master-clean-releases/ | ||
| + | </url> | ||
| + | <releases> | ||
| + | <enabled>true</enabled> | ||
| + | </releases> | ||
| + | <snapshots> | ||
| + | <enabled>false</enabled> | ||
| + | </snapshots> | ||
| + | </pluginRepository> | ||
| + | <pluginRepository> | ||
| + | <id>compex-snapshots</id> | ||
| + | <name>Compex Snapshots</name> | ||
| + | <url>http://download.osbee.org:8086/nexus/content/repositories/osbp-master-clean-snapshots/ | ||
| + | </url> | ||
| + | <releases> | ||
| + | <enabled>false</enabled> | ||
| + | </releases> | ||
| + | <snapshots> | ||
| + | <updatePolicy>always</updatePolicy> | ||
| + | <enabled>true</enabled> | ||
| + | </snapshots> | ||
| + | </pluginRepository> | ||
| + | </pluginRepositories> | ||
| + | |||
| + | <repositories> | ||
| + | <repository> | ||
| + | <id>compex-nexus-snapshots</id> | ||
| + | <name>Compex Nexus Snapshots</name> | ||
| + | <url>http://download.osbee.org:8086/nexus/content/repositories/osbp-master-clean-snapshots/ | ||
| + | </url> | ||
| + | <releases> | ||
| + | <enabled>false</enabled> | ||
| + | </releases> | ||
| + | <snapshots> | ||
| + | <updatePolicy>always</updatePolicy> | ||
| + | <enabled>true</enabled> | ||
| + | </snapshots> | ||
| + | </repository> | ||
| + | <repository> | ||
| + | <id>compex-nexus-release</id> | ||
| + | <name>Compex Nexus Release</name> | ||
| + | <url>http://download.osbee.org:8086/nexus/content/repositories/osbp-master-clean-releases/ | ||
| + | </url> | ||
| + | <releases> | ||
| + | <enabled>true</enabled> | ||
| + | </releases> | ||
| + | <snapshots> | ||
| + | <enabled>true</enabled> | ||
| + | </snapshots> | ||
| + | </repository> | ||
| + | |||
| + | <repository> | ||
| + | <id>Compex Internal P2 OSbee</id> | ||
| + | <!-- use the URL you installed the softwarefactory from --> | ||
| + | <url>http://download.osbee.org/downloads/p2/osbee/neon/xxxxx | ||
| + | </url> | ||
| + | <layout>p2</layout> | ||
| + | </repository> | ||
| + | </repositories> | ||
| + | </profile> | ||
| + | </profiles> | ||
| + | <!-- activeProfiles | List of profiles that are active for all builds. | | ||
| + | <activeProfiles> <activeProfile>alwaysActiveProfile</activeProfile> <activeProfile>anotherAlwaysActiveProfile</activeProfile> | ||
| + | </activeProfiles> --> | ||
| + | </settings></syntaxhighlight> | ||
| + | # Go to ''Eclipse'' '''Preferences''' -> '''Maven''' -> '''User Settings''' and enter the path to the '''settings.xml''' file in the '''User settings''' section. | ||
You can now continue with [[OS.bee Software Factory Samples]] | You can now continue with [[OS.bee Software Factory Samples]] | ||
| + | |||
| + | |||
| + | === Adding a new workspace to an existing Eclipse installation === | ||
| + | |||
| + | If you want to use an additional workspace with your Eclipse installation, you can simply do this by | ||
| + | * opening the workspace in a different folder than before and | ||
| + | * execute steps 1.3 [[#Set_the_Target_Platform_for_the_OS.bee_Software_Factory]] and 1.4 [[#Setting_preferences_in_Eclipse]]again | ||
| + | |||
| + | This can be done for as many workspaces as you want to use. | ||
| + | |||
| + | == General information == | ||
| + | === Copyright Notice === | ||
| + | {{Copyright Notice}} | ||
| + | |||
| + | === License information === | ||
| + | |||
| + | {{License information}} | ||
Latest revision as of 11:07, 28 March 2024
Contents
Installation of the Software Factory
Before you start
Java Version
To be able to use the OS.bee Software Factory, you need to have the right Java version installed.
You can find the appropriate Java 8 version here
If you have Java installed, there is generally a Java icon on the control panel which will enable you to find out the current version.
Eclipse Version
To be able to use the OS.bee Software Factory, you need to have the correct Eclipse Neon version installed. You can use Eclipse Neon 3 Java Developers. Download and extract it to a folder location of your choosing. On Windows, we recommend C:\. This results in the installation folder C:\eclipse. This will be the assumed Eclipse installation folder for the rest of this document.
To be able to launch Eclipse easily, create a shortcut on the computer's desktop to the program C:\eclipse\eclipse.exe. Be sure to add the parameter -data /path/to/your/workspace to the shortcut's invocation of Eclipse in order to start in the correct workspace in the future. Otherwise, you will be prompted to specify a workspace each time you start Eclipse.
Make the following change to the eclipse.ini file found in the C:\eclipse folder:
-Xmx4096m
This line allocates extra memory for Eclipse to use.
A resulting eclipse.ini file for a Windows installation might look like this:
<existing lines above>
-Xms128m
-Xmx4096m
OS.bee P2 Repository
Installation of the OS.bee Software Factory
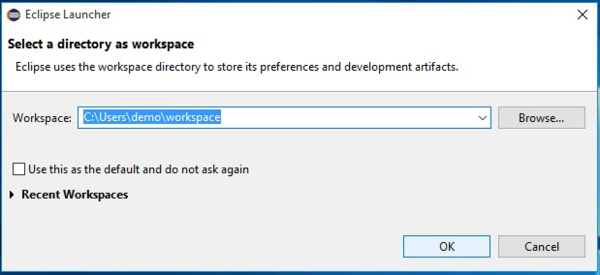
- Start the new Eclipse installation and select or define a workspace in the Menu under File/Switch Workspace. It is important that each Eclipse installation is assigned to its own workspace.
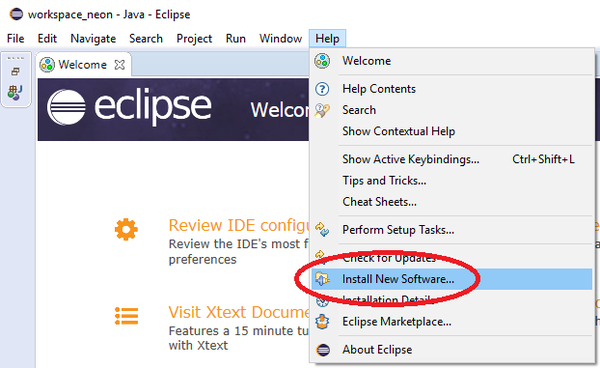
- Go to the menu bar and select Help -> Install New Software....
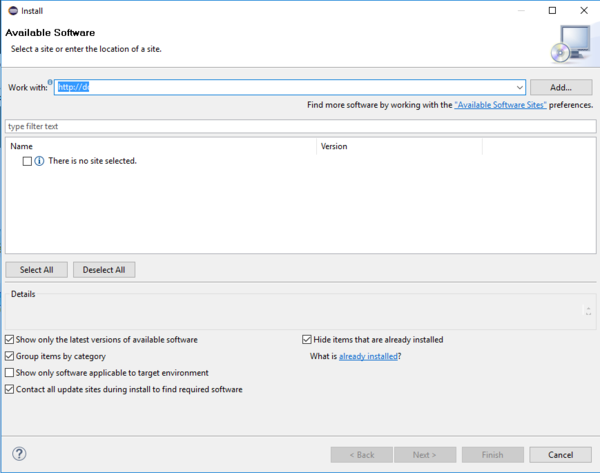
- Get the link to the repository from the download page, activate the checkbox if you agree to our Terms of Service and Use and if you are not a consumer. Click on one of the subsequently enabled buttons, copy the link and paste it into the field labeled Work with:. Then, press Enter to make Eclipse load the content of the repository.
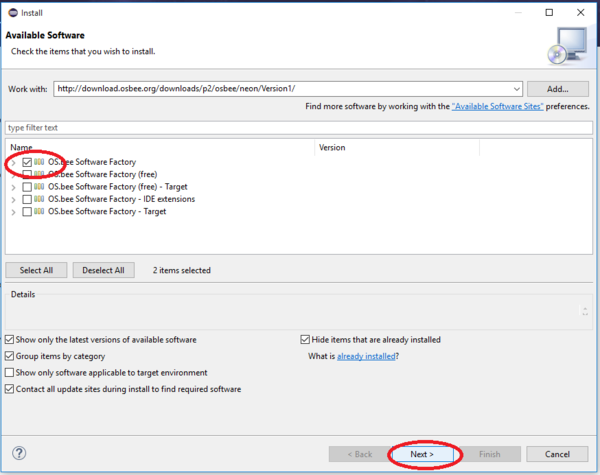
- Expand the OS.bee Software Factory group, select the OS.bee Software Factory and click on Next.
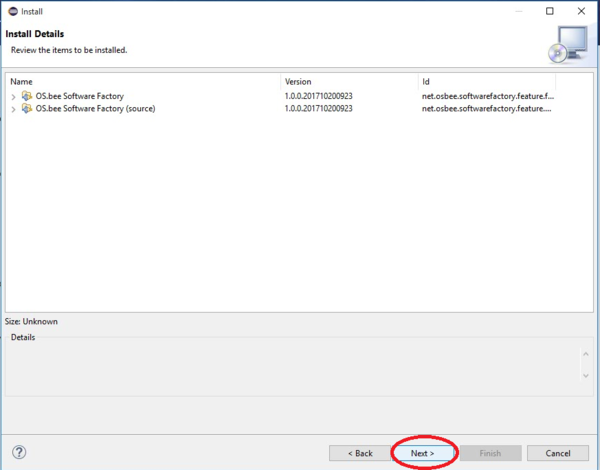
- In the installation dialog, confirm the software to be installed by clicking on Next.
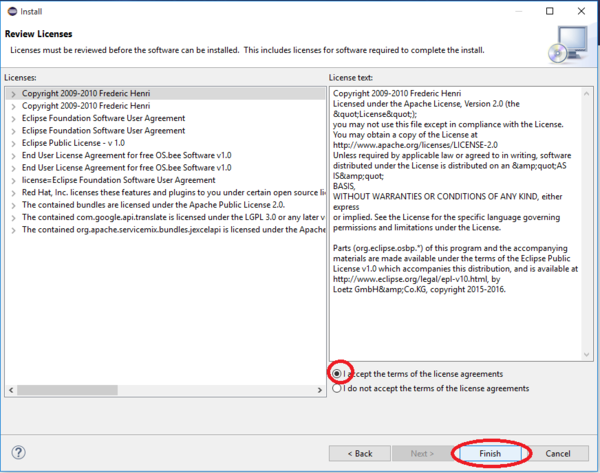
- Accept the terms of the license agreement after reading them carefully, and then confirm the dialog by clicking on Finish.
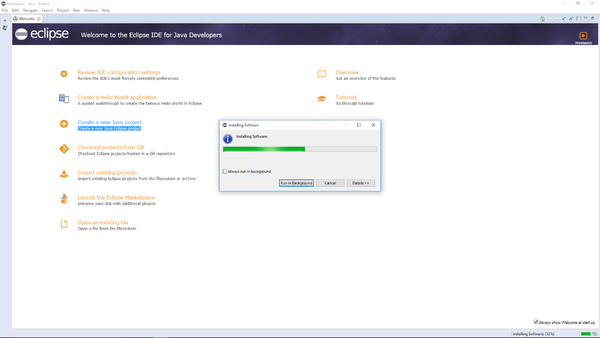
- The installation will now begin. This may take a while, depending on your Internet connection speed and your hardware.
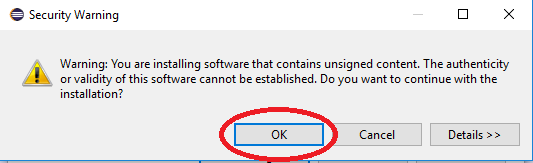
- After the software has been downloaded, confirm the "Security Warning" dialog by clicking on OK.
- The following question will arise:
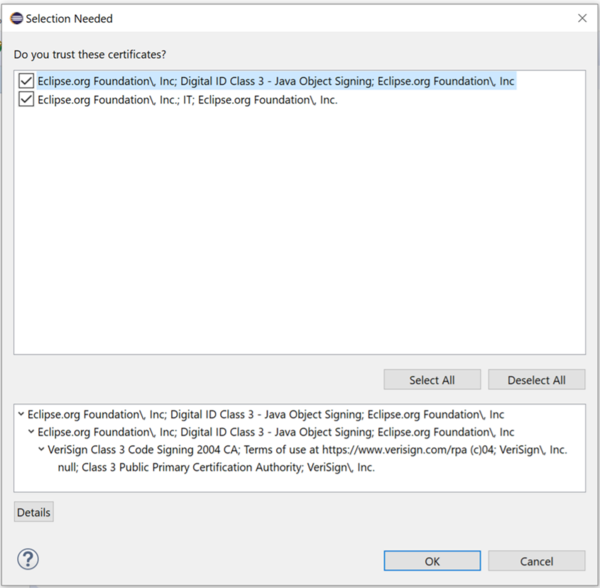
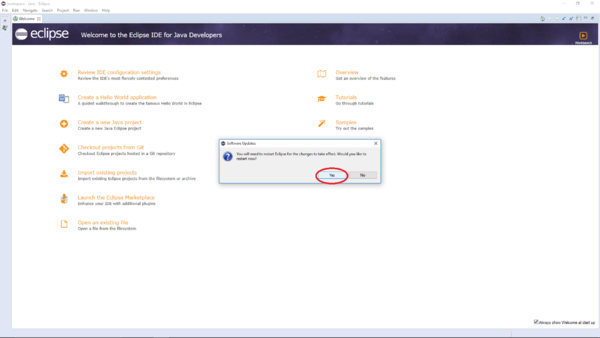
Select all checkboxes and click OK to continue. - You will then be prompted to restart Eclipse. Please do so.
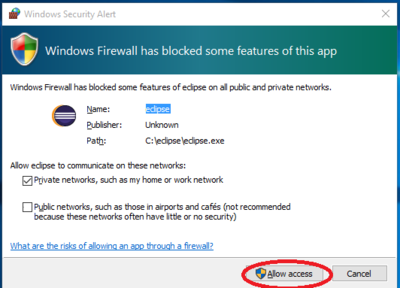
- After the restart of Eclipse, you might be asked to allow Eclipse to communicate to various networks. Please allow at least the private networks.
- The next question is about JBoss Tools usage statistics. You can give your preferred answer.


Set the Target Platform for the OS.bee Software Factory
- Check if the workspace you are using is the one you selected above when first opening Eclipse. If not, open the right one.
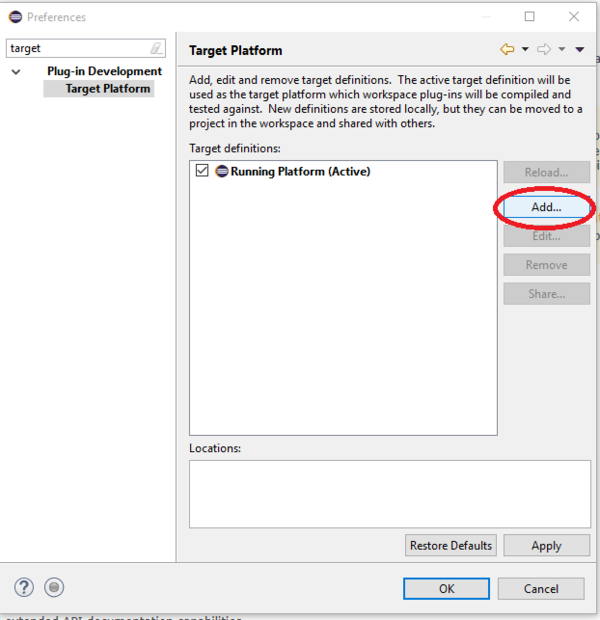
- Set the target platform here: Menu -> Window -> Preferences. Then go to Plug-in Development -> Target Platform.
You can use "Target" as the filter text. - Click on Add... to add a new target definition.
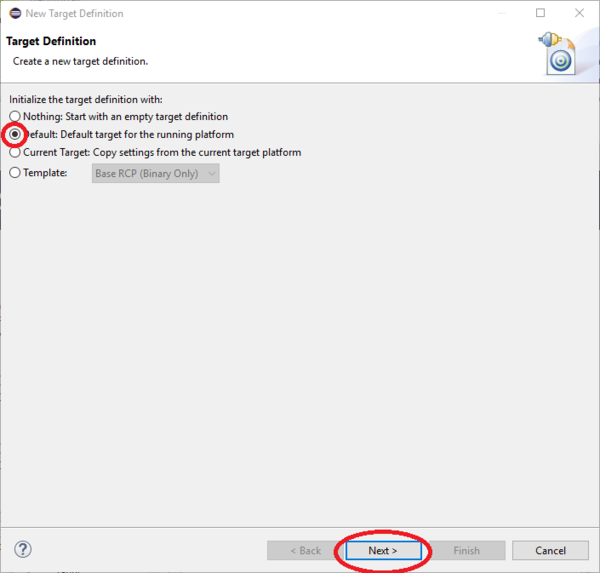
- Select "Default: ..." and click on Next.
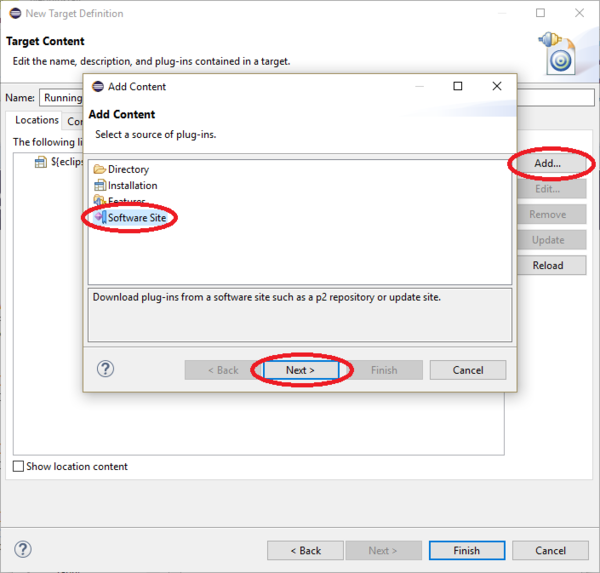
- Click on Add... to add content, select Software Site and click on Next.
- For the Software Site, use the same URL that was previously saved to the clipboard and press enter.
- Select OS.bee Softwarefactory - Target,
uncheck the Include required software checkbox and click on Finish.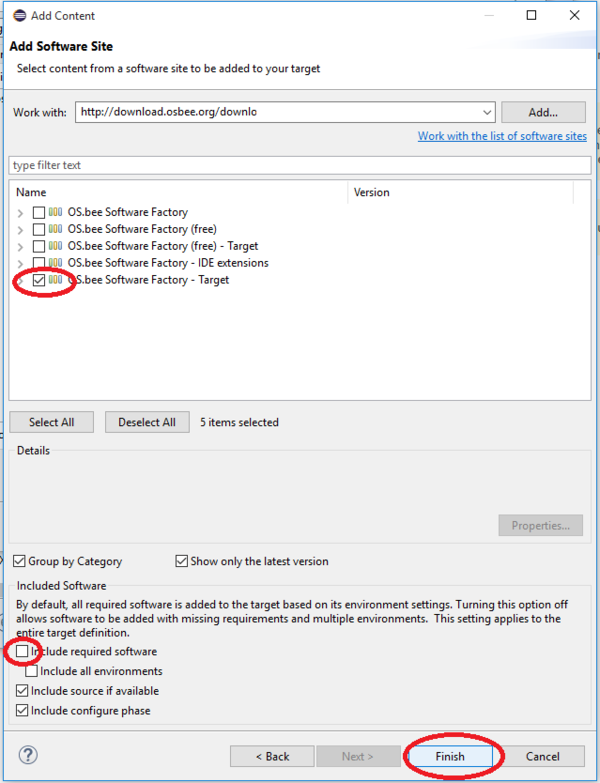
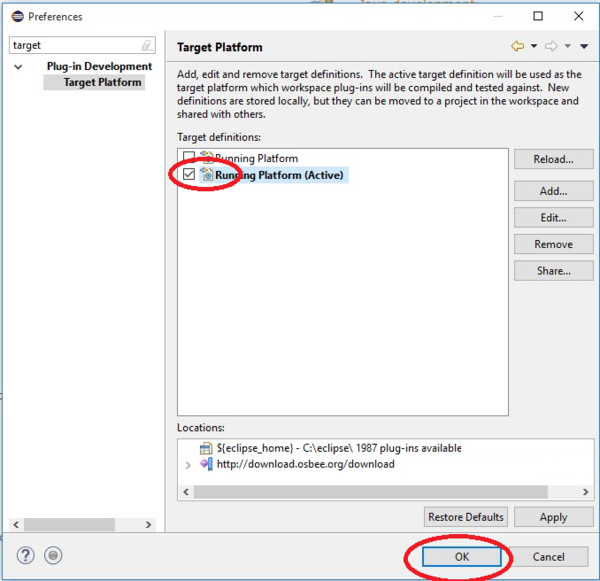
- Do not forget to activate your newly created target definition!
- Restart Eclipse. You can use Menu -> File -> Restart to do so.


Setting preferences in Eclipse
Git settings
In case you're using git, be sure to uncheck the automatic git-ignore for derived files, otherwise generated files will not be checked in:

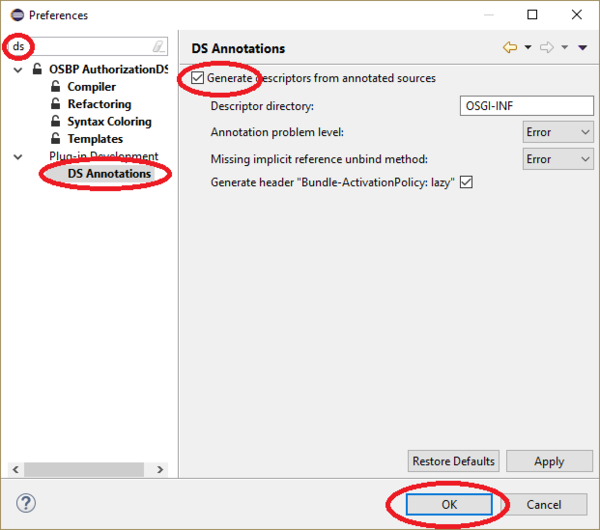
DS Annotations
- It is neccessary to activate the generation of descriptors based on DS Annotations.
- Go to Window -> Preferences in your Eclipse IDE, enter
dsin the filter field and then click on DS Annotations. - Activate the Generate descriptors from annotated sources checkbox.

JDK Settings
Please check the JDK settings in case you have multiple Java versions installed on your machine.
- Go to Window -> Preferences in your Eclipse IDE, enter
javain the filter field, click on Installed JREs and then click on Search....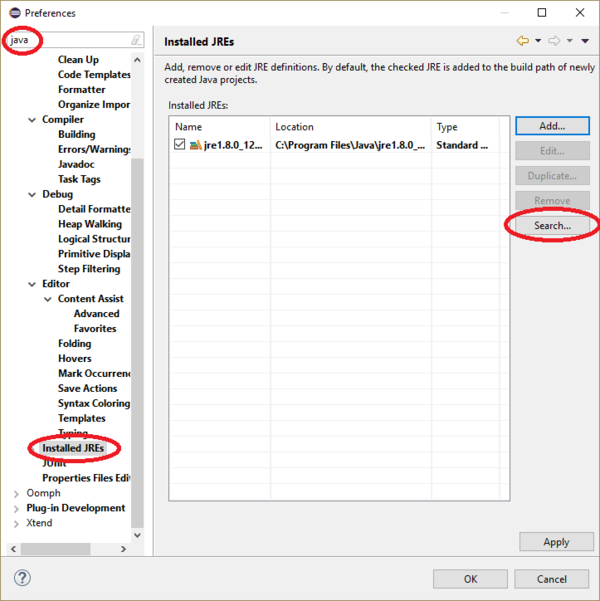
- Locate your JDK 1.8 (on Windows it's usually under
C:\Program Files\Java\...) and click OK.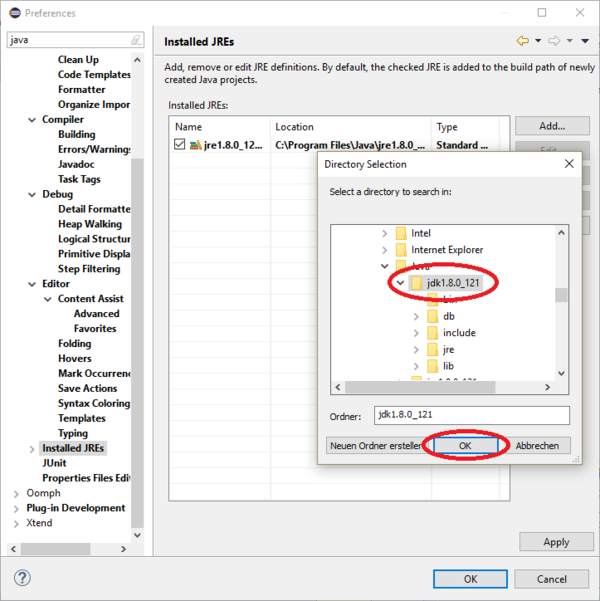
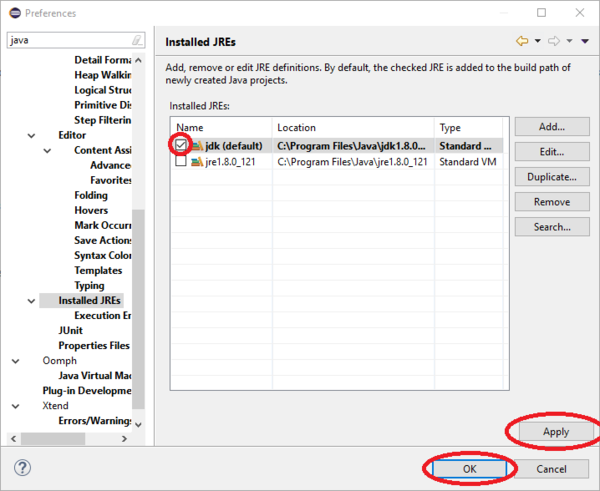
- Select the newly added JDK and click on Apply, then on OK.


Java Settings
Please ensure that the java Compiler Building settings are as follows:

Maven Settings
For developers only!
Maven requires some settings in a file called settings.xml. The file is usually expected by Eclipse to be located in the m2 folder in the user's home folder.
- You can start with the following content of the settings.xml file (don't forget to replace the xxxx with the appropriate repo names):
 <?xml version="1.0" encoding="UTF-8"?>

 <settings xmlns="http://maven.apache.org/SETTINGS/1.0.0"
	xmlns:xsi="http://www.w3.org/2001/XMLSchema-instance"
	xsi:schemaLocation="http://maven.apache.org/SETTINGS/1.0.0 http://maven.apache.org/xsd/settings-1.0.0.xsd">
	<!-- TODO: adapt the local path to your personal favourite -->
	<localRepository>c:/maven/.m2/repository</localRepository>

	<mirrors>
		<!-- mirror | Specifies a repository mirror site to use instead of a given
			repository. The repository that | this mirror serves has an ID that matches
			the mirrorOf element of this mirror. IDs are used | for inheritance and direct
			lookup purposes, and must be unique across the set of mirrors. | <mirror>
			<id>mirrorId</id> <mirrorOf>repositoryId</mirrorOf> <name>Human Readable
			Name for this Mirror.</name> <url>http://my.repository.com/repo/path</url>
			</mirror> -->

		<!-- not working mirrors p2: Gemini DBaccess maven: central.maven.org, -->
		<mirror>
			<id>Apache Mirror</id>
			<mirrorOf>apache-nexus-snapshots</mirrorOf>
			<url>http://www-eu.apache.org/dist/</url>
		</mirror>

	</mirrors>

	<!-- profiles | This is a list of profiles which can be activated in a variety
		of ways, and which can modify | the build process. Profiles provided in the
		settings.xml are intended to provide local machine- | specific paths and
		repository locations which allow the build to work in the local environment.
		| | For example, if you have an integration testing plugin - like cactus
		- that needs to know where | your Tomcat instance is installed, you can provide
		a variable here such that the variable is | dereferenced during the build
		process to configure the cactus plugin. | | As noted above, profiles can
		be activated in a variety of ways. One way - the activeProfiles | section
		of this document (settings.xml) - will be discussed later. Another way essentially
		| relies on the detection of a system property, either matching a particular
		value for the property, | or merely testing its existence. Profiles can also
		be activated by JDK version prefix, where a | value of '1.4' might activate
		a profile when the build is executed on a JDK version of '1.4.2_07'. | Finally,
		the list of active profiles can be specified directly from the command line.
		| | NOTE: For profiles defined in the settings.xml, you are restricted to
		specifying only artifact | repositories, plugin repositories, and free-form
		properties to be used as configuration | variables for plugins in the POM.
		| | -->
	<profiles>

		<profile>
			<id>osbp-dev</id>
			<activation>
				<activeByDefault>true</activeByDefault>
			</activation>
			<properties>
				<osbp.build.ignore.license>false</osbp.build.ignore.license>
				<osbp.build.verbose.license>true</osbp.build.verbose.license>

				<osbp.skip.javadoc>false</osbp.skip.javadoc>
				<osbp.javadoc.failOnError>false</osbp.javadoc.failOnError>

				<osbp.skip.test>true</osbp.skip.test>

				<osbp.build.branch>latest</osbp.build.branch>
				<osbp.developer.home>C:${file.separator}osbee${file.separator}downloads${file.separator}</osbp.developer.home>


				<osbee.build.ignore.license>false</osbee.build.ignore.license>
				<osbee.build.verbose.license>true</osbee.build.verbose.license>

				<osbee.developer.home>${osbp.developer.home}</osbee.developer.home>
				<osbee.build.branch>${osbp.build.branch}</osbee.build.branch>

				<distribution.server.baseurl>http://my.own.nexus.local</distribution.server.baseurl>
				<!-- where to deploy the release artifacts -->
				<distribution.repository.release.url>${distribution.server.baseurl}:8086/nexus/content/repositories/developer-releases/</distribution.repository.release.url>
				<!-- where to deploy the snapshot artifacts -->
				<distribution.repository.snapshot.url>${distribution.server.baseurl}:8086/nexus/content/repositories/developer-snapshots/</distribution.repository.snapshot.url>
				<osbp.p2>http://download.osbee.org/downloads/p2/osbp/neon/xxxx</osbp.p2>
				<org.osbee.p2>http://download.osbee.org/downloads/p2/osbee/neon/xxxx</org.osbee.p2>
				<net.osbee.p2>http://download.osbee.org/downloads/p2/osbee/neon/xxxx</net.osbee.p2>

				<osbee.helpdesk.product.download.folder>${osbp.developer.home}products${file.separator}helpdesk</osbee.helpdesk.product.download.folder>


			</properties>

			<pluginRepositories>
				<pluginRepository>
					<id>compex-nexus-release</id>
					<name>Compex Nexus Release</name>
					<url>http://download.osbee.org:8086/nexus/content/repositories/osbp-master-clean-releases/
					</url>
					<releases>
						<enabled>true</enabled>
					</releases>
					<snapshots>
						<enabled>false</enabled>
					</snapshots>
				</pluginRepository>
				<pluginRepository>
					<id>compex-snapshots</id>
					<name>Compex Snapshots</name>
					<url>http://download.osbee.org:8086/nexus/content/repositories/osbp-master-clean-snapshots/
					</url>
					<releases>
						<enabled>false</enabled>
					</releases>
					<snapshots>
						<updatePolicy>always</updatePolicy>
						<enabled>true</enabled>
					</snapshots>
				</pluginRepository>
			</pluginRepositories>

			<repositories>
				<repository>
					<id>compex-nexus-snapshots</id>
					<name>Compex Nexus Snapshots</name>
					<url>http://download.osbee.org:8086/nexus/content/repositories/osbp-master-clean-snapshots/
					</url>
					<releases>
						<enabled>false</enabled>
					</releases>
					<snapshots>
						<updatePolicy>always</updatePolicy>
						<enabled>true</enabled>
					</snapshots>
				</repository>
				<repository>
					<id>compex-nexus-release</id>
					<name>Compex Nexus Release</name>
					<url>http://download.osbee.org:8086/nexus/content/repositories/osbp-master-clean-releases/
					</url>
					<releases>
						<enabled>true</enabled>
					</releases>
					<snapshots>
						<enabled>true</enabled>
					</snapshots>
				</repository>

				<repository>
					<id>Compex Internal P2 OSbee</id>
					<!-- use the URL you installed the softwarefactory from -->
					<url>http://download.osbee.org/downloads/p2/osbee/neon/xxxxx
					</url>
					<layout>p2</layout>
				</repository>
			</repositories>
		</profile>
	</profiles>
	<!-- activeProfiles | List of profiles that are active for all builds. |
		<activeProfiles> <activeProfile>alwaysActiveProfile</activeProfile> <activeProfile>anotherAlwaysActiveProfile</activeProfile>
		</activeProfiles> -->
 </settings>
- Go to Eclipse Preferences -> Maven -> User Settings and enter the path to the settings.xml file in the User settings section.
You can now continue with OS.bee Software Factory Samples
Adding a new workspace to an existing Eclipse installation
If you want to use an additional workspace with your Eclipse installation, you can simply do this by
- opening the workspace in a different folder than before and
- execute steps 1.3 #Set_the_Target_Platform_for_the_OS.bee_Software_Factory and 1.4 #Setting_preferences_in_Eclipseagain
This can be done for as many workspaces as you want to use.
General information
Copyright Notice
All rights are reserved by Compex Systemhaus GmbH. In particular, duplications, translations, microfilming, saving and processing in electronic systems are protected by copyright. Use of this manual is only authorized with the permission of Compex Systemhaus GmbH. Infringements of the law shall be punished in accordance with civil and penal laws. We have taken utmost care in putting together texts and images. Nevertheless, the possibility of errors cannot be completely ruled out. The Figures and information in this manual are only given as approximations unless expressly indicated as binding. Amendments to the manual due to amendments to the standard software remain reserved. Please note that the latest amendments to the manual can be accessed through our helpdesk at any time. The contractually agreed regulations of the licensing and maintenance of the standard software shall apply with regard to liability for any errors in the documentation. Guarantees, particularly guarantees of quality or durability can only be assumed for the manual insofar as its quality or durability are expressly stipulated as guaranteed. If you would like to make a suggestion, the Compex Team would be very pleased to hear from you.
(c) 2016-2024 Compex Systemhaus GmbH
License information
The OS.bee Software Factory is distributed under a commercial license.
The product itself is based on the OSBP Software Factory which is an Eclipse project. In addition, the software depends on several other open source projects, and the entire list of licenses used can be found here.