Action DSL
Contents
Purpose
Editing data is nice, but it must be persisted otherwise all effort invested in its editing would be lost. For this reason, OS.bee apps come with a set of create, read, update and delete functionality (CRUD) to manipulate data in a database. OS.bee can be operated with different database products by allowing user to:
- Create: Create or add new entries.
- Read: Read, retrieve, search or view existing entries from the database.
- Update: Update or edit existing entries in the underlying database.
- Delete: Delete, deactivate or remove existing entries from the database.
Each one of those functions is made available in OS.bee through the application for interactions with the user, after being defined in the Action DSL Model. In the following sections, you will get a closer look on how to the Action DSL works and how you can create basic and custom commands in order to make them available to the user.
Overview
The ActionDSL facilitates the implementation of certain interactions done by users through the application. It currently allows you to define toolbars after setting up beforehand the commands that will be triggered and executed. Custom made functions can also be implemented and attached (bound) to some items in the same manner as described in the sections below.
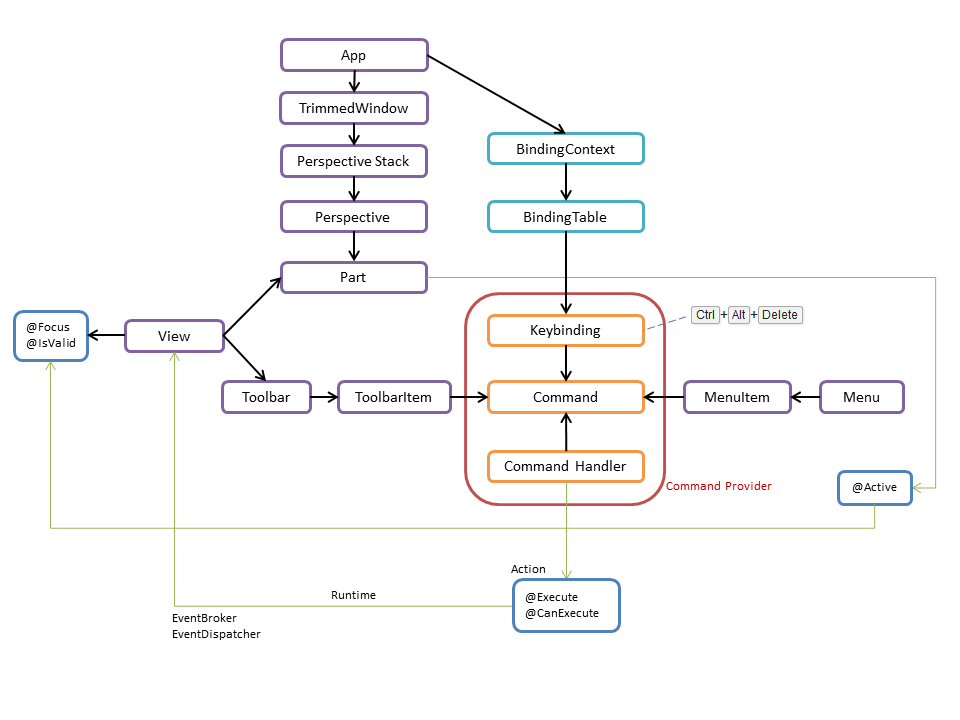
It provides a Command Provider, which encapsulates a Binding Context to the application view model (based on E4) and a Command Handler listing all defined actions (commands), which can be executed either application wide or in a single view.
Action Model Files
The Action DSL works for Os.bee models, it defines the actions for task, select workload, dialog, report, chart, workflow, datainterchange, functions and user interface. These actions are defined in text files with the file extension .action. Action model files carry the information necessary to create interaction components that will be executed in the background of the user interface.
Action model files are made up of the following sections:
- Package declaration: The Action model file must have a unique fully qualified name that can be specified with the keyword package at the beginning of the file.
- Import section: Action model files can address definitions from other models (e.g. Datainterchange, Function Library or Message DSL’s specifications) or other action model files. The model files that contain these definitions can be specified with the import keyword followed by the fully qualified name of the file and the * wildcard.
- Command section: The command section contains all the action command definitions that have to be defined to be used later on in the same model file.
- Toolbar section: The toolbar section contains all toolbar definitions, which are later used to build part of the user interface through the Dialog DSL among others.
package defintion
With the keyword package followed by a qualified name, you define the root element that contains all the other elements. A model can contain multiple packages.
► Syntax:
package <package name> [noCommandProvider] [{
	command <command name> [describedBy <description>] [key binding <binding combination>] [key binding <binding combination>] actionType <action rule>

	toolbar <toolbar name> [describedBy <description>] [items { . . .}]
} ]
- Keyword noCommandProvider -- When present (at package level), this keyword will prevent a `CommandsProvider` class to be generated.
Example:
 package net.osbee.sample.foodmart.actions noCommandProvider {
     ...
 }
In java file, the public class CommandsProvider will not be generated for the project in src-gen directory.
- One or more command can be defined in the same package, as well as the many toolbars using those commands. The keyword describedBy is optional and can be used to define the description of this toolbar.
In the following example, the commands NEW and SAVE and 1 toolbar Dialog are defined in the same package.
► Example:
package net.osbee.sample.foodmart.actions {
	command    NEW 		describedBy    "create new item"	dialogAction    New
	command    SAVE 	describedBy    "save an item"		dialogAction    Save

	toolbar    Dialog 	describedBy    "Toolbar for Dialogs" 	items { . . . }
}
Commands
The command section is the main part of this model. All Actions are to be defined here by declaring every command that can be later executed. For each command, a java file named <commandName>+Action.java will be generated in folder ./src-gen/<package name>/. The <action rule> is predefined in Action Type and will be introduced in the next section.
► Syntax:
command <command name> [key binding <binding combination>] actionType <action rule>


actionType:
	chartAction		defines action applicable to chart elements.
	datainterchangeAction	defines action using datainterchange units.
	dialogAction	        defines basic dialog actions (CRUD).
	functionalAction	defines custom actions using operations from the function library.
	reportAction		defines report type actions.
	selectWorkloadAction	defines select workload actions.
	taskAction		defines task actions.
	userinterfaceAction	defines actions with direct access and effect on the user interface.
	workflowAction		defines workflow actions.
The keyword describedBy is optional and can be used to define the description of a command. With the optional keyword keyBinding you are able to bind key combinations to commands.
► Syntax:
keyBinding <binding combination >
The following example illustrates the creation of the four basic dialog action commands (CRUD).
► Example:
package net.osbee.sample.foodmart.actions {
	. . .
	command   NEW 		describedBy    "create new item"	keyBinding   "CTRL ALT N"	dialogAction    New
	command   SAVE 	 	describedBy    "save an item"		keyBinding   "CTRL ALT S"	dialogAction    Save
	command   DELETE 	describedBy    "delete1 an item"	keyBinding   "CTRL ALT D"	dialogAction    Delete
	command   CANCEL 	describedBy    "undo changes"		keyBinding   "CTRL ALT Z"	dialogAction    Cancel
	. . .
}
Each command has its own key binding combination to be pressed as an alternative action trigger.
ActionTypes
As already mentioned above there are there are currently eight ActionTypes to set the command type.
dialogAction
With the keyword dialogAction followed by a corresponding action rule, you can define actions for dialogs.
► Syntax:
dialogAction <dialogAction rule>
As you can see in the last example, these are the 4 different dialogAction rules:
- “New” means create a new entry.
- “Save” means save the changing.
- “Delete” means delete the selected entry.
- “Cancel” means ignore the changing.
- “SaveAndNew” means save the changing and create a new entry.
- “SaveAsNew” means create a new entry and save the changing in this new entry.
taskAction
With the keyword taskAction followed by a corresponding action rule, you can define actions for BPM (Business Process Management) tasks to make use of the OS.bee BLIP DSL functionalities.
► Syntax:
taskAction <taskAction rule>
There are currently 15 different taskAction rules, which correspond to BPM tasks:
Claim, Start, Stop, Release, Suspend, Resume, Skip, Complete, Delegate, Forward, Fail, Register, Remove, Activate, Exit
► Example:
package net.osbee.sample.foodmart.actions {
	. . .
	command   STOP 		taskAction    Stop
	command   RELEASE 	taskAction    Release
	command   SUSPEND	taskAction    Suspend
	command   COMPLETE	taskAction    Complete
	. . .
}
selectWorkloadAction
With the keyword selectWorkloadAction followed by a corresponding action rule, you can define actions of type select workload.
► Syntax:
selectWorkloadAction <selectWorkloadAction rule>
There are currently two select workload action rules available:
RemoveAll, AddAll
► Example:
package net.osbee.sample.foodmart.actions {
	. . .
	command REMOVE_ALL_WORKLOAD_ITEMS 		selectWorkloadAction 	RemoveAll
	command ADD_ALL_SELECTED_ITEMS_TO_THE_WORKLOAD 	selectWorkloadAction 	AddAll
	. . .
}
reportAction
With the keyword reportAction followed by a by a corresponding action rule, you can define actions for reports.
► Syntax:
reportAction <reportAction rule>
Currently there are 2 different report action rules available:
Download, PrintOnServer
► Example:
package net.osbee.sample.foodmart.actions {
	. . .
	command PRINT 		reportAction 	PrintOnServer
	command PRINT_DOWNLOAD 	reportAction 	Download
	. . .
}
chartAction
With the keyword chartAction followed by a corresponding action rule, you can define actions for charts.
► Syntax:
chartAction <chartAction rule>
Currently the only rule available:
ChartDownload
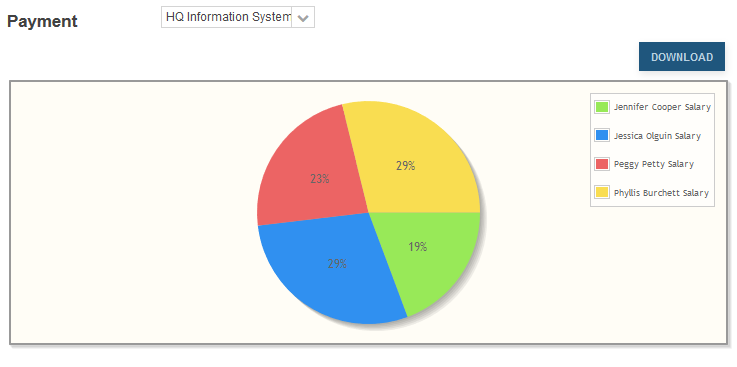
This action allows you to download a chart as image file.
► Example:
package net.osbee.sample.foodmart.actions {
	. . .
	command SAVE_CHART 	chartAction 	ChartDownload
	. . .
}
Further information can be viewed in the Chart DSL documentation page.
workflowAction
With the keyword workflowAction followed by a corresponding action rule, you can define actions for workflows.
► Syntax:
workflowAction <workflowAction rule>
Currently only one action rule is available:
Start
► Example:
package net.osbee.sample.foodmart.actions {
	. . .
	command START	workflowAction 	Start
	. . .
}
datainterchangeAction
With the keyword datainterchangeAction followed by a corresponding action rule, you can define actions for data interchange, and so forth using data interchange unit functionalities.
► Syntax:
datainterchangeAction <datainterchangeAction rule> <datainterchangeUnit name>
Currently there are 2 datainterchange action rules available:
Import, Export
Please note that the data interchange units have to be already defined in the Datainterchange DSL in order to be used via imports in the Action DSL.
► Example:
package net.osbee.sample.foodmart.actions {
	command CURRNAMESIMPORT		datainterchangeAction Import CurrencyNames
	command CURRIMPORT 		datainterchangeAction Import Currencies
}
userinterfaceAction
With the keyword userinterfaceAction followed by a corresponding action rule, you can define actions which affect directly the user interface as a whole.
► Syntax:
userinterfaceAction <userinterfaceAction rule>
Currently there are two action rules is available:
- NextPart: allows you to switch the focus (moving forwards) between views from the left to the right inside a perspective.
- PreviousPart: allows you to switch the focus (moving backwards) between views from the right to the left, inside a perspective.
- Info: allows you to show the information page.
► Example:
command FORWARD 	describedBy	"move forwards to next part" 		keyBinding "ALT F6" userinterfaceAction NextPart
command BACKWARD 	describedBy	"move backwards to previous part" 	keyBinding "ALT SHIFT F6" userinterfaceAction PreviousPart
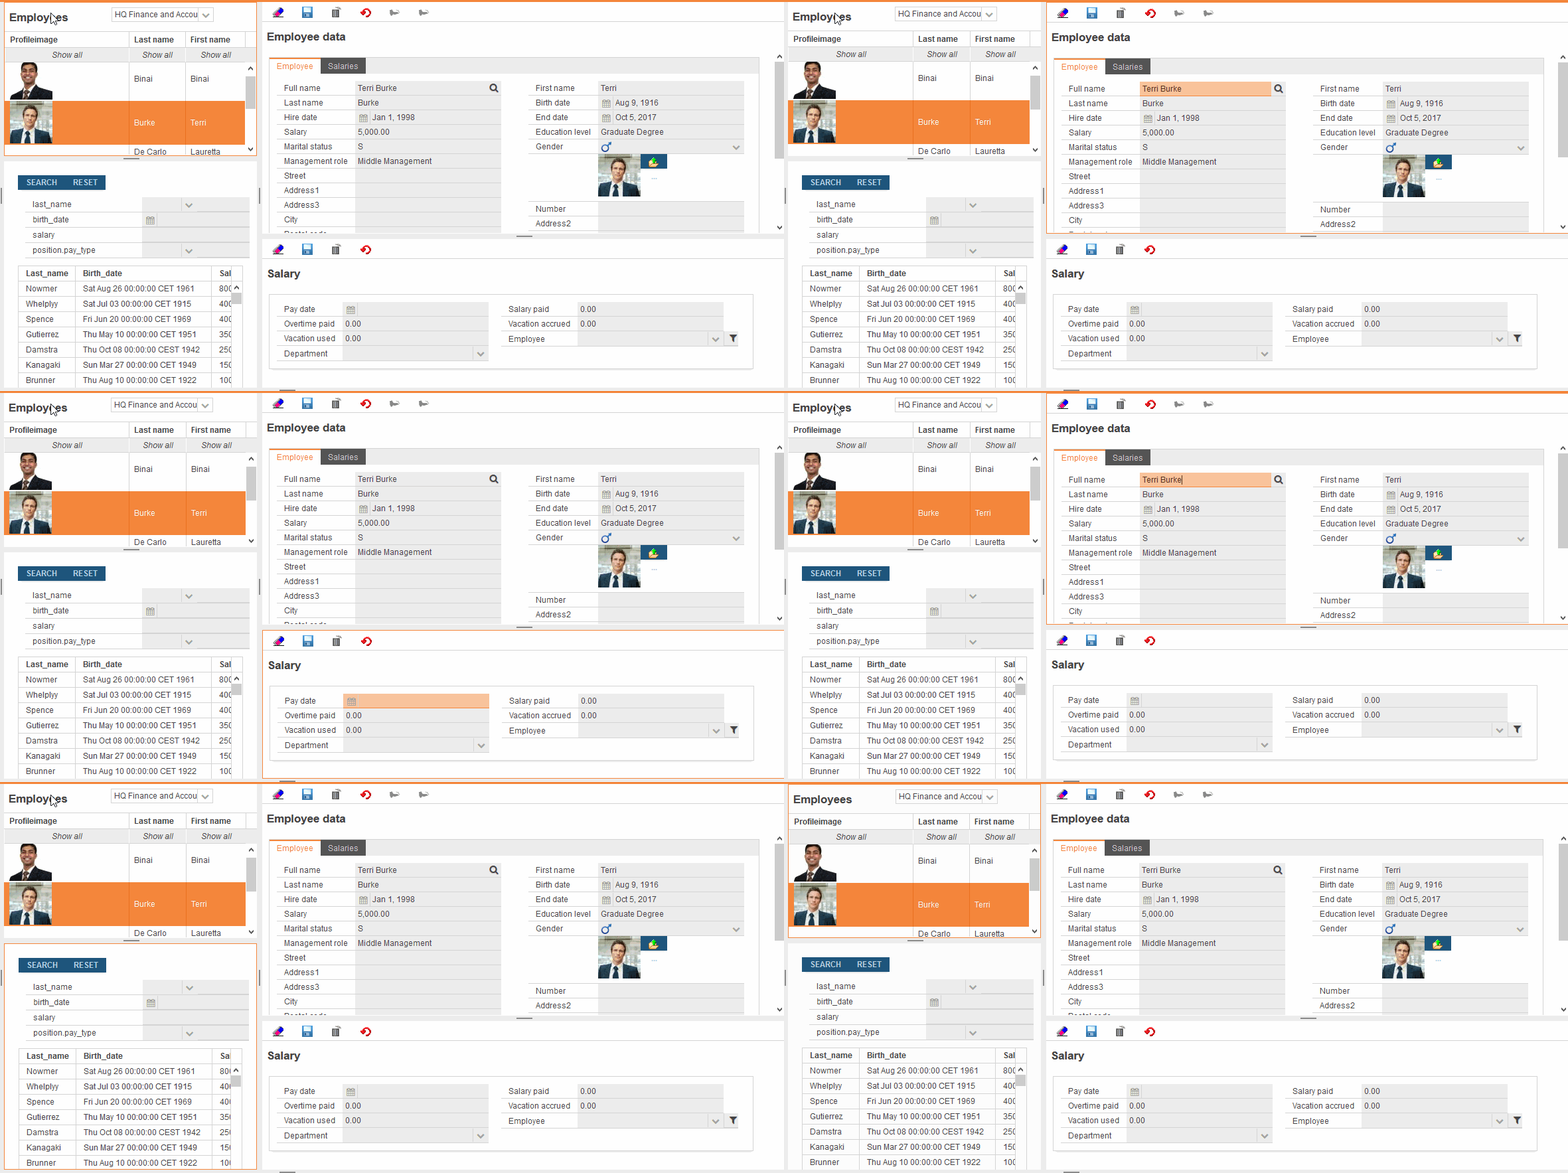
The example above illustrates how to define user interface actions for users to switch between views inside a perspective. You may notice here that keyBindings have been attached to those commands, which means that users have now able to press those key combinations in order to move from a view to another one (forward ALT + F6) and back (backwards ALT + SHIFT + F6), as illustrated below.
Please note that the orange border on each the figure shown above, highlights the actual active view: the view which is currently focused on.
functionalAction
The action type functionalAction is used to define custom action commands, which have to be linked with operations defined in the Functionlibrary DSL. You can define a functional action command using the type functionalAction followed by the keywords group, canExecute and executeImmediate or executeLater like shown below.
► Syntax:
functionalAction group <FunctionGroupName> canExecute <FunctionName#1> executeImmediate|executeLater <FunctionName#2> [messageCategory-definition]
Those keywords are needed to make the link between the command and the predefined function inside which this item could use from Function Library DSL:
- group: specifies a unique group of functions defined in the function library to be used.
- canExecute: sets a test operation, which can be performed before executing the actual and expected business logic.
- executeImmediate: indicates that the business logic has to be executed right away, so that any results can be observed right away.
- executeLater: indicates that the business logic has to be executed with delay asynchronously.
It is also possible to extend the functional action command definition with an optional message output definition. It basically allows you to define a set output messages to be seen in form of pop up dialogs, which would be shown to the user depending on the outcome of its interaction.
► Syntax:
[messageCategory <messageCategoryName> onFailMessage|onSuccessMessage|onStartedMessage <messageName>]
Those messages are predefined in the Message DSL and can be linked to the command using the keyword messageCategory followed by the message category name and the condition, which has to be fulfilled to show the message:
- onFailMessage: shows the message after a failed outcome of the action.
- onSuccessMessage: shows the message after a successful outcome of the action.
- onStartedMessage: shows the message right away.
► Example:
command	FIRE_EMPLOYEE	    functionalAction group Employee canExecute canFire executeImmediate fire  messageCategory Employee onFailMessage    FireNotAllowed  onSuccessMessage Fired
command FIRE_EMPLOYEE_ASYNC functionalAction group Employee canExecute canFire executeLater	fire  messageCategory Employee onStartedMessage FireStarted
Please note that no information or error message will be shown to the user, unless you explicitly define and set a message category to your functional action command.
Command Provider
The Command Provider/Handler is generated as soon as you define a single command. For all command definitions, a single java file named CommandsProvider.java will be generated in folder ./src-gen/<package name>/. It is responsible to provides to each command, the binding tables and context they need be able to apply any key binding as illustrated above on the figure 1.
Toolbars
For each toolbar, one .java file named <toolbar name>+Toobar.java will be generated in folder ./src-gen/<package name>/.
Items
With the items {…} block you specify the list of items that are part of a toolbar.
► Syntax:
items {
	item . . . |  spacer
	. . .
}
The items in this block can be a action button defined with keyword item, or if you need a empty place between the buttons, a spacer can be defined with keyword spacer.
item
With the keyword item followed by an identifier you can currently define buttons inside the items {…} block of a toolbar and so forth assign them to it.
► Syntax:
items {
	item <item name> [described by <description>] command <command_name string>] [icon <URI string>]
	. . .
}
As shown here above, item definitions are based on predefined commands specified by the use of the keyword command followed by the command name. The keyword icon is optional, it defines the identifier for a resource (e.g. icon file ![]()
![]()
![]() ) that would be applied on the button and shown in the user interface.
) that would be applied on the button and shown in the user interface.
► Example:
toolbar Dialog described by "Toolbar for Dialogs" items {
	item newItem command NEW icon "dsnew"
	spacer
	item saveItem command SAVE icon "dssave"
	spacer
	item deleteItem command DELETE icon "dsdelete"
	spacer
	item cancelItem command CANCEL icon "dscancel"
}

toolbar Employee describedBy "Toolbar for employee dialogs" items {
	item newItem command NEW icon "dsnew"
	spacer
	item saveItem command SAVE icon "dssave"
	spacer
	item deleteItem command DELETE icon "dsdelete"
	spacer
	item cancelItem command CANCEL icon "dscancel"
	spacer
	item fireEmployee command FIRE_EMPLOYEE icon "fireemployee"
	spacer
	item fireEmployeeAsync command FIRE_EMPLOYEE_ASYNC icon "fireemployee"
}
In this example, two java files will be generated by the Action DSL model and make those toolbars available for the user interface.
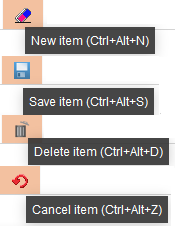
Since the commands used in this example have been defined with key bindings in the command section above, those can also be viewed in the user interface as tooltip over each button, like shown here below.
Copyright Notice
All rights are reserved by Compex Systemhaus GmbH. In particular, duplications, translations, microfilming, saving and processing in electronic systems are protected by copyright. Use of this manual is only authorized with the permission of Compex Systemhaus GmbH. Infringements of the law shall be punished in accordance with civil and penal laws. We have taken utmost care in putting together texts and images. Nevertheless, the possibility of errors cannot be completely ruled out. The Figures and information in this manual are only given as approximations unless expressly indicated as binding. Amendments to the manual due to amendments to the standard software remain reserved. Please note that the latest amendments to the manual can be accessed through our helpdesk at any time. The contractually agreed regulations of the licensing and maintenance of the standard software shall apply with regard to liability for any errors in the documentation. Guarantees, particularly guarantees of quality or durability can only be assumed for the manual insofar as its quality or durability are expressly stipulated as guaranteed. If you would like to make a suggestion, the Compex Team would be very pleased to hear from you.
(c) 2016-2026 Compex Systemhaus GmbH


