Difference between revisions of "AppUpIn5Extensions"
(→AppUpIn5 - Extensions 1.0) |
|||
| Line 15: | Line 15: | ||
== ''AppUpIn5 - Extensions 1.0'' == | == ''AppUpIn5 - Extensions 1.0'' == | ||
| − | You get access to those new functionalities by opening a csv file with the CSV2App module editor of the OS.bee Software Factory, and by making a left mouse click on the column you wish to edit the metadata from.<br><br>[[File:Brandtype.png| | + | You get access to those new functionalities by opening a csv file with the CSV2App module editor of the OS.bee Software Factory, and by making a left mouse click on the column you wish to edit the metadata from. |
| + | <br><br>[[File:Brandtype.png|none|frame|''Figure 1: Brandtype.csv im CSV2 Editor'']] | ||
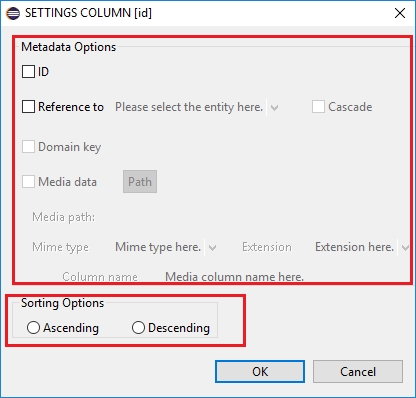
| − | The setting dialog of the corresponding column will appear and several options will be available for you to choose, based on the analysis of the type of data contained in this column and the configurations you would have made so far.<br><br>[[File:Brandtype1.png|frame| | + | The setting dialog of the corresponding column will appear and several options will be available for you to choose, based on the analysis of the type of data contained in this column and the configurations you would have made so far. |
| + | <br><br>[[File:Brandtype1.png|frame|none|''Figure 2: Settings dialog of column "id"'']] | ||
==Metadata options== | ==Metadata options== | ||
| Line 28: | Line 30: | ||
With a left mouse click on the column named ''id'' of the csv file ''BrandType.csv'', the user opens the settings dialog of this column. | With a left mouse click on the column named ''id'' of the csv file ''BrandType.csv'', the user opens the settings dialog of this column. | ||
| − | [[File:SettingsID.png|frame| | + | <br><br>[[File:SettingsID.png|frame|none|''Figure 3: Settings dialog column "id" of Brandtype'']] |
(1) By selecting the ''ID'' checkbox, (2) and then pressing the OK button, the user set the column ''id'' as the ''ID''-column of the entity created later on, like shown on the figure below. Each entity has always one UUID attribute, therefore each csv file must have one ''ID''-column. The generated code later on will look like this snippet on figure 4. | (1) By selecting the ''ID'' checkbox, (2) and then pressing the OK button, the user set the column ''id'' as the ''ID''-column of the entity created later on, like shown on the figure below. Each entity has always one UUID attribute, therefore each csv file must have one ''ID''-column. The generated code later on will look like this snippet on figure 4. | ||
| − | [[File:ID.png|frame| | + | <br><br>[[File:ID.png|frame|none|''Figure 4: Entity dsl model - "id" attribute of Brandtype'']] |
| + | |||
===Reference=== | ===Reference=== | ||
With the reference option you are able to set column data as reference data (or foreign key) pointing to the ''Universal Unique Identifier'' (primary key) of another '''already existing entity'''. These data are also alphanumerical values, as mentioned in the section above concerning the id-option. | With the reference option you are able to set column data as reference data (or foreign key) pointing to the ''Universal Unique Identifier'' (primary key) of another '''already existing entity'''. These data are also alphanumerical values, as mentioned in the section above concerning the id-option. | ||
| − | [[File:RefArea.png|frame| | + | <br><br>[[File:RefArea.png|frame|none|''Figure 5: Reference area.'']] |
| + | |||
A reference column results into the creation of a 1-n relation between the new entity, which will be created on the basis of the considered csv file and the referenced entity, which already exists in the entity model file of your project. The condition of having this target entity to be referenced on already existing in the model translates into a specific '''order of execution''' of the application creation: successively pressing the button ''Create App'' in the right order to be able to choose the target entity. | A reference column results into the creation of a 1-n relation between the new entity, which will be created on the basis of the considered csv file and the referenced entity, which already exists in the entity model file of your project. The condition of having this target entity to be referenced on already existing in the model translates into a specific '''order of execution''' of the application creation: successively pressing the button ''Create App'' in the right order to be able to choose the target entity. | ||
| Line 44: | Line 48: | ||
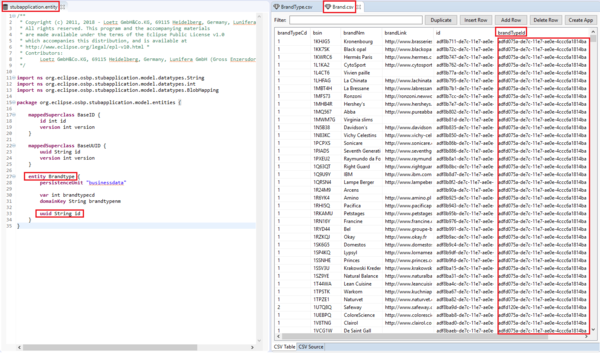
For instance, we would like to create a reference between the entity ''Brandtype'' and the new entity to be created ''Brand'', whose csv file contains the ''brandTypeId'' as column. As you can see on the left side of figure 6, showing the content of the entity dsl model file, the entity ''Brandtype'' has already been created. | For instance, we would like to create a reference between the entity ''Brandtype'' and the new entity to be created ''Brand'', whose csv file contains the ''brandTypeId'' as column. As you can see on the left side of figure 6, showing the content of the entity dsl model file, the entity ''Brandtype'' has already been created. | ||
| − | [[File:RefEntityBrand.png|thumb|600px| | + | <br><br>[[File:RefEntityBrand.png|thumb|600px|none|''Figure 6: Entity model file and Brand.csv file.'']] |
| + | |||
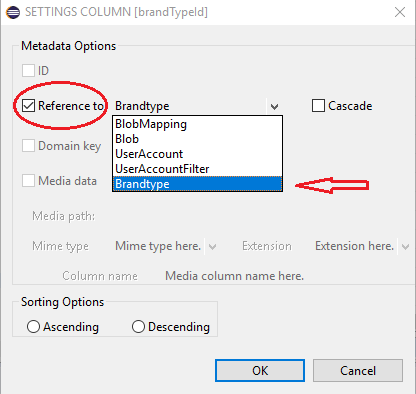
(1) By selecting the reference checkbox, (2) selecting ''Brandtype'' in the list of all existing entities, (3) and then by pressing the OK button, the user set the column ''brandTypeId'' as a reference key pointing to the UUID of the entity ''Brandtype''. | (1) By selecting the reference checkbox, (2) selecting ''Brandtype'' in the list of all existing entities, (3) and then by pressing the OK button, the user set the column ''brandTypeId'' as a reference key pointing to the UUID of the entity ''Brandtype''. | ||
| − | [[File:RefBrandtypeId.png|thumb|600px| | + | <br><br>[[File:RefBrandtypeId.png|thumb|600px|none|''Figure 7: Settings dialog column "brandTypeId" of Brand'']] |
| + | |||
The result of this relation at the end of the app creation would then look like this. | The result of this relation at the end of the app creation would then look like this. | ||
| − | [[File:RefBrandtypeId1.png|thumb|600px| | + | <br><br>[[File:RefBrandtypeId1.png|thumb|600px|none|''Figure 8: Reference result on "brandTypeId"'']] |
| + | |||
The optional tag <code>cascade</code> allows, when selected, the deletion of all elements of the n-side of the relation, when the one-side element is deleted. In our example, the removal of one brand type would then result to the deletion of all the brands categorized by that type. The generated relation would then look like this in contrast to last example. | The optional tag <code>cascade</code> allows, when selected, the deletion of all elements of the n-side of the relation, when the one-side element is deleted. In our example, the removal of one brand type would then result to the deletion of all the brands categorized by that type. The generated relation would then look like this in contrast to last example. | ||
| − | [[File:RefBrandtypeId2.png|thumb|600px| | + | <br><br>[[File:RefBrandtypeId2.png|thumb|600px|none|''Figure 9: Reference result on "brandTypeId"'']] |
| + | |||
| Line 71: | Line 79: | ||
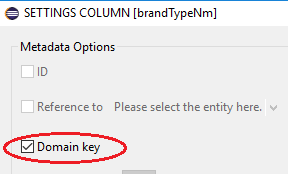
(1) By selecting the domain key checkbox, (2) and then pressing the OK button, the user define the column ''brandTypeNm'' as the domain key column of the entity Brandtype. | (1) By selecting the domain key checkbox, (2) and then pressing the OK button, the user define the column ''brandTypeNm'' as the domain key column of the entity Brandtype. | ||
| − | [[File:Brandtypenm.png|frame| | + | <br><br>[[File:Brandtypenm.png|frame|none|''Figure 10: Settings dialog column "brandTypeNm" of Brandtype'']] |
| + | |||
This results into the creation of the domain key attribute of the entity ''Brandtype'' as shown on the figure below. | This results into the creation of the domain key attribute of the entity ''Brandtype'' as shown on the figure below. | ||
| − | [[File:BrandtypenmEntity.png|frame| | + | <br><br>[[File:BrandtypenmEntity.png|frame|none|''Figure 11: Domain key in entity dsl model'']] |
| + | |||
===Media data=== | ===Media data=== | ||
The media data option allows the user to define a column as a multimedia column. It allows user to specify from which columns information can be gathered from, in order to create the appropiate structures to store and upload any type of files in your application. This type of column contains the filenames of the multimedia files without extension. In addition to both the mime type and the extension, the user has also to define the directory path, where those files are located. | The media data option allows the user to define a column as a multimedia column. It allows user to specify from which columns information can be gathered from, in order to create the appropiate structures to store and upload any type of files in your application. This type of column contains the filenames of the multimedia files without extension. In addition to both the mime type and the extension, the user has also to define the directory path, where those files are located. | ||
| − | [[File:Mediadata.png|thumb|600px| | + | <br><br>[[File:Mediadata.png|thumb|600px|none|''Figure 12: Media data section'']] |
| + | |||
The currently supported mime types are the following: plain, jpg, mpeg, octetstream and pdf. | The currently supported mime types are the following: plain, jpg, mpeg, octetstream and pdf. | ||
| − | [[File:Mediadata4.png|thumb|600px| | + | <br><br>[[File:Mediadata4.png|thumb|600px|none|''Figure 13: Mimetypes'']] |
| + | |||
The user can not just select one of the predefined extension formats (bmp, csv, jpg, mp3, pdf, txt, xml), but also edit an extension format on his own (java or sql...). | The user can not just select one of the predefined extension formats (bmp, csv, jpg, mp3, pdf, txt, xml), but also edit an extension format on his own (java or sql...). | ||
| − | [[File:Mediadata5.png|thumb|600px| | + | <br><br>[[File:Mediadata5.png|thumb|600px|none|''Figure 14: Extensions'']] |
| + | |||
An optional column name can be given by the user to set the name of the multimedia column, which will be additionally created to store these files based on the OS.bee [[BlobMapping]] data type. If not defined, the media column name will consist of the actual column name followed with the suffix '''media'''. | An optional column name can be given by the user to set the name of the multimedia column, which will be additionally created to store these files based on the OS.bee [[BlobMapping]] data type. If not defined, the media column name will consist of the actual column name followed with the suffix '''media'''. | ||
| Line 95: | Line 108: | ||
Only columns containing text data can be defined as media data column by the user. | Only columns containing text data can be defined as media data column by the user. | ||
| − | [[File:Mediadata1.png|thumb|600px| | + | <br><br>[[File:Mediadata1.png|thumb|600px|none|''Figure 15: Media data on column "bsin"'']] |
| + | |||
The column ''bsin'' of the entity Brand contains media file name. Besides being provided with the Brand.csv file, we also have the corresponding jpg-files illustrated here in figure 16. | The column ''bsin'' of the entity Brand contains media file name. Besides being provided with the Brand.csv file, we also have the corresponding jpg-files illustrated here in figure 16. | ||
| − | [[File:Mediadata2.png|thumb|600px| | + | <br><br>[[File:Mediadata2.png|thumb|600px|none|''Figure 16: Media file location'']] |
| + | |||
After opening the settings dialog of the column ''bsin'', (1) the user needs first to select the media data checkbox, which allows the modification of the information needed. (2) The user sets the path directory with the help of directory chooser, which appears after pressing the Path button and then selects the directory, in which the files are located. (3) The mime type and extension of the files have to be chosen within the corresponding combo boxes. (4) After pressing the OK button, the user sets the column ''bsin'' as a multimedia column. This will then result into the creation of both attributes ''bsin'' and ''bsinmedia'' of the entity Brand later on, as shown below. | After opening the settings dialog of the column ''bsin'', (1) the user needs first to select the media data checkbox, which allows the modification of the information needed. (2) The user sets the path directory with the help of directory chooser, which appears after pressing the Path button and then selects the directory, in which the files are located. (3) The mime type and extension of the files have to be chosen within the corresponding combo boxes. (4) After pressing the OK button, the user sets the column ''bsin'' as a multimedia column. This will then result into the creation of both attributes ''bsin'' and ''bsinmedia'' of the entity Brand later on, as shown below. | ||
| + | <br><br>[[File:Mediadata3.png|thumb|600px|none|''Figure 17: Blobmapping attribute in entity Brand'']] | ||
| − | |||
==General Notice== | ==General Notice== | ||
| Line 122: | Line 137: | ||
==Sorting options== | ==Sorting options== | ||
The sorting section allows you to sort the csv data within the editor. The selected column data can be sorted either in an ascending or a descending order. | The sorting section allows you to sort the csv data within the editor. The selected column data can be sorted either in an ascending or a descending order. | ||
| − | [[File:Sorting.png|frame| | + | <br><br>[[File:Sorting.png|frame|none|''Figure 18: Sorting options'']] |
| + | |||
The following examples show you how to use the sort functions by applying it on the column ''brandNm'' of the provided [[#files|Brand.csv]] file. After you opened it in the CSV2App module editor within your eclipse workspace (for example via drag-n-drop), (1) make a left-mouse click on the column ''brandNm'', (2) choose either the ascending (figure 19) or the descending (figure 20) option in the sorting section, (3) and then press the OK button to trigger to the sorting of the column data. (4) You can observe the resulting sorted column data on the right side of both figures below. | The following examples show you how to use the sort functions by applying it on the column ''brandNm'' of the provided [[#files|Brand.csv]] file. After you opened it in the CSV2App module editor within your eclipse workspace (for example via drag-n-drop), (1) make a left-mouse click on the column ''brandNm'', (2) choose either the ascending (figure 19) or the descending (figure 20) option in the sorting section, (3) and then press the OK button to trigger to the sorting of the column data. (4) You can observe the resulting sorted column data on the right side of both figures below. | ||
| − | ► '''Example 1''': | + | ► '''Example 1''':<br><br>[[File:Sorting1.png|thumb|600px|none|''Figure 19: Ascending sort of the column "brandNm"'']] |
| − | [[File:Sorting1.png|thumb|600px| | + | |
| + | |||
| + | ► '''Example 2''':<br><br>[[File:Sorting2.png|thumb|600px|none|''Figure 20: Descending sort of the column "brandNm"'']] | ||
| − | |||
| − | |||
Revision as of 16:51, 22 January 2018
Contents
Purpose
The purpose of this document is to describe the first set of functional extensions of the CSV2App module presented in the App up in 5 minutes page, which will be available with the next release version.
OSBP applications
The OSBP application My1App should already have been generated before starting this app. You can find the instructions here.
CSV-file
You may use the two following files as reference files BrandType.csv and Brand.csv.
AppUpIn5 - Extensions 1.0
You get access to those new functionalities by opening a csv file with the CSV2App module editor of the OS.bee Software Factory, and by making a left mouse click on the column you wish to edit the metadata from.
The setting dialog of the corresponding column will appear and several options will be available for you to choose, based on the analysis of the type of data contained in this column and the configurations you would have made so far.
Metadata options
The metadata section allows users to set additional information related to the entity that will be created, based on the content of a csv file and existing dsl model files.
Id
With the option ID you are able to define the column representing the unique identifier data of an entity. An entity has always one identification key, also known as primary key, which is here a Universal Unique Identifier (UUID), a unique alphanumerical string. Only columns having this type of data can be defined by the user as ID-columns.
With a left mouse click on the column named id of the csv file BrandType.csv, the user opens the settings dialog of this column.
(1) By selecting the ID checkbox, (2) and then pressing the OK button, the user set the column id as the ID-column of the entity created later on, like shown on the figure below. Each entity has always one UUID attribute, therefore each csv file must have one ID-column. The generated code later on will look like this snippet on figure 4.
Reference
With the reference option you are able to set column data as reference data (or foreign key) pointing to the Universal Unique Identifier (primary key) of another already existing entity. These data are also alphanumerical values, as mentioned in the section above concerning the id-option.
A reference column results into the creation of a 1-n relation between the new entity, which will be created on the basis of the considered csv file and the referenced entity, which already exists in the entity model file of your project. The condition of having this target entity to be referenced on already existing in the model translates into a specific order of execution of the application creation: successively pressing the button Create App in the right order to be able to choose the target entity.
For instance, we would like to create a reference between the entity Brandtype and the new entity to be created Brand, whose csv file contains the brandTypeId as column. As you can see on the left side of figure 6, showing the content of the entity dsl model file, the entity Brandtype has already been created.
(1) By selecting the reference checkbox, (2) selecting Brandtype in the list of all existing entities, (3) and then by pressing the OK button, the user set the column brandTypeId as a reference key pointing to the UUID of the entity Brandtype.
The result of this relation at the end of the app creation would then look like this.
The optional tag cascade allows, when selected, the deletion of all elements of the n-side of the relation, when the one-side element is deleted. In our example, the removal of one brand type would then result to the deletion of all the brands categorized by that type. The generated relation would then look like this in contrast to last example.
Besides the fact that here 1-n relations are created between entities, a reference attribute will also be generated in each entity. This is needed in order to show the information data of each relation graphically (here as table) in the application interface. This is characterized by the use of a properties{...} block.
Domain key
The domain key option allows the user to set a user friendly identification search field for the application instead of UUIDs, since those are too cryptic for users to clearly distinguish data from each other.
Only column data from type string allow the user to define a column as the domain key column.
In the case of the entity Brandtype, an adequate candidate for the domain key is the column brandTypeNm containing the names of brand types, which are easy for users to read and identify data from in the application later on.
(1) By selecting the domain key checkbox, (2) and then pressing the OK button, the user define the column brandTypeNm as the domain key column of the entity Brandtype.
This results into the creation of the domain key attribute of the entity Brandtype as shown on the figure below.
Media data
The media data option allows the user to define a column as a multimedia column. It allows user to specify from which columns information can be gathered from, in order to create the appropiate structures to store and upload any type of files in your application. This type of column contains the filenames of the multimedia files without extension. In addition to both the mime type and the extension, the user has also to define the directory path, where those files are located.
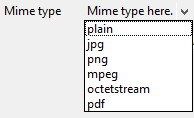
The currently supported mime types are the following: plain, jpg, mpeg, octetstream and pdf.
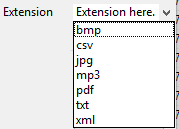
The user can not just select one of the predefined extension formats (bmp, csv, jpg, mp3, pdf, txt, xml), but also edit an extension format on his own (java or sql...).
An optional column name can be given by the user to set the name of the multimedia column, which will be additionally created to store these files based on the OS.bee BlobMapping data type. If not defined, the media column name will consist of the actual column name followed with the suffix media.
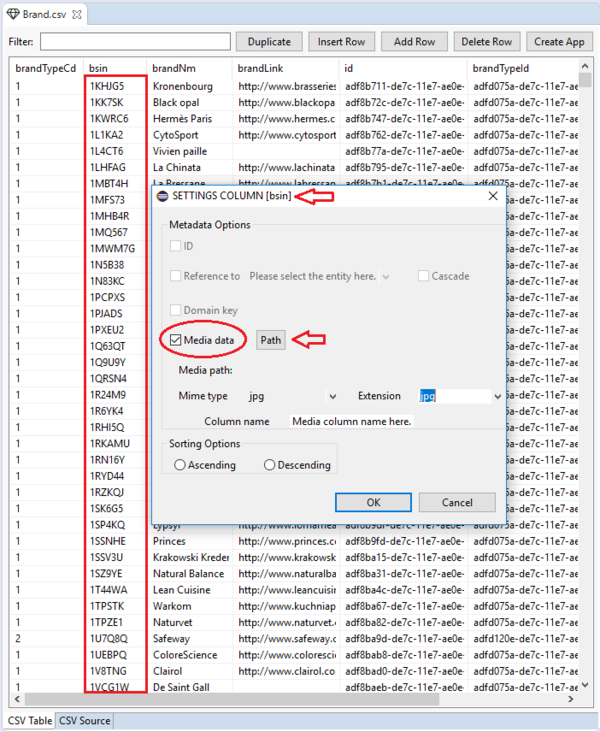
Only columns containing text data can be defined as media data column by the user.
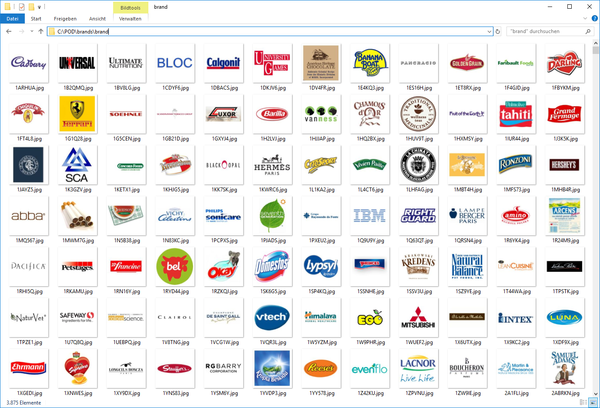
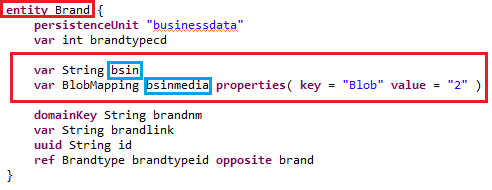
The column bsin of the entity Brand contains media file name. Besides being provided with the Brand.csv file, we also have the corresponding jpg-files illustrated here in figure 16.
After opening the settings dialog of the column bsin, (1) the user needs first to select the media data checkbox, which allows the modification of the information needed. (2) The user sets the path directory with the help of directory chooser, which appears after pressing the Path button and then selects the directory, in which the files are located. (3) The mime type and extension of the files have to be chosen within the corresponding combo boxes. (4) After pressing the OK button, the user sets the column bsin as a multimedia column. This will then result into the creation of both attributes bsin and bsinmedia of the entity Brand later on, as shown below.
General Notice
As soon as the user press the button "Create App", an error message will eventually be displayed to inform the user to complete or adapt the metadata configuration of the considered csv file.
- Please note that a proper configuration of column definitions has to be done by the user as soon as id, reference or domain keys candidates have been detected. Candidates are columns of a csv file, which meet the criteria for either an id, a reference (both from alphanumerical string with UUID format as described above) or a domain key column. Setting the metadata of those columns is then mandatory.
- A universal unique identifier (UUID) will be automatically generated by the OS.bee Software Factory for an entity only in the case, in which no id-column candidates are available in a csv file.
- Please note that all configurations made by the user in one csv file are immediately lost, as soon as the user close the file from the CSV2App module editor or by restarting the eclipse IDE.
Further information over the usage of metadata such as id, reference and domain key can be found in the Entity DSL documentation page.
Sorting options
The sorting section allows you to sort the csv data within the editor. The selected column data can be sorted either in an ascending or a descending order.
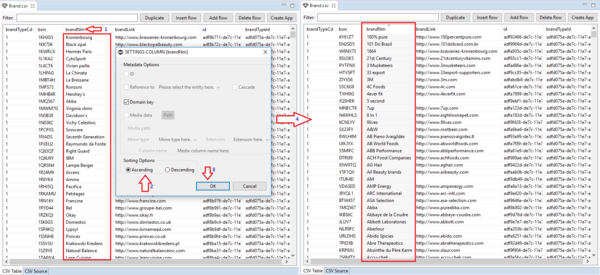
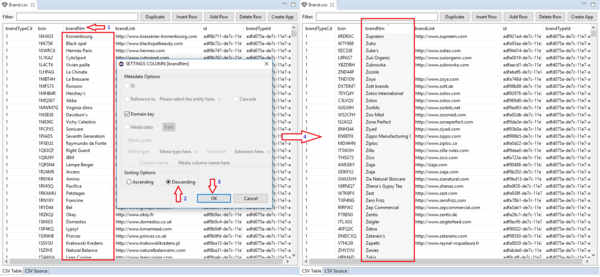
The following examples show you how to use the sort functions by applying it on the column brandNm of the provided Brand.csv file. After you opened it in the CSV2App module editor within your eclipse workspace (for example via drag-n-drop), (1) make a left-mouse click on the column brandNm, (2) choose either the ascending (figure 19) or the descending (figure 20) option in the sorting section, (3) and then press the OK button to trigger to the sorting of the column data. (4) You can observe the resulting sorted column data on the right side of both figures below.
Copyright Notice
All rights are reserved by Compex Systemhaus GmbH. In particular, duplications, translations, microfilming, saving and processing in electronic systems are protected by copyright. Use of this manual is only authorized with the permission of Compex Systemhaus GmbH. Infringements of the law shall be punished in accordance with civil and penal laws. We have taken utmost care in putting together texts and images. Nevertheless, the possibility of errors cannot be completely ruled out. The Figures and information in this manual are only given as approximations unless expressly indicated as binding. Amendments to the manual due to amendments to the standard software remain reserved. Please note that the latest amendments to the manual can be accessed through our helpdesk at any time. The contractually agreed regulations of the licensing and maintenance of the standard software shall apply with regard to liability for any errors in the documentation. Guarantees, particularly guarantees of quality or durability can only be assumed for the manual insofar as its quality or durability are expressly stipulated as guaranteed. If you would like to make a suggestion, the Compex Team would be very pleased to hear from you.
(c) 2016-2026 Compex Systemhaus GmbH
License information
The OS.bee Software Factory is distributed under a commercial license.
The product itself is based on the OSBP Software Factory which is an Eclipse project. In addition, the software depends on several other open source projects, and the entire list of licenses used can be found here.

