OS.bee Tutorial
Contents
OS.bee Tutorial
Introduction
This tutorial will introduce the architecture, technology and functionality of OS.bee using basic OS.bee application My1App.
My1App is a personal administration application consisting of a collection of models based on OS.bee Domain Specific Languages. It is generated by Eclipse wizards; the wizards build the Eclipse workspace, provide the basic structure and a number of consistent objects of models.
We use the "2BEE concept":
- describe the requirements from the point of a fictive user with using story map
- technically implement the requirements of user
You can step by step expand the rudimentary person administration (which has only basic configuration) with the user stories described in the story map, and then generate an employee administration based on your new person administration.
Please notice:
- The task solutions can often be solved either by DSL code or graphic modeling. We will only present the solution with DSL code in this tutorial. You can use any one of them as you will.
- Each tutorial user stories are independent from each other; you don’t need to totally complete the tutorial in once.
Purpose
The task for the user of this tutorial is first the administration of personal data and then the main task is the administration of employee data.
Requirement
My1App is a personal administration application consisting of a collection of models based on OS.bee Domain Specific Languages. It is generated by Eclipse wizards; the wizards build the Eclipse workspace, provide the basic structure and a number of consistent objects of models. So before executing the tutorial steps in this tutorial using My1App, the appropriate wizards must be installed. You can find more information about installation in doc of My1App.
My1App has the following basic objects:
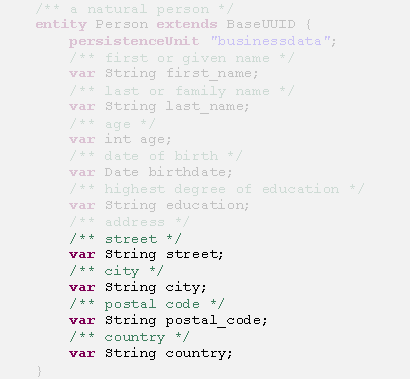
- The superclass BaseID, which has only one attribute identifier (id) as UUID (See UUID). It is the technical key as a basis of identification and it is an obligation for all entities.
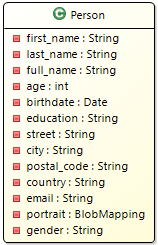
- The entity Person , which inherits the identifier attribute (id) from the superclass BaseID and has additional personal attributes.
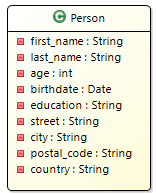
The following vertically divided person-view represent the entity Person in My1App, on the left side is the Person-Table and on the right side is the Person-Dialog:

Use cases
The personal administration should be extended by the following use cases:
- change address
- search person with full-name
- establish current age of person
- add profile picture
- add gender
- add marital status
The expected employee administration is described by the following use cases:
- hire employee
- dismiss employee
- increase salary of employee
- assign employee
- transfer employee
- evaluate employee
Story map

User stories
Administration of personal data
Change the address
Target:
Introducing the EntityDSL instance by extending an existing entity with new attributes.
Requirement:
As an administrator, I want to change a person's address.
User Task & User Story:

Process:
First of all, we need to set Street (Person.street), City (Person.city), Postal Code (Person.postal_code) and Country (Person.country) of a person.
Following are new attributes for the entity Person:
- street (street)
- city (city)
- postal code (postal_code)
- country (country)
These new attributes should be created as the extension of the entity Person.
After that, mocking data should be extended regarding to the new attributes, in order to already have data to use after restarting the application. Or we can change the address by hand using the Person Table and Person Dialog UI.
Detail implementation:
- Edit the EntityDSL model (my1app.entity) (See Entity DSL ).
- Add the attributes street (street), city (city), postal code (postal_code) and country (country) as variables of the entity person.
-
- new graphic view of entity Person:


- mock data:

Test:
- After the creation of new attributes, we can change the address by calling up the person perspective via the menu entry of the person administration:
- Call up the Person Administration menu.
- open the employee perspective:
- on the left side is the table of all persons.
- on the right side is the persons dialog.
- open the employee perspective:
- Edit a person.
- Select an existing and already created person from the person table on the left side of the perspective.
- Change the corresponding address attributes street, city, postal code (postal_code) and country in the person dialog on the right side of the perspective.
- Select an existing and already created person from the person table on the left side of the perspective.
- Save the changed personal data.

Search person with full-name
Target:
Introducing a text search field and a function within the EntityDSL instance.
Requirement:
As a user of the OS.bee application, I want to find a person through a name-search.
User Task & User Story:


Process:
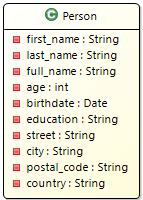
The full-text name search for a person requires a new attribute which show the full name (Person.full_name) of a person. This full name should be filled by a function from the attributes first name (Person.first_name) and last name (Person.last_name) during the creation or modification.
- Creation of the new attribute full name (full_name) as search text field.
- Creation of the function full_name_function as extension of the entity Person.
Detail implementation:
- Creating the new attribute full name (full_name) as an extension of the entity Person.
- Edit the EntityDSL model (My1app.entity).
- Add attribute full name (full_name) as variable of entity Person.
- Define the full name field as search text field using keyword domainKey.
- new graphic view of entity Person:
- Edit the EntityDSL model (My1app.entity).


- mock data:
- To make the using of this tutorial easier, the corresponding full name data in the Person-Data-Object are already exist by the installation of My1App. You only need to add the full name attribute in the Person Mock Entity.

- Creating the new function full_name_function as an extension of the entity Person, which fill the full name(full_name) from the first name(first_name) and last name (last_name).
- Edit the EntityDSL model(My1app.entity).
- Add the function full_name_function as a process of the entity Person.
- Fill the function with the annotations @javax.persistence.PrePersist and @javax.persistence.PreUpdate so that the content of the full name (full_name) will be filled when the attributes first name (first_name) and last name (last_name) are created or changed.
- Edit the EntityDSL model(My1app.entity).

Test:
- After the creation of new attributes and functions, we can test the functionalities by calling up the person perspective via the menu entry of the person administration.
- The full name should be filled from the first name and surname of a person .
- Call up the Person Administration menu.
- Open the employee perspective:
- On the left side is the table of all persons.
- On the right side is the persons dialog.
- Open the employee perspective:
- Edit a person.
- Select an existing and already created person from the person table on the left side of the perspective.
- Change the corresponding name attributes first name (first_name) and last name (last_name).
- Select an existing and already created person from the person table on the left side of the perspective.
- Save the changed personal data.
- In the full name (full_name) field, the changed name appears.
- Call up the Person Administration menu.
- The full-text-name search of a person by calling up the person perspective via the menu entry of the person administration.
- Call up the Person Administration menu.
- Open the employee perspective:
- On the left side is the table of all persons.
- On the right side is the persons dialog.
- Open the employee perspective:
- Find a person.
- Enter the search term (name part) in the search field (full_name) in the persons dialog, and then all matching names will be shown as suggestion.
- Select the name you want from the suggested names.
- Call up the Person Administration menu.

Establish current age
Target:
Introducing a transient attribute for entities and creating an individual data type.
Requirement:
As a user of the application, I would like to get the person's current age up-to-date, instead of always manually updating it.
User Task & User Story:

Process:
The age of a person (Person.age) should be always calculated from the date of birth and no longer be provided from the database as a fixed persisted value which must be manual-maintained regularly. Age is a transient attribute.
- Make a transient attribute from the existing attribute age, and it should be not persisted in the database and its content will be always calculated from the attribute birthdate.
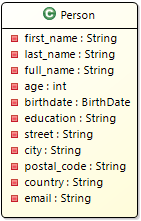
- In addition, we change the existing data type Date to the individual data type of date Birthday (Birthdate), which in the future must not equals to zero and is only accurate to the day. It eliminates the time information.
Detail implementation:
- Change the existing data type Date to the individual date data type Birthday (Birthdate), which in the future must not equals to zero and is only accurate to the day without time information.
- Edit the DatatypeDSL model (My1app.datatype).
- Add a new custom date type Birthdate.
- Edit the EntityDSL model(My1app.entity).
- Change the data type of the existing birthday attribute birthdate from data type Date to the new data type Birthdate.
- Edit the DatatypeDSL model (My1app.datatype).


- The representation format of birthday without time information should be changed in the person table. We do this in the TableDSL.
- Edit the TableDSL model(My1app.table).
- Extending the table Person with a format SHORTDATE for the values of birthday (birthdate).
- Edit the TableDSL model(My1app.table).

- Make a transient attribute from the existing attribute age, which is not persisted in the database and its content is always calculated from the attribute birthdate.
- Edit the EntityDSL model(My1app.entity).
- Change the existing persistent attribute age to a transient attribute.
- Change the keyword var in derived.
- The calculated current age is implemented as its return value.
- new graphic view of entity Person:
- Change the existing persistent attribute age to a transient attribute.
- Edit the EntityDSL model(My1app.entity).


- mock data:
- The age is no longer a persisted value , but is calculated from other data.
- As a result, no mocking data is required and everything related to the attribute age (Person.age) can be deleted from the EntityMockDSL instance.
Test:
To test the current age of a person, the person perspective must be called up via the menu entry of the person administration
- Call up the Person Administration menu.
- Open the employee perspective:
- On the left side is the table of all persons
- On the right side is the persons dialog.
- Open the employee perspective:
- Edit a person.
- Select an existing and already created person from the person table on the left side of the perspective.
- Change the birthday (birthdate) to the new format of the birthday without time information in the dialog.
- You can also change the birthday (birthdate) to the new format of the birthday without time information only in the table.
- Select an existing and already created person from the person table on the left side of the perspective.
- Save the changed personal data.
- In the field age, the current age appears.


Add profile photo
Target:
Introducing the DataTypeDSL instance by creating its own data type and using a blob object.
Requirement:
As an administrator, I want to see the profile photo for each person, and I also would like to be able to maintain it.
User Task & User Story:

Process:
If you want to maintain a profile photo, you should first have it. To create a profile photo, we should create a new attribute portrait. This attribute has an individual data type BlobMapping for the use of images, which builds on an existing data type, but with additional information (properties).
- Creation of the new data type Blobmapping.
- Creation of the new attribute portrait as an extension of the entity Person.
Detail implementation:
- Creation of the new data type Blobmapping.
- Edit the DataTypeDSL model (My1app.datatype). (more information about datatype you can find here)
- Add a new data type Blobmapping.
- Edit the DataTypeDSL model (My1app.datatype). (more information about datatype you can find here)

- Creation of the new attribute portrait as an extension of the entity Person.
- Edit the EntityDSL model (My1app.entity).
- Add the attribute portrait as a variable of the entity Person.
- new graphic view of entity Person:

- Edit the EntityDSL model (My1app.entity).


- mock data:
- To make the using of this tutorial easier, the portrait data in the Person-Mock-Data-Object are already exist with installation of My1App. You only need to add the added portrait attribute in the Person Mock Entity.

Test:
After the creation of new data type and new attribute, we can test the functionalities by calling up the person perspective via the menu entry of the person administration.
- Call up the Person Administration menu.
- Open the employee perspective:
- On the left side is the table of all persons.
- On the right side is the persons dialog.
- Open the employee perspective:
- Edit a person.
- Select an existing and already created person from the person table on the left side of the perspective.
- Change the profile photo (portrait).
- Select an existing and already created person from the person table on the left side of the perspective.
- Save the changed personal data.

Add gender
Target:
Introducing how to use the functions by the properties attribute within the EntityDSL instance and how to creating a function within the FunctionLibraryDSL instance and how to use it in the EntityDSL instance via the properties attribute.
Requirement:
As an administrator, I want to arrange all people with their gender.
User Task & User Story:

Process:
First of all, a new attribute gender must be created for maintaining of the gender. To maintain the gender, we need to select one from two predefined genders, male (M) or female (W). These string values (M or W) are persisted, but on the application user interface (UI) they will be represented by images.
For the selection of gender on the UI, a new function getImagePickerMap has to be created.
- Creation of a new function getImagePickerMap in FunctionLibraryDSL.
- Creation of a new gender attribute as an extension of the Person entity in EntityDSL.
Detail implementation:
- Create the new function getImagePickerMap in a new subgrouping ComboBox.
- Edit the FunctionLibraryDSL model (my1app.functionlibrary).
- Creating the grouping ComboBox and the function getImagePickerMap.
- The string values M & F are linking to "gender_male" and "gender_female", the strings "gender_male" & "gender_female" are the names of related PNG icons that are used to represent the gender.
- These PNG icons are already available by the installation of OS.bee.
- Edit the FunctionLibraryDSL model (my1app.functionlibrary).

- Creation of the new gender attribute as an extension of the Person entity.
- Edit the EntityDSL model (my1app.entity).
- Add the gender attribute as a variable of the Person entity.
- new graphic view of entity Person:
- Edit the EntityDSL model (my1app.entity).


- mock data:
- To make using this tutorial easier, the gender data in the Person-Mock-Data-Object is already created by installation of My1App. You just need to add the gender attribute in the Person Mock Entity.

Test:
After the creation of new attribute and function, we can test the functionalities by calling up the person perspective via the menu entry of the person administration.
- Call up the Person Administration menu.
- Open the employee perspective:
- On the left side is the table of all persons.
- On the right side is the persons dialog.
- Open the employee perspective:
- Edit a person.
- Select an existing and already created person from the person table on the left side of the perspective.
- Change the gender.
- Select an existing and already created person from the person table on the left side of the perspective.
- Save the changed personal data.

Add marital status
Target:
Introducing the Enum object within EntityDSL Instance by creating such an Enum object.
Requirement:
An administrator wants to assign each person with their marital status.
User Task & User Story:

Process:
For maintaining the marital status, a new attribute marital status (marital_status) has to be created. The marital status is one of three pre-defined values: SINGLE, MARRIED or DIVORCED. These values should be pre-defined in an Enum MaritalStatus. For the selection, we need to create a combo-box. Its elements are the three predefined values( SINGLE, MARRIED and DIVORCED) and an icon for each value before them.
The path to the corresponding icon is the path to the currently used theme and the name of the icon is composed as follows:
<EnumName>.<EnumWert>.image.png
So the names of the icons in this example are as the following:
MartialStatus.SINGLE.image.png
MartialStatus.MARRIED.image.png
MartialStatus.DIVORCED.image.png
These icons should be created and suitable to add to the application as an EnumComboBox.
- Creation of the new Enum MaritalStatus.
- Creation of the new attribute marital status (marital_status) as an extension of the entity Person.
- Creation of the Enum Icons MartialStatus.SINGLE.image.png, MartialStatus.MARRIED.image.png and MartialStatus.DIVORCED.image.png.
- Add the new-created icons to the application.
Detail implementation:
- Creation of the new Enum MaritalStatus.
- Edit the EntityDSL model (my1app.entity).
- Defining the Enum MaritalStatus with three values: SINGLE, MARRIED and DIVORCED.
- new graphic view of Enum MaritalStatus:
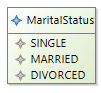
- Edit the EntityDSL model (my1app.entity).


- Creation of the new attribute marital status(marital_status) as an extension of the entity Person .
- Edit the EntityDSL model(my1app.entity).
- Add marital_status attribute as new attribute of entity Person .
- new graphic view of entity Person:
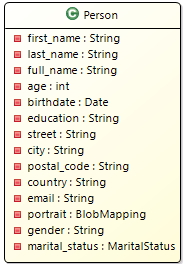
- Edit the EntityDSL model(my1app.entity).


- Creation of the Enum Icons MartialStatus.SINGLE.image.png, MartialStatus.MARRIED.image.png and MartialStatus.DIVORCED.image.png.
- Add the new-created icons to the application.
- Create your own fragment-bundle
org.eclipse.osbp.mythemeswithorg.eclipse.osbp.themesas the host bundle. - Creation of a theme-corresponding Vaadin Icon subdirectory
/org.eclipse.osbp.mythemes/VAADIN/themes/osbp/icon. - Copy the PNG files into this subdirectory.
- Create your own fragment-bundle
- mock data:
- To make using this tutorial easier, the marital status data in the Person-Mock-Data-Object is already exist with installation of My1App. You only need to add the added marital status attribute in the Person Mock Entity.

Test:
After the creation of new attribute and function, we can test the functionalities by calling up the person perspective via the menu entry of the person administration.
- Call up the Person Administration menu.
- Open the employee perspective:
- On the left side is the table of all persons.
- On the right side is the persons dialog.
- Open the employee perspective:
- Edit a person.
- Select an existing and already created person from the person table on the left side of the perspective.
- Change the marital status.
- Select an existing and already created person from the person table on the left side of the perspective.
- Save the changed personal data.

Administration of employee data
Create new entity of employee
Target:
Introducing the inheritance by creating a new entity which inherits from the existing entity and how to present this in the application.
Requirement:
As a manager position, I would like to manage employees.
Process:
To fulfill the requirements of the employee use case, an additional entity Employee has to be created. The entity Person already exists in My1App. It is a general model that serves as the basic of different roles which any person can take. So the new model employee can build basic of the model person and fully reuse its attributes, it makes sense to let entity Employee to inherit all the properties of entity Person.
Additional attributes will further clarify the person's role as an employee.
If we just add these attributes to the existing entity Person, then the entity Person could no longer serve as the basic for other person's roles, such as contacts of a connected organization, even though they share the same characteristics of person. Employee is a specialization of person. Conversely, person is generalization of employee.
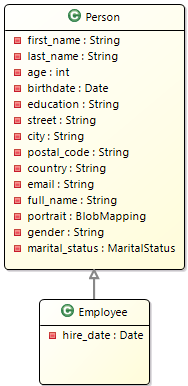
The entity Person is so called SuperTyp and the entity Employee is a SubTyp.
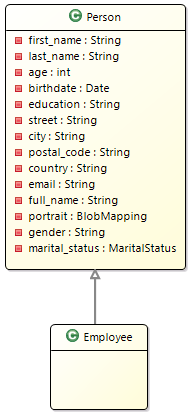
- Creation of the new entity Employee as an extension of entity Person.
Due to inheritance, the existing UI elements of Person (Table, Dialog, Perspective and Menu) can also be used for the new Entity Employee.
Detail implementation:
- Creation of the new entity Employee as an extension of entity Person .
- Edit the EntityDSL model (my1app.entity).
- Define the entity Employee.
- Edit the EntityDSL model (my1app.entity).

- new graphic view of entity Person and entity Employee:

Hire employee
Target:
The extension of the new inheriting entity with a new attribute.
Requirement:
As a manager position, I would like to hire a new employee.
User Task & User Story:

Process:
'
To hire an employee, a hire date (Employee.hire_date) must be set. This is a new attribute for the entity Employee and an extension of its Basic Entity (SuperType) Person.
- Creation of the new attribute hire date (hire_date) as an extension of the entity Employee.
Detail implementation:
- Creation of the new attribute hire date (hire_date) as an extension of the entity Employee.
- Edit the EntityDSL model (my1app.entity).
- Add the attribute hire date (hire_date) as a variable of the Employee entity.
-

- new graphic view of entity Person and entity Employee:
-
- Edit the EntityDSL model (my1app.entity).


- mock data:
- Create new Object employeeObject with attribute hire_date and the added hire_date attribute to Employee Mock Entity which is based on Person Mock Entity.


Test:
After the creation of new attribute, we can test the functionalities by calling up the employee perspective via the menu entry of the employee administration.
There may be two different initial states for performing the use case. The employee to be hired may be either not yet exist in the system, then at first create him in the system; or he already exists, then select him and edit the data of employee.
- Call up the Employee Administration menu.
- Open the employee perspective:
- On the left side is the table of all employee.
- On the right side is the employee dialog.
- Open the employee perspective:
- Edit the employee.
- Create a new employee.
- Enter the personal information.
- Set the hire date (Employee.hire_date) with today's date.
- If necessary, set the hire date in the future.
- or
- Select an existing and already created employee from the employee table on the left side of the perspective.
- If necessary, change the personal data.
- Set the hire date.
- Create a new employee.
- Save the changed employee data.

Dismiss employee
Increase salary of employee
Assign employee
Transfer employee
Evaluate employee
Copyright Notice
All rights are reserved by Compex Systemhaus GmbH. In particular, duplications, translations, microfilming, saving and processing in electronic systems are protected by copyright. Use of this manual is only authorized with the permission of Compex Systemhaus GmbH. Infringements of the law shall be punished in accordance with civil and penal laws. We have taken utmost care in putting together texts and images. Nevertheless, the possibility of errors cannot be completely ruled out. The Figures and information in this manual are only given as approximations unless expressly indicated as binding. Amendments to the manual due to amendments to the standard software remain reserved. Please note that the latest amendments to the manual can be accessed through our helpdesk at any time. The contractually agreed regulations of the licensing and maintenance of the standard software shall apply with regard to liability for any errors in the documentation. Guarantees, particularly guarantees of quality or durability can only be assumed for the manual insofar as its quality or durability are expressly stipulated as guaranteed. If you would like to make a suggestion, the Compex Team would be very pleased to hear from you.
(c) 2016-2026 Compex Systemhaus GmbH