Datainterchange DSL
Contents
- 1 Purpose
- 2 Overview
- 3 Data Interchange Model File
- 4 TriggerView
- 5 Smooks Configuration and Settings File
- 6 Copyright Notice
Purpose
The Data Interchange DSL (datainterchange for short) is made for defining data exchange models that can be used to import data from various formats (CSV, XML, EDI, etc.), map the data to entities, store them into database, or export them back into other formats.
You only need to define the relationship between the file and the bean, not the import / export process themselves. Once defined, these models can be used in e.g. action DSL to define actions which, when triggered, execute the actual import / export process, which are generated automatically by the OSBP based on the model.
Overview
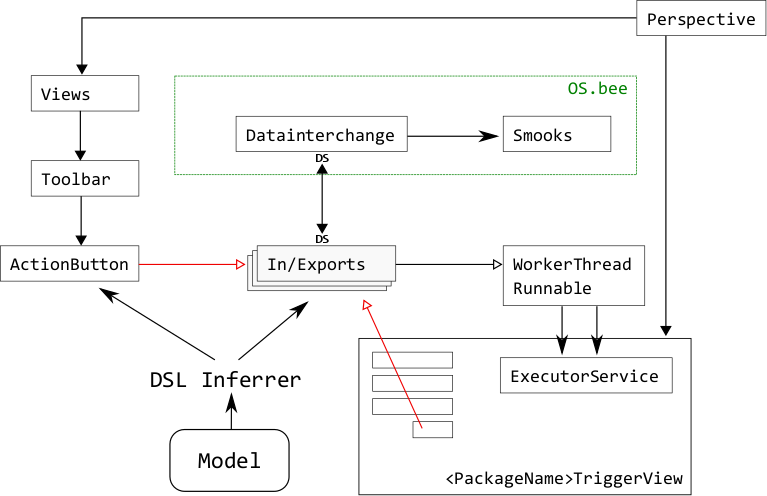
As shown on the figure below, the [DSL Inferrer] will generate various views and In/Export component according to model described by datainterchange DSL (and action DSL, in the case of ActionButtons). The action buttons, when clicked, will trigger their corresponding In/Export processes by putting WorkerThread (Runnable) jobs into the executor job pool within the TriggerView (prefixed with datainterchang name), buttons (and toolbar / menus containing them) are further included in the perspective.
Data Interchange Model File
Datainterchange DSL model files end with the .data extension. Data Interchange models may be split into several .data files, as long as they have the same package declaration.
In the following we will dive deeper into the description and the usage of Datainterchange related and reserved keywords.
import
In the import section are all entities to be found - as full qualified names – that are currently used in the DSL.
► Example:
import ns net.osbee.sample.foodmart.entities.Mstore
import ns net.osbee.sample.foodmart.entities.Mwarehouse
import ns net.osbee.sample.foodmart.entities.Mregion
Note that ns is a mandatory keyword (stands for "namespace") that comes after import for distinguishing the OS.bee internal namespaces and Java library namespaces. Wildcards are not supported, all names should be imported separately. Note that the import section will be imported/added automatically if they are used in the package, so you don't have to manually manage this section.
package
Datainterchange DSL model files must start with a package declaration. Packages are the root element of the DSL and should be defined as <ApplicationName>.datainterchanges.
► Example:
package net.osbee.sample.foodmart.datainterchanges { }
Data Interchange models may be split into several .data files, as long as they have the same package declaration, the interchanges will be available under this package name.
title
With the keyword title you can give a name to the corresponding TriggerView dialog inside your application. For example, the definition of the same datainterchanges package from above with title "Data Interchange Example":
► Example:
package net.osbee.sample.foodmart.datainterchanges title "Data Interchange Example" {}
This title will be translated based on locale.
You can get more details about the TriggerView in the section below.
interchange
The interchange keyword defines interchange units for entities in the package, it should be in the form of:
► Example:
interchange <InterchangeUnitName> [describedBy <description>] <EntityManagerMode> file <FileType> [<FileDetails>] path{
  ...
}
Where InterchangeUnitName being the name of the interchange unit; describedBy (optional) can be used to provide a short description string. EntityManagerMode being how the file should be handled (see section "persist, merge, remove" below), and after file keyword, you should specify the type of the source / target data file you would like to import from or export to, then the file path, and other details depends on the type.
The following example specifies an interchange that reads a CSV file under the specified path (note the forward slash as the path separator), delimited by semicolon, skip one line (the header), and treat the content as encoded in UTF-8:
► Example:
interchange CurrencyNames persist file
CSV "C:/data/ISOCurrencyCode20170101.csv" delimiter ";" skipLines 1 encoding "UTF-8"
path {
  ...
}
The path keyword comes after all the file specification and starts a block of entity definitions, which will be covered in section "entity".
describedBy
With this keyword you can the optional description of an interchange unit as shown below.
► Example:
interchange Currencies describedBy "european central bank currency exchange rates based on euro" persist ... { ... }
vectorName
With the optional keyword vectorName followed by a string value you are able to define the name of the root element of both XML configuration files needed by Smooks. Please note that it also means that the first (root-)element of an XML-File you would have exported (file filled with real data) via the application will have the same name.
► Example:
interchange Stores remove vectorName "stores" elementSize 83 file ... { ... }
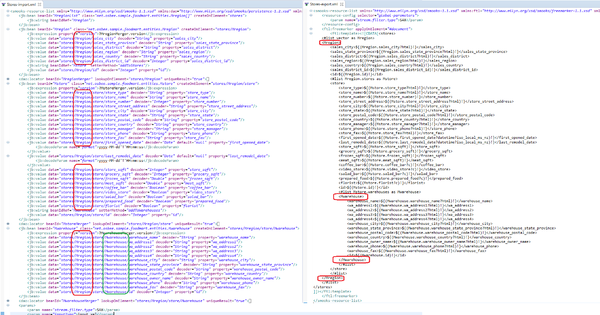
You can view the result of this sample of code like shown below on figure3.
persist, merge, remove
These keywords define the purpose of the datainterchange unit and has a similar meaning as in the JPA's EntityManager class. Basically, persist will insert the data records into database, merge will update existing data record, or insert new one if necessary, remove will remove the record if it could be found in database.
► Example 1: (persist)
interchange EDIOrders describedBy "Orders" persist file
XML "C:/data/orders.xml"
path {
  ...
}
► Example 2: (merge)
interchange Stores merge file
XML "C:/data/stores.xml"
path {
  ...
}
► Example 3: (remove)
interchange Storesremove remove file
XML "C:/data/stores_remove.xml"
path {
  ...
}
file
With the keyword file you are able to set the file format of the files you intent to process with you interchange unit.
► Syntax:
interchange <SampleInterchangeUnitName> <EntityManagerMode> file <FileNameFormat> {}
The current supported file formats are CSV, EDI and XML followed by the name of the file you want to process, given its full path location in the system.
interchange SampleInterchangeUnit1 merge file CSV "C:/temp/testFile.csv" {}
interchange SampleInterchangeUnit2 persist file XML "C:/temp/testFile.xml" {}
interchange SampleInterchangeUnit3 merge file EDI "C:/temp/testFile.edi" {}
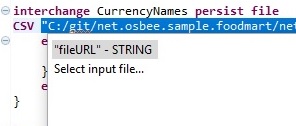
After choosing the file format you can either give the file name as a String value in a double quote "..." as shown here above, or press Ctrl+Space to get via the content assist the option of opening a File Chooser/Picker to specify the file you want to work with.
Please note that you can also change the path(?) of the file to process on runtime by selecting a new file.
new with OS.bee Softwarefactory 4.5.4
- Export
- The files created during export will be numbered in case the file already exists. E.g. the next exported "testFile.xml" will be named "testFile#1.xml" if "testFile.xml" is already in the target directory.
- The number of entries in a file can now be configured. The default ist 1000. The configuration can be done via a system configuration paramter corresponding each datainterchange definition. The configuration is created if it is not present and can be adjusted later.
- Import
- The import reads now files that follow a numbering scheme. E.g. "testFile.xml" as the default name is still read. In addition, files with the pattern "testfile#<number>.xml" are also processed. This allows to add new files into the directory althoug "old" files are still there or to split up files due to a huge the number of records that shall be processed.
- The import processes existing files after a system restart.
- Common
- Monitoring of the datainterchange work is now possible through the application frontend. Under Administration / monitoring, one can find a perspective that shows the datainterchange action. The entries are kept 7 days by default. The duration can be configured in the system configuration
mapByAttribute
The mapByAttribute keyword is an XML-specific keyword that turns on the automatic attribute mapping. When enabled, datainterchange will detect if the value being mapped is from an attribute. For example, the 'USD' value in the following XML file comes from the attribute 'currency' of the element 'Cube':
► Example:
<Cube currency='USD' rate='1.3759'/>
while in the following XML file, the same value is encapsulated in the element 'currency':
► Example:
<Cube>
 <currency>USD</currency>
 <rate>1.3759</rate>
</Cube>
When mapByAttribute is present, datainterchange will automatically decide that a query in the form like '/Cube/currency' will also catch the value from attribute. Without it, the query will have to put a '@' symbol in front of the attribute name, i.e. '/Cube/@currency'.
elementSize
With the keyword elementSize followed by an integer, the user can set the estimated average size of the elements in bytes. Since the underlying API cannot know the size of an element before it is processed, this value can be supplied as a guide value to be used for estimating the import / output progress based on how much bytes have been processed.
► Example:
interchange EDIOrders describedBy "edi orders" persist elementSize 50 file EDI "C:/data/orders.edi" path {
  ...
}
Defines an average estimated element size of 50 bytes.
delimiter
The delimiter is a CSV format-specific keyword, which defines the character to use in the CSV file to set the delimiter/separation character between different values. Default value is "," (comma).
► Example:
interchange CurrencyNames persist file
CSV "C:/data/ISOCurrencyCodes081507.csv" delimiter ";" ... {
  ...
}
will set the delimiter of the CSV file to ";".
skipLines
This is a CSV format-specific keyword. Using skipLines followed by an integer, the user can specify the number of lines to be skipped from the beginning in the processing of the selected file, this can be used to skip headers.
► Example:
interchange CurrencyNames persist file CSV "C:/data/ISOCurrencyCodes081507.csv" ... skipLines 1 encoding "UTF-8" {
   ...
}
will skip the first line of the CSV file.
report
If a datainterchange unit is defined with the report keyword, a report will be generated for data conversions. The report file is generated by Smooks, lies under /smooks output directory of the datainterchange bundle, and has a name in the form like <DataInterChangeName>-input.xml for input processes, and <DataInterChangeName>-output.xml for output processes. Note: turn on report will have an impact performance.
indent
The indent is a CSV-format specified keyword which adds indentation character data to the generated event stream. This simply makes the generated event stream easier to read in its serialized form and generally should only be used in testing.
quoteCharacter
The quoteCharacter is a CSV format-specific keyword, which defines the character to use in the CSV file to identify values.
encoding
With the keyword enconding followed by the encoding name as a string value you are able to specify the valid encoding of the file content.
► Example 1:interchange SampleInterchangeUnitName merge elementSize 50 file CSV "C:/temp/testFile.csv" delimiter ";" skipLines 1 encoding "UTF-8"{}
interchange SampleInterchangeUnitName remove elementSize 50 file CSV "C:/temp/testFile.csv" delimiter ";" skipLines 1 encoding "GB18030"{}
interchange SampleInterchangeUnitName persistelementSize 50 file CSV "C:/temp/testFile.csv" delimiter ";" skipLines 1 encoding "ISO-2022-JP"{}
mappingModel
The mappingModel keyword is an EDI-specific keyword which can be used to specify an EDI to XML mapping model in XML format for Smooks.
validate
The validate keyword is an EDI-specific keyword that...
path
The keyword path starts the series of entities. (Formerly, the keyword was named beans. The name "bean" comes from the internal entities called JavaBean, which act as data containers.)
entity
With the entity keyword followed by a fully qualified name, the user can specify the mapping between a source data file and a data-containing entity. The behavior of the mapping can be further fine-tuned with the keywords discussed below. While these keywords can theoretically be combined all together and create very complicated behavior, they are normally used in a simple and straight forward way.
The general form of entity keywords is:
► Syntax:
entity <ID>
    [nodeName <node-name>]
    [createOn <element-map>]
    [marker <property-name>]
    [expression '{' <expressions> '}']
    [lookup '{' <lookup-rules> '}']
    [format '{' <formats> '}']
    [mapping '{' <mappings> '}']
    [keys '{' <lookup-keys> '}']
;
The order of the keywords is fixed, i.e. they are all optional, but must appear in the given order.
nodeName
With the optional keyword nodeName followed by a string you can specify the name (alias) of corresponding elements inside an (XML) input/output configuration file. This name is used to identify entities within an XML file using the NodeModel of Freemarker instead of using the standard Java Object Model name. For example:
► Example:
interchange Stores remove vectorName "stores" elementSize 83 file XML "C:/.../net.osbee.sample.foodmart/net.osbee.sample.foodmart.datainterchange/smooks-resources/stores.xml" path {
	entity Mregion nodeName    "region"
	entity Mstore nodeName     "store"
	entity Mwarehouse nodeName "warehouse"
}
The result from this example code is the generation of Smooks configuration files, in which the structure of the output data file (order of elements) will be the same as declared inside the path {...} expression block. The alias you have specified after the keyword will be used as element (entity) name inside the XML files.
The use of this keyword gives you the flexibility of naming entities using aliases in order to match any third part system description. By omitting the definition of both aliases region and warehouse like shown below, we obtain slightly divergent but very different contents than the ones from above.
► Example:
interchange Stores remove vectorName "stores" elementSize 83 file XML "C:/.../net.osbee.sample.foodmart/net.osbee.sample.foodmart.datainterchange/smooks-resources/stores.xml" path {
	entity Mregion
	entity Mstore nodeName     "store"
	entity Mwarehouse
}
Please note that the declaration order of each node names matters.
createOn
The createOn keyword followed by a string specifies on which input element should an entity to be created. For example:
► Example:
entity Mcurrency createOn "/Envelope/Cube/Cube/Cube" ... {
    ...
}
will create an Mcurrency entity when encountering /Envelope/Cube/Cube in the source data file.
latestImport / latestExport
With latestImport keyword optionally followed by a property-name, the user can set the data to be imported to have an additional property under the given name whose value set to 1, while updating the existing data to have this property having value 0. This could be useful to identify the most recent import of some periodically updated data. For example:
► Example:
entity McurrencyStream createOn "/Envelope/Cube" latestImport latest expression {
	...
}
will make the entity McurrencyStream to have a property "latest", which is to be set to 1 for the most recently imported data.
Keyword latestExport works analogous.
expression
With an expression { ... } block, the user can define expressions that assign certain value to an entity property. These expressions are of two types, the first one is:
► Syntax:
assign <id> with <value> as <type>
this will assign the property id with the value of value, in type of type. The value may be one of the following:
-
NowDate: the date of now (the time point of action) -
StartDate: the date when the process started -
UniversallyUniqueIdentifier: an UUID
and type may be one of the following:
-
Date: the value of NowDate or StartDate will be in date format -
Milliseconds: the value of NowDate or StartDate will be in millisecond -
Nanoseconds: the value of NowDate or StartDate will be in nanosconds -
Random: the value of UUID will be random -
ExecuteContext: the value of UUID will be unique for the execute context
Note that the Random and ExecuteContext should be only combined with UniversallyUniqueIdentifier, while the other types should be only combined with NowDate or StartDate.
► Example:
  entity McurrencyStream createOn "/Envelope/Cube" marker latest expression {
      assign importDate with NowDate as Date
  }
will assign the importDate as the current date in Date format.
The other type of expression has the form:
► Syntax:
copy <target-property> from <entity-name> property <from-property>
which will copy the value of from-property from the entity-name to target-property.
► Example:
  entity Mcurrency createOn "/Envelope/Cube/Cube/Cube" expression {
      copy currencyDate from McurrencyDay property ratingDate
  }
will copy the value of ratingDate from McurrencyDay entity to currencyDate.
lookup
With a lookup { ... } block, the user can define a set of lookup-rules to identify complex data within our persistence layer (DB or In-Memory...). This makes sense when the data in a source file can't be clearly identified by an attribute (id), but moreover when the set data it contains is persisted over several entities.
► Syntax:
lookup {
   [<lookup-rules>]*
}
Lookup-rule expression:
lookup-rule:
 'for' .. 'on' .. 'createOn' .. 'with' .. 'cacheSize' .. 'mapTo' .. ['allowNoResult' | 'allowNoResult' | 'markerPath']
► Example:
interchange Currencies describedBy "european central bank currency exchange rates based on euro" persist elementSize 50 file
	XML "C:/git/development/net.osbee.sample.foodmart/net.osbee.sample.foodmart.datainterchange/smooks-resources/eurofxref-hist-90d.xml"

	mapByAttribute path {
		entity McurrencyStream createOn "/Envelope/Cube" marker latest expression {
			assign importDate with NowDate as Date
		}
		entity McurrencyDay createOn "/Envelope/Cube/Cube" format {
			for ratingDate coding "yyyy-MM-dd"
		}
		mapping {
			map ratingDate to "time"
		}
		entity Mcurrency createOn "/Envelope/Cube/Cube/Cube" expression {
			copy currencyDate from McurrencyDay property ratingDate
		}
		lookup {
			for currency_name on McurrencyName createOn "/Envelope/Cube/Cube/Cube" with isoCode cacheSize 300 mapTo "currency" allowNoResult
			markerPath {
				markerEntity McurrencyNameStream markedBy latest
			}
		}
		mapping {
			map conversion_ratio to "rate"
		}

}
We will provide you in upcoming releases with more information about so called locator instances, which are generated in the background on the basis of the lookups you would have defined, in order to query persisted data. This will give you more insights about how the Datainterchange DSL really works at the lower level.
format
With a format { ... } block, the user can define the format of the entity property being converted. A format block can have more than one format definitions, in the following format:
► Syntax:
    format {
        for <property> coding <format-string> [locale <locale-string>]
        ...
    }
► Example:
    entity McurrencyDay createOn "/Envelope/Cube/Cube" format {
        for ratingDate coding "yyyy-MM-dd"
    }
will convert the "/Envelope/Cube/Cube" data to ratingDate property of McurrencyDay in format "yyyy-MM-dd", where
► Example:
    entity EDIOrderHeader createOn "/Order/header" format {
        for hdrDate coding "EEE MMM dd HH:mm:ss zzz yyyy" locale "en_US"
    }
will format the hdrDate in format "EEE MMM dd HH:mm:ss zzz yyyy" with English locale, i.e. the month and weekday names will be in English.
expose
With a expose { ... } block, when and only when exporting an entity, the user can expose properties of its referenced entity. A expose block can have more than one expose definitions, in the following syntax format:
► Syntax:
    expose {
        ref <EntityReference>
            on <EntityAttribute>
          | subExpose
        ...
    }
subExpose has the same syntax format as expose, which is:
    expose {
        ref <EntityReference>
            on <EntityAttribute>
          | subExpose
        ...
    }
► Example:
Entities are defined as following:
entity CashSlip {
     ...
     var boolean payed
     ref cascade CashPosition[ * ]positions opposite slip
     ref Mcustomer customer opposite slips  }
entity Mcustomer extends BaseID {
     ...
     var long account_num
     var String name
     ref Mregion region opposite customers
     ref Msales_fact[ * ]sales opposite customer  }
In datainterchange DSL, when exporting entity "CashSlip", the user can use "expose" keyword to export the "account_num" property of "Mcustomer" referenced here as "customer". And sub-reference of the reference can also be exported. In the following example, the "region" reference (of entity "Mregion") in "Mcustomer" has a property "sales_city", it is also exported.
interchange CashSlip describedBy "CashSlip" merge vectorName "cashslip" file XML "C:/MC/cashdata.xml" encoding "UTF-8"
     path {
         entity CashSlip

         expose {
             customer on account_num
             customer expose {
                 region on sales_city
             }
         }
     }
In the generated Smooks config XML, the section will look like this:
<account_num>${(CashSlip.customer.account_num)!}</account_num>
And the sub-expose part looks like this:
<sales_city>${(CashSlip.customer.region.sales_city)!}</sales_city>
- This recursive-export can go as many levels as the user want.
mapping
With a mapping { ... } block, the user can easily map (or rather match) attributes of the data model to values from external source files.
► Syntax:
mapping {
 [map <entity-attribute> to <Data>]*
 [mapBlob <entity-attribute> to <Data> [extension <blob-file-extension] [path <blob-path>] mimeType <mine-type> ]*
}
► Example:
mapping{
  map conversion_ratio to "rate"
  mapBlob currency_icon to "currency_icon" extension "png" path "C:/data/currency_images" mimeType png
}
The first map of the above example will map the attribute conversion_ratio of the entity to field "rate". The second mapBlob does a bit more work, it will:
 * generate full file paths by combining the path, the file names specified by "currency_icon" field, and the extension,
 * upload the files into database with the given mimeType, and
 * assign the UUID of the blob to property currency_icon of the entity.
Please note that the only valid attributes here are the members of the corresponding entity, which the user has chosen prior defining the mapping block itself.
keys
With a keys { ... } block, the user can define a set of keys to identify data within our persistence layer (DB or In-Memory...).
This makes sence when the data in a source file can't be clearly identified by an attribute (id). Therefore a set of attributes (keys) can be defined and then be used as identification parameter set by a lookups instance in order to query our data pool and identify data using several criteria.
► Syntax:
keys {
 [key <entity-attribute>]*
}
Assuming you try to update the address data of an employee from an entity named Employee, but you happen not to have his/her personal id. By setting a keys { ... } block, like shown here below, you allow the Datainterchange unit to look into the database after employee's data based on the key set inside this block, rather than using a personal id, which might have been here unique and more than enough to find the employee right away.
► Example:
keys {
  key last_name
  key first_name
  key age
}
Please note that the only valid attributes here are members of the corresponding entity, that you would have chosen prior defining the keys block itself.
TriggerView
A TriggerView will be automatically generated by the DataInterchange DSL as soon as you define an interchange unit inside the model file and save it.
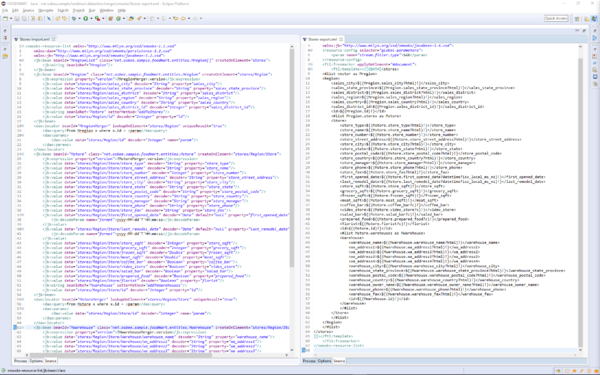
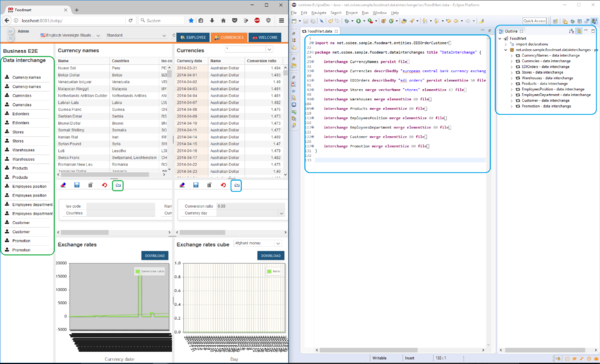
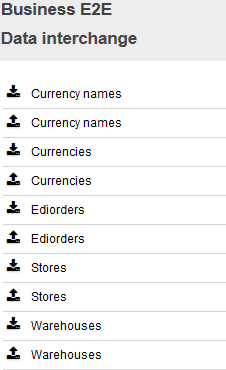
You can see on the right side of the figure shown below, the definition of 10 interchange units within the Datainterchange model file (blue rectangles); and on the right side of the figure you can see, how the TriggerView looks like (green rectangle), when it is embedded inside an application page in its entirety.
To achieve this result you need to do two simple steps. You need first to either integrate the TriggerView into an existing perspective or create a new perspective and then integrate the view into it, like shown below.
► Example 1:
import ns net.osbee.sample.foodmart.datainterchanges
...

package net.osbee.sample.foodmart.perspectives {

	perspective Currencies iconURI "employee" {
		sashContainer c1 orientation horizontal {
			part imex view dataInterchange datainterchanges spaceVolume "20"
			...
		}
	}
}
The most important thing in this example is to notice the use of the keyword view followed by the keyword dataInterchange and the name datainterchanges referring to the package, in which all datainterchange unit definitions have to be found.
The second step would be to create a menu entry for you to be able to access the newly created or altered perspective in the application via the menu bar, like shown in the following example.
► Example 2:
import ns net.osbee.sample.foodmart.perspectives.Currencies
...

package net.osbee.sample.foodmart.menues {
	...
	entry Menu describedBy "my menu" {
		entry Perspectives {
			entry MasterData {
				entry Company image "company" perspective Company
				entry Employees image "employee" perspective Employee
				entry Products image "products" perspective Products
				entry CashRegisterData image "editor_area" perspective CashMasterDataRegister

				entry Currencies image "products" perspective Currencies

				entry People image "task_action_delegate" perspective PeopleMock

			}
		...
	...	}
	}

}
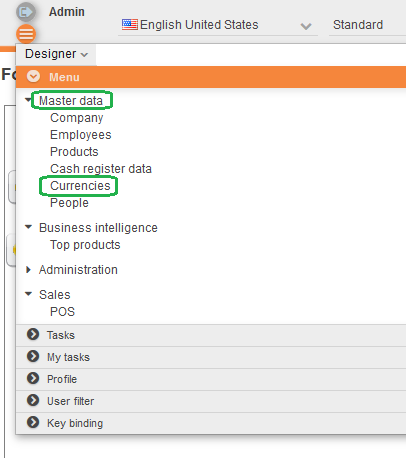
The figure above shows the same menu structure defined in the example 2 and results in showing the application with the TriggerView, as you can see on the left side of the figure 5. You can get and review more information on how to create menu entries and perspectives in both Menu DSL and Perspective DSL documentation pages.
Among all the components that are generated for the use of each interchange unit functions are action buttons, you would find inside toolbars in some dialogs. Usually you have to define them by yourself in the corresponding DSL files. This step is not needed here, since it has already been generated for this particular view.
Please note that it is not mandatory to display all available functionalities through the use of the TriggerView like shown here above. It is customary to only use parts of the generated Datainterchange components (e.g. action buttons) where you see them fit; for instance in order to only use each interchange unit functionalities (import and/or export) in separated and dedicated views (dialogs). Therefore, we also recommend you to have a look at the Action DSL documentation page in order to understand how to create your own toolbars, and so forth creating the buttons using import or export functions of any datainterchange unit you would have created.
Smooks Configuration and Settings File
Please note that whenever a model is saved, the Datainterchange DSL will do three things automatically:
- generate Java classes,
- generate Smooks configuration files for both import and export functions, and
- generate a config file to modify the import and export paths on runtime.
Smooks Configuration File
The OS.bee implementation of Data Interchange interface is based on Smooks. Smooks is a Java framework for processing XML and non XML data (CSV, EDI, Java etc) by mapping data to JavaBeans, which can later be persisted, enriched (merge with existing data from other source), or converted and exported into other formats.
Smooks relies on a proper configuration file for the import / export processes. These configuration files are generated by the Datainterchange DSL automatically. Here is a brief introduction of how the generated Smooks configuration files work.
When a data import / export Smooks instance is initiated, it will be supplied with the generated config file. This file defines the actions to be performed upon certain events during the SAX parsing process. Here is an example:
 1 <?xml version="1.0" encoding="UTF-8" standalone="no"?>
 2 <smooks-resource-list xmlns="http://www.milyn.org/xsd/smooks-1.1.xsd" xmlns:csv="http://www.milyn.org/xsd/smooks/csv-1.2.xsd" xmlns:dao="http://www.milyn.org/xsd/smooks/persistence-1.2.xsd" xmlns:jb="http://www.milyn.org/xsd/smooks/javabean-1.2.xsd">
 3     <jb:bean beanId="McurrencyNameStream" class="net.osbee.sample.foodmart.entities.McurrencyNameStream" createOnElement="/csv-set">
 4         <jb:expression property="importDate">PTIME.nowDate</jb:expression>
 5         <jb:wiring beanIdRef="McurrencyName" setterMethod="addToCurrencyNames"/>
 6     </jb:bean>
 7     <jb:bean beanId="McurrencyName" class="net.osbee.sample.foodmart.entities.McurrencyName" createOnElement="/csv-set/csv-record">
 8         <jb:value data="/csv-set/csv-record/isoCode" decoder="String" property="isoCode"/>
 9         <jb:value data="/csv-set/csv-record/name" decoder="String" property="name"/>
10         <jb:value data="/csv-set/csv-record/countries" decoder="String" property="countries"/>
11     </jb:bean>
12     <csv:reader fields="isoCode,name,countries" indent="false" separator=";" skipLines="1"/>
13     <params>
14         <param name="stream.filter.type">SAX</param>
15         <param name="inputType">input.csv</param>
16         <param name="smooks.visitors.sort">false</param>
17         <param name="input.csv" type="input.type.actived">C:/git/net.osbee.sample.foodmart/net.osbee.sample.foodmart.datainterchange/smooks-resources/ISOCurrencyCodes081507.csv</param>
18     </params>
19 </smooks-resource-list>
Further informations on the Smoooks framework are available and can be reviewed in its documentation you will find on the official website.
Path Config File
The file is interpreted using the Properties xml im- and export method and looks like this:
<?xml version="1.0" encoding="UTF-8" standalone="no"?>
<!DOCTYPE properties SYSTEM "http://java.sun.com/dtd/properties.dtd">
<properties>
<comment>dataInterchange file URLs</comment>
<entry key="EmployeesDepartment-import">C:/myimports/employeesdepartment.xml</entry>
<entry key="EmployeesDepartment-export">C:/myexports/employeesdepartment.xml</entry>
</properties>
By default this file is named like the title in the Data Interchange package and extended by "Config" and has the extension "xml":
package net.osbee.sample.foodmart.datainterchanges title "DataInterchange" {}
leads to the filename:
DataInterchangeConfig.xml
and is stored platform independently in the current user's home directory under the subdirectory ".osbee".
An administrator must receive this configuration file with the application, modify it and place it somewhere on the application server. The path to this configuration file must be supplied in the product's preferences (org.eclipse.osbp.production.prefs):
datainterchange/datainterchangeConfiguration=c\:\\DataInterchangeConfig.xml
The path value obviously depends on the operating system you are developing.
Further Reading
There is a lot of information to be found in the internet that describe the formal structure of the smooks configuration in any case. A very good one can be found at RedHat.
Copyright Notice
All rights are reserved by Compex Systemhaus GmbH. In particular, duplications, translations, microfilming, saving and processing in electronic systems are protected by copyright. Use of this manual is only authorized with the permission of Compex Systemhaus GmbH. Infringements of the law shall be punished in accordance with civil and penal laws. We have taken utmost care in putting together texts and images. Nevertheless, the possibility of errors cannot be completely ruled out. The Figures and information in this manual are only given as approximations unless expressly indicated as binding. Amendments to the manual due to amendments to the standard software remain reserved. Please note that the latest amendments to the manual can be accessed through our helpdesk at any time. The contractually agreed regulations of the licensing and maintenance of the standard software shall apply with regard to liability for any errors in the documentation. Guarantees, particularly guarantees of quality or durability can only be assumed for the manual insofar as its quality or durability are expressly stipulated as guaranteed. If you would like to make a suggestion, the Compex Team would be very pleased to hear from you.
(c) 2016-2026 Compex Systemhaus GmbH
