Difference between revisions of "OS.bee Documentation for Designer"
(→New ways to supply icons for enum literals) |
(→Execute something by pressing a toolbar button) |
||
| (59 intermediate revisions by the same user not shown) | |||
| Line 83: | Line 83: | ||
At the end of Chapter one there are some helpful hints to work with eclipse. To start with Eclipse and the SWF these hints could be very useful. | At the end of Chapter one there are some helpful hints to work with eclipse. To start with Eclipse and the SWF these hints could be very useful. | ||
* One more hint: to Use '''STRG-Shift-O''' to organize the import inside the DSL. | * One more hint: to Use '''STRG-Shift-O''' to organize the import inside the DSL. | ||
| + | |||
| + | |||
| + | ===Setup Foodmart MySQL database and data--PART1=== | ||
| + | |||
| + | Foodmart is a example application where all important modelling use-cases are used and where they can be tested. Foodmart data and entity-model was derived from the famous example of [https://mondrian.pentaho.com/documentation/installation.php#2_Set_up_test_data Mondrian Pentaho]. | ||
| + | |||
| + | This is a short introduction about how to configure a MySQL database and import Foodmart-data. | ||
| + | |||
| + | First of all you have to install an [https://dev.mysql.com/downloads/installer/ MySQL Server]. This introduction refers to '''version 5.7 of MySql for Windows'''. | ||
| + | |||
| + | |||
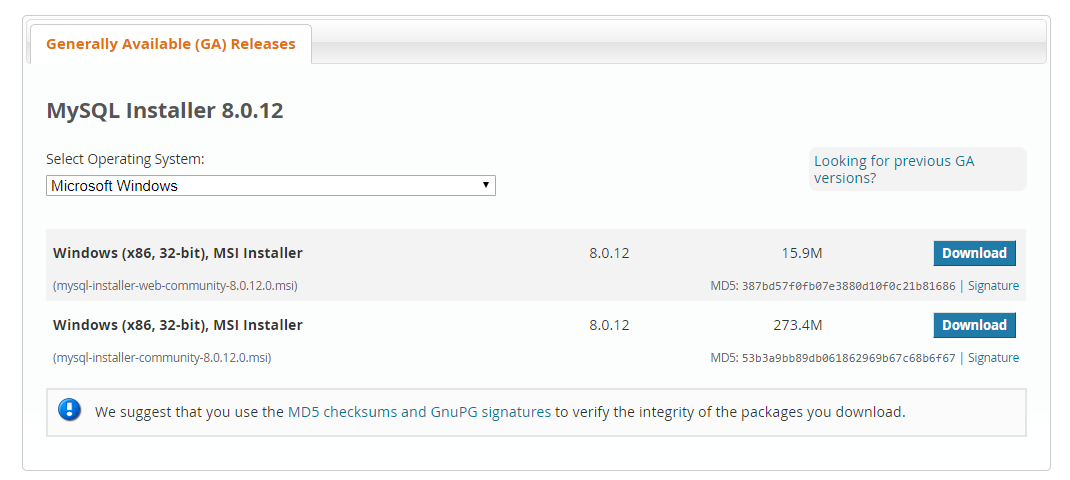
| + | [[File:Osb_MySQL_Installer_8012.png]] | ||
| + | |||
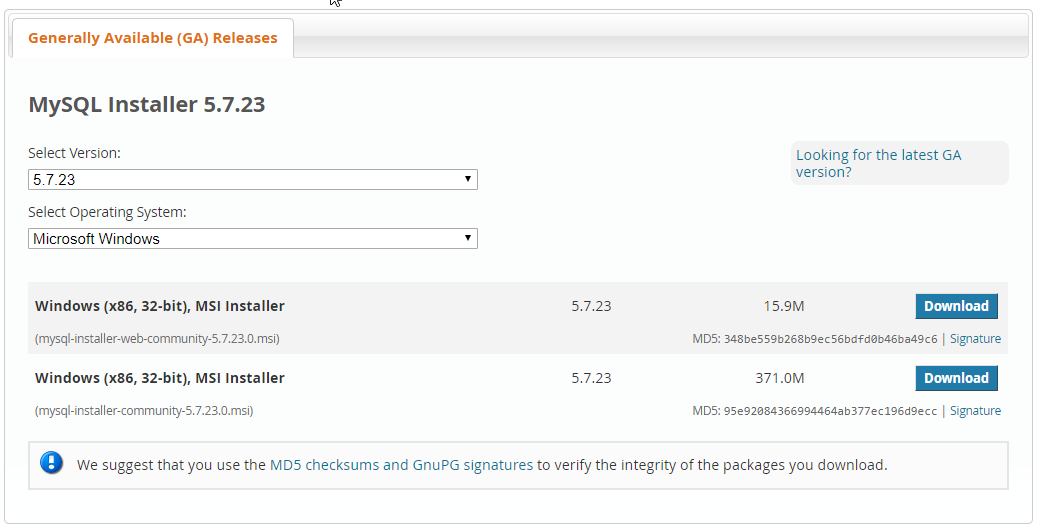
| + | So you have to select ''"Looking for previous GA versions?"'' and will get this screen: | ||
| + | |||
| + | [[File:Osb_MySQL_Installer_57.png]] | ||
| + | |||
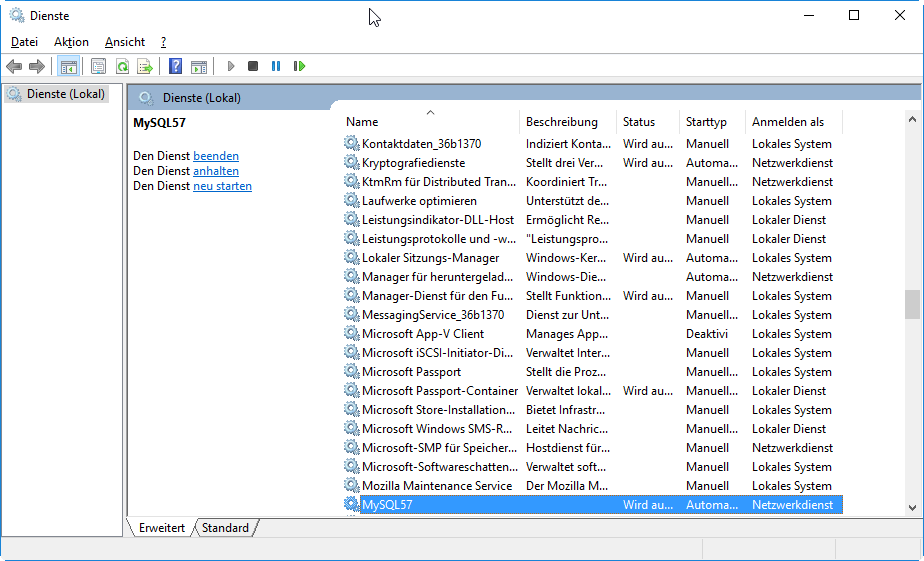
| + | Download the mysql-installer-community-version and follow the instructions of this installer. After successful installation you'll have a new service: | ||
| + | |||
| + | [[File:Osb_MySQL57_service.png]] | ||
| + | |||
| + | |||
| + | If not already running, start the MySQL57 service or reboot your machine. | ||
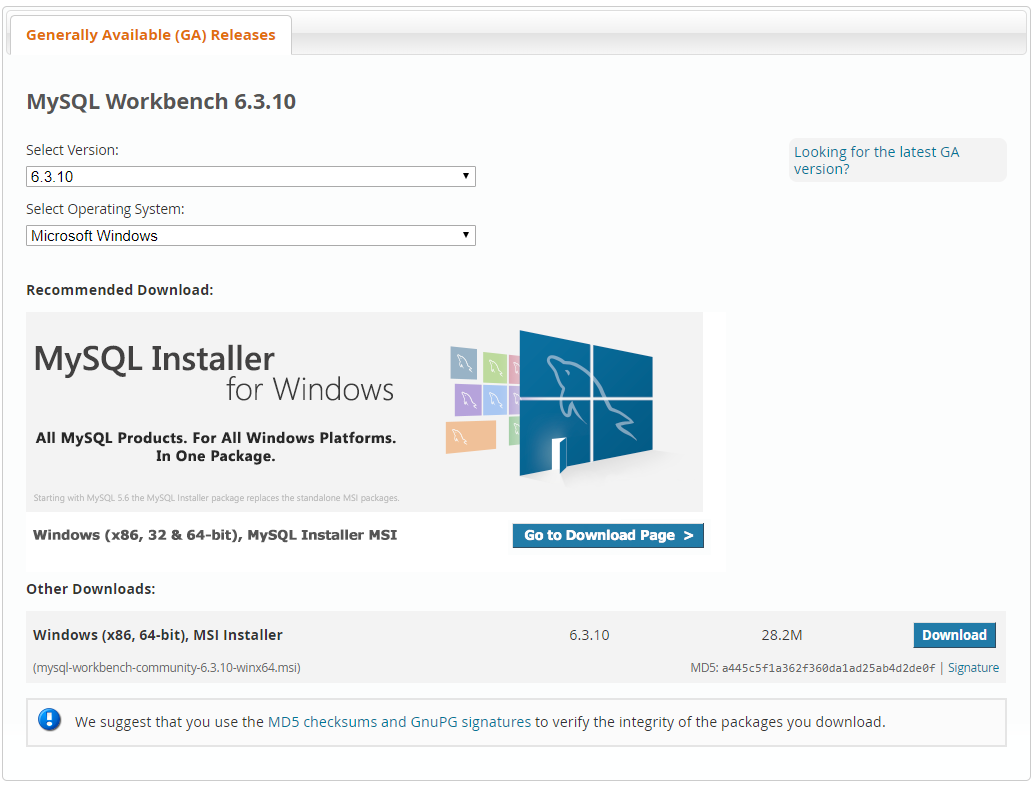
| + | Then you install [https://dev.mysql.com/downloads/workbench/ MySQL Workbench]. As we use an older version here you must select "Looking for previous GA versions?" and you'll get this screen: | ||
| + | |||
| + | [[File:Osb_MySQL_Workbench.png]] | ||
| + | |||
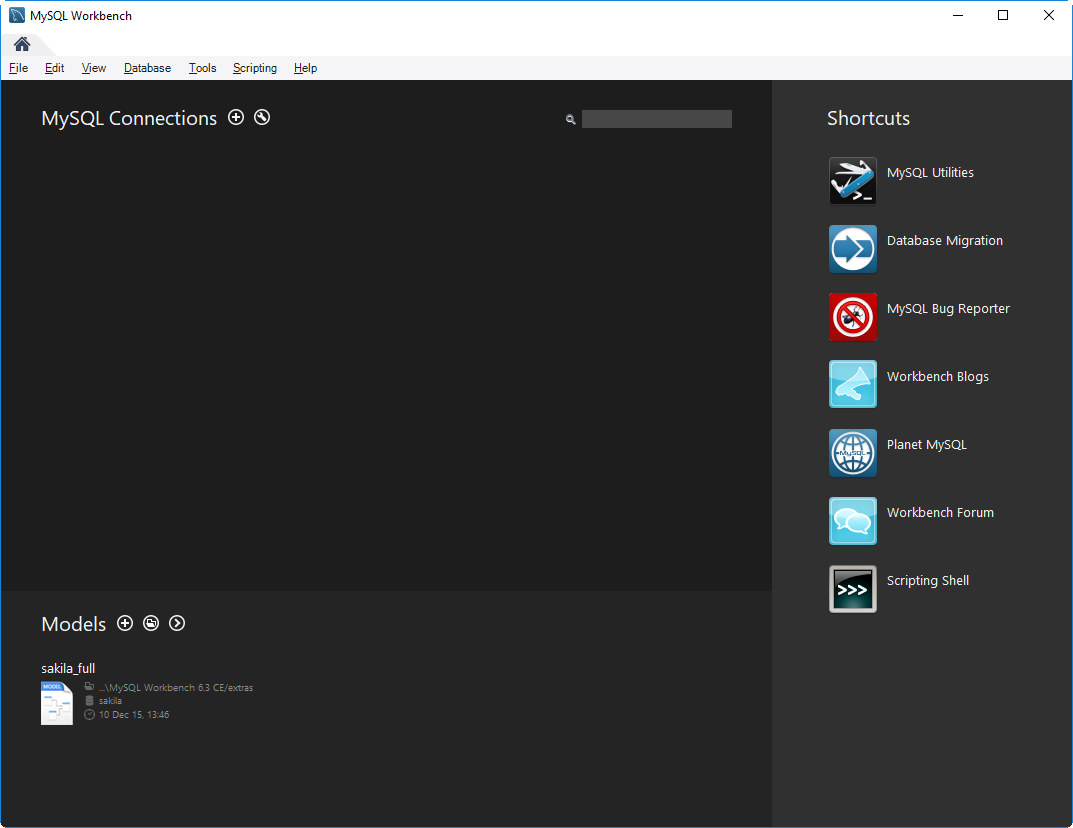
| + | Download and install the workbench. After successful installation, open the workbench and create a new connection by clicking the '''+''' symbol: | ||
| + | |||
| + | [[File:Osb_MySQL_Workbench_create_new_connection.png]] | ||
| + | |||
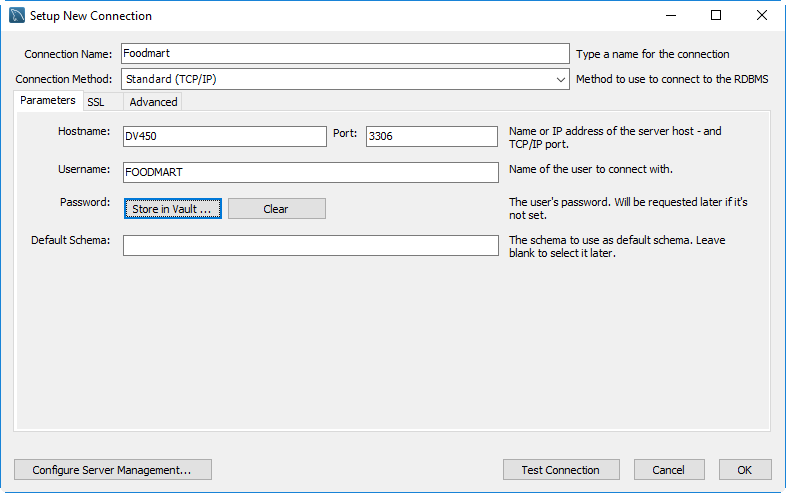
| + | Create a new connection like this: | ||
| + | |||
| + | [[File:Osb_MySQL_Workbench_new_connection_foodmart.png]] | ||
| + | |||
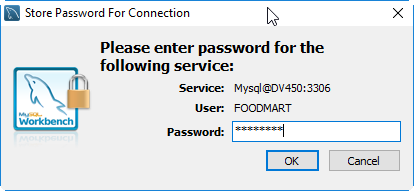
| + | Store the password "FOODMART" in capitals in Vault: | ||
| + | |||
| + | [[File:Osb_MySQL_Workbench_connection_foodmart_password.png]] | ||
| + | |||
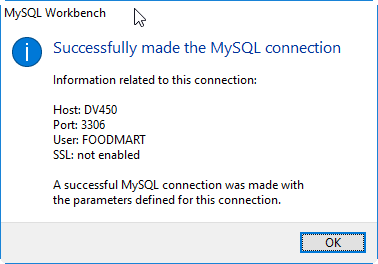
| + | Test the connection: | ||
| + | |||
| + | [[File:Osb_MySQL_Workbench_connection_foodmart_test.png]] | ||
| + | |||
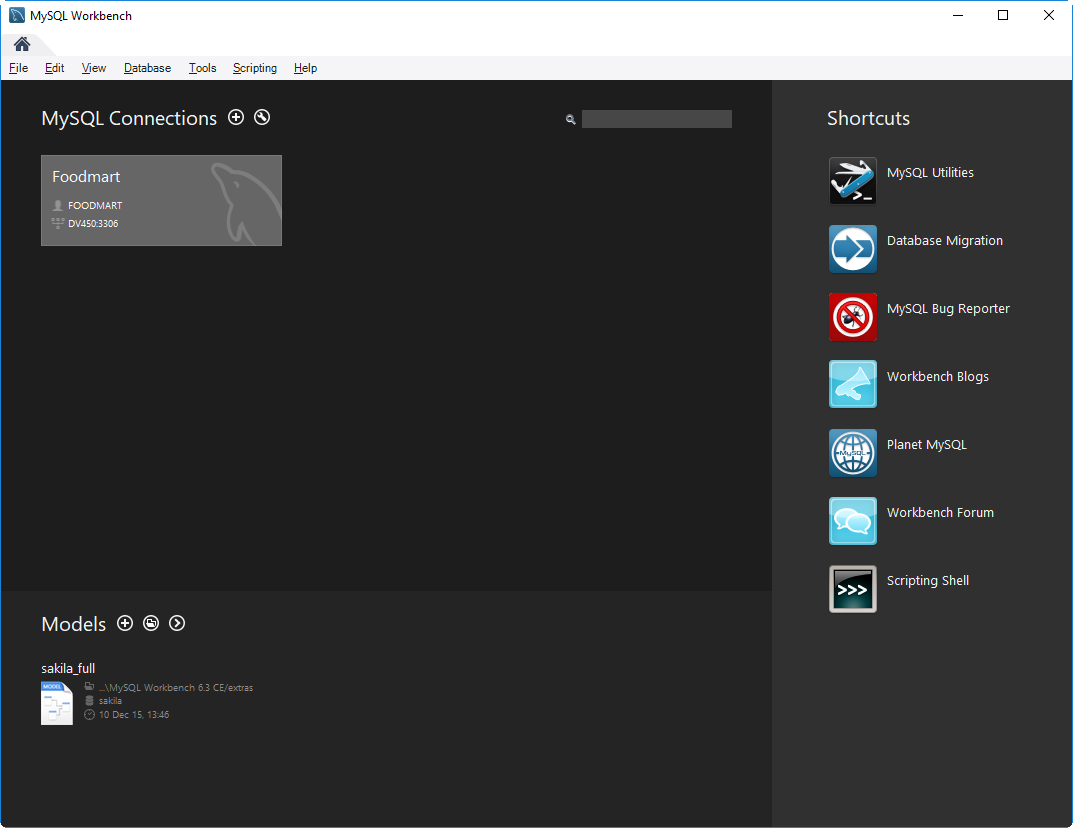
| + | Your workbench should look like this afterwards: | ||
| + | |||
| + | [[File:Osb_MySQL_Workbench_connection_foodmart.png]] | ||
| + | |||
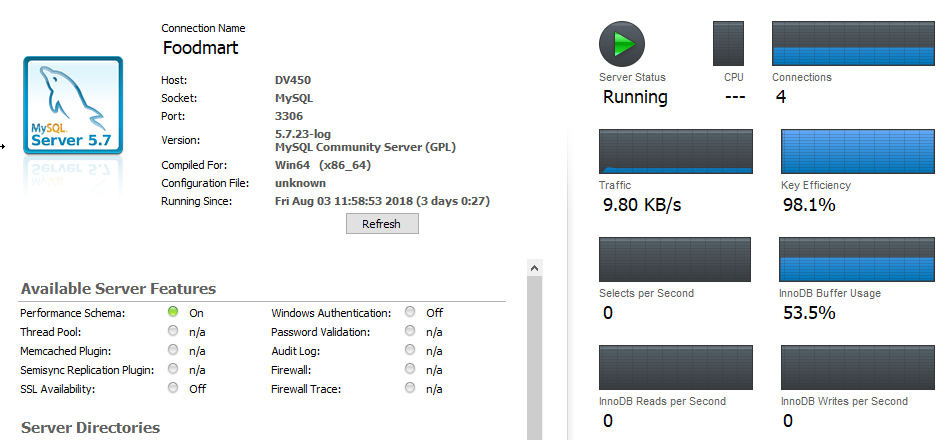
| + | After you clicked on '''Foodmart''' (which is the name of your connection here), the workbench opens with the navigator an you can check the server status: | ||
| + | |||
| + | [[File:Osb_MySQL_Workbench_connection_foodmart_server_status.png]] | ||
| + | |||
| + | ===Setup Foodmart MySQL database and data--PART2=== | ||
| + | |||
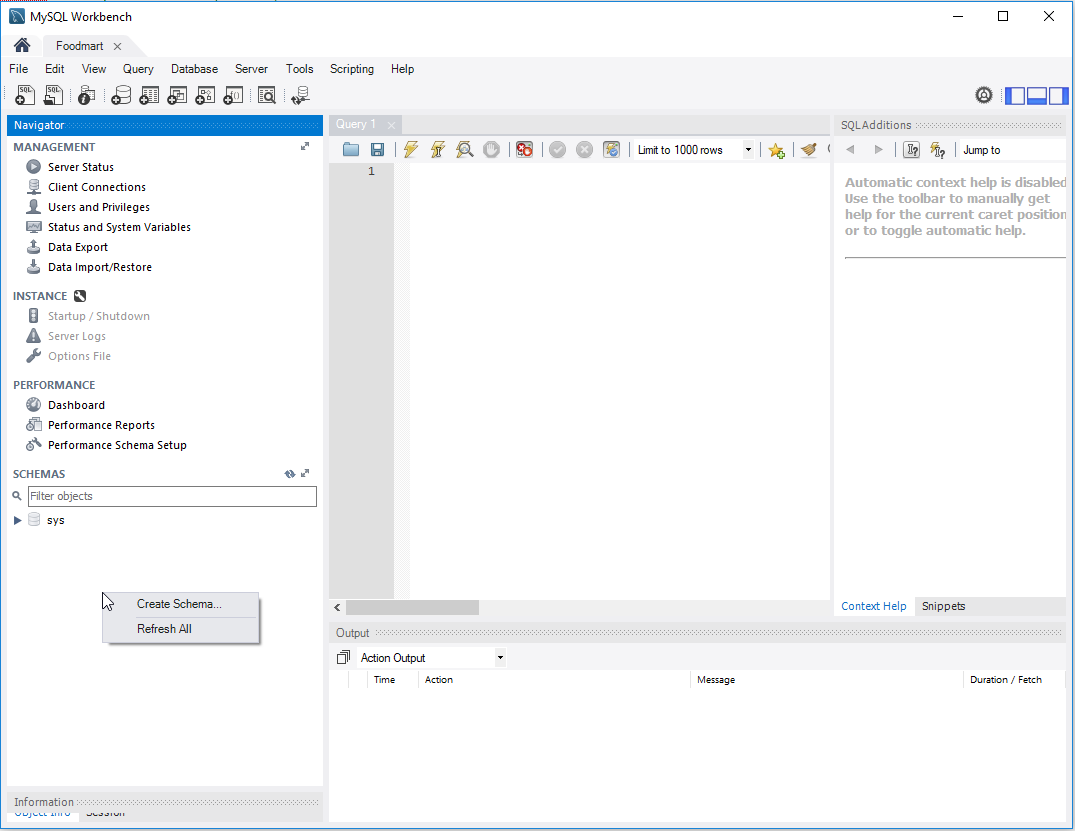
| + | After your Server ist setup, right click in the SCHEMAS area of the Navigator and create new schemas: | ||
| + | |||
| + | [[File:Osb_MySQL_Workbench_create_schema.png]] | ||
| + | |||
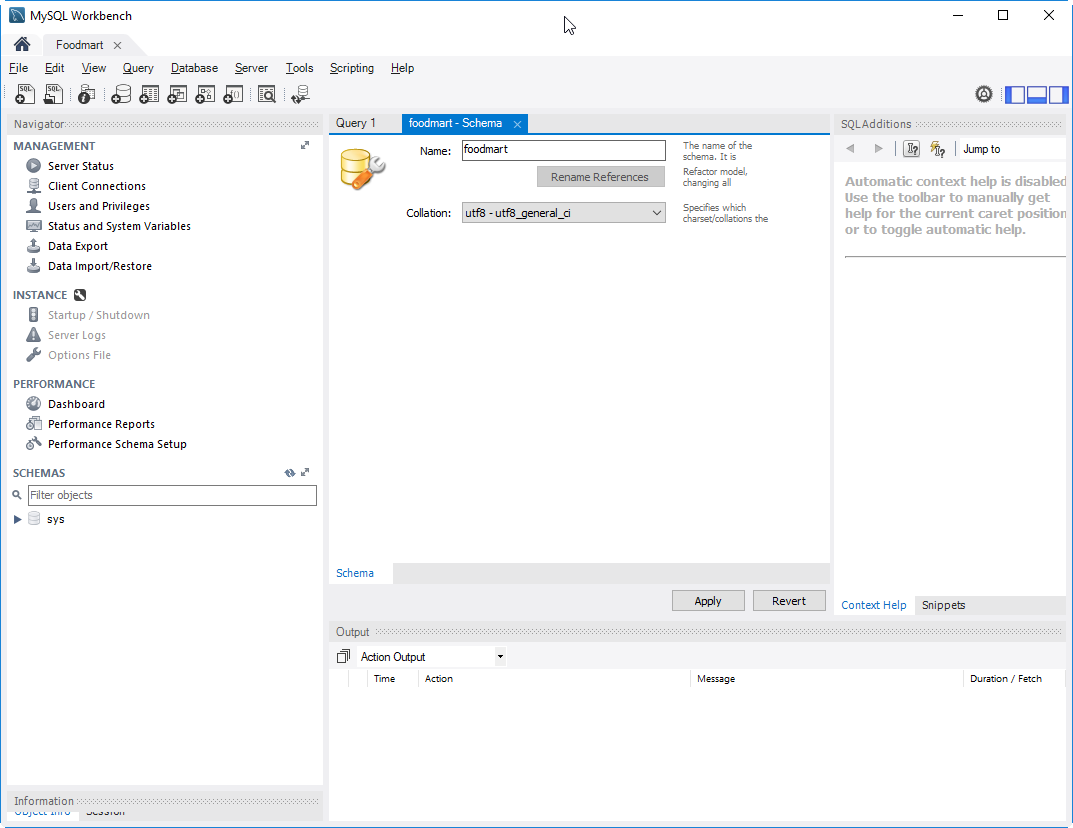
| + | You create a schema named '''foodmart''' which is your database later on. Don't forget to select '''utf8''' encoding like shown here: | ||
| + | |||
| + | [[File:Osb_MySQL_Workbench_schema_foodmart.png]] | ||
| + | |||
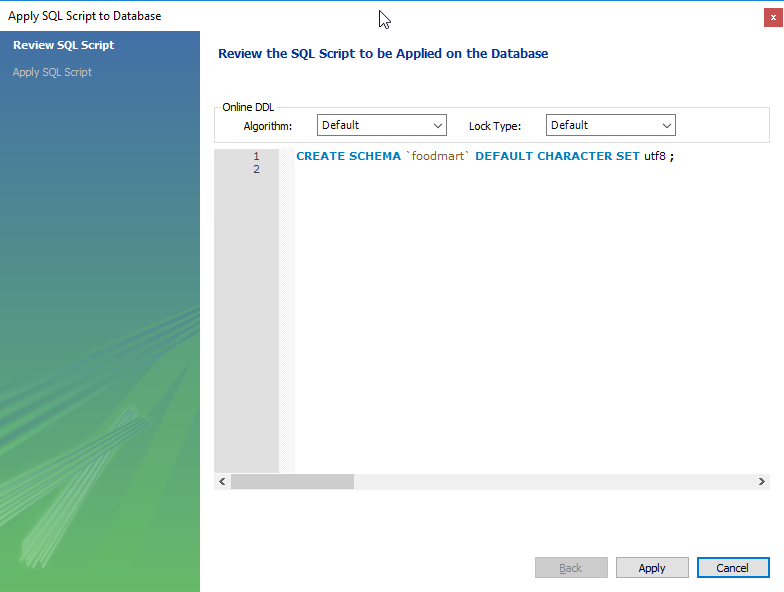
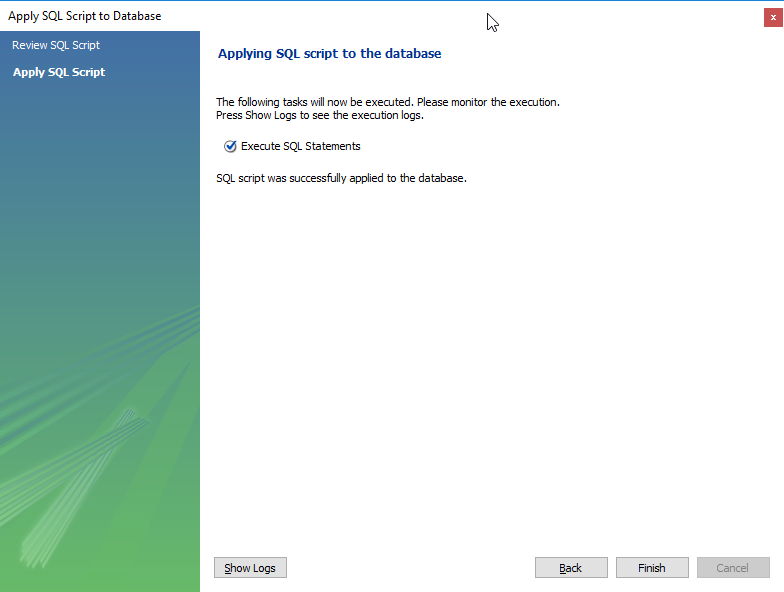
| + | Follow the steps: | ||
| + | |||
| + | [[File:Osb_MySQL_Workbench_Review_SQL_Script.png]] | ||
| + | |||
| + | [[File:Osb_MySQL_Workbench_Apply_SQL_Script.png]] | ||
| + | |||
| + | |||
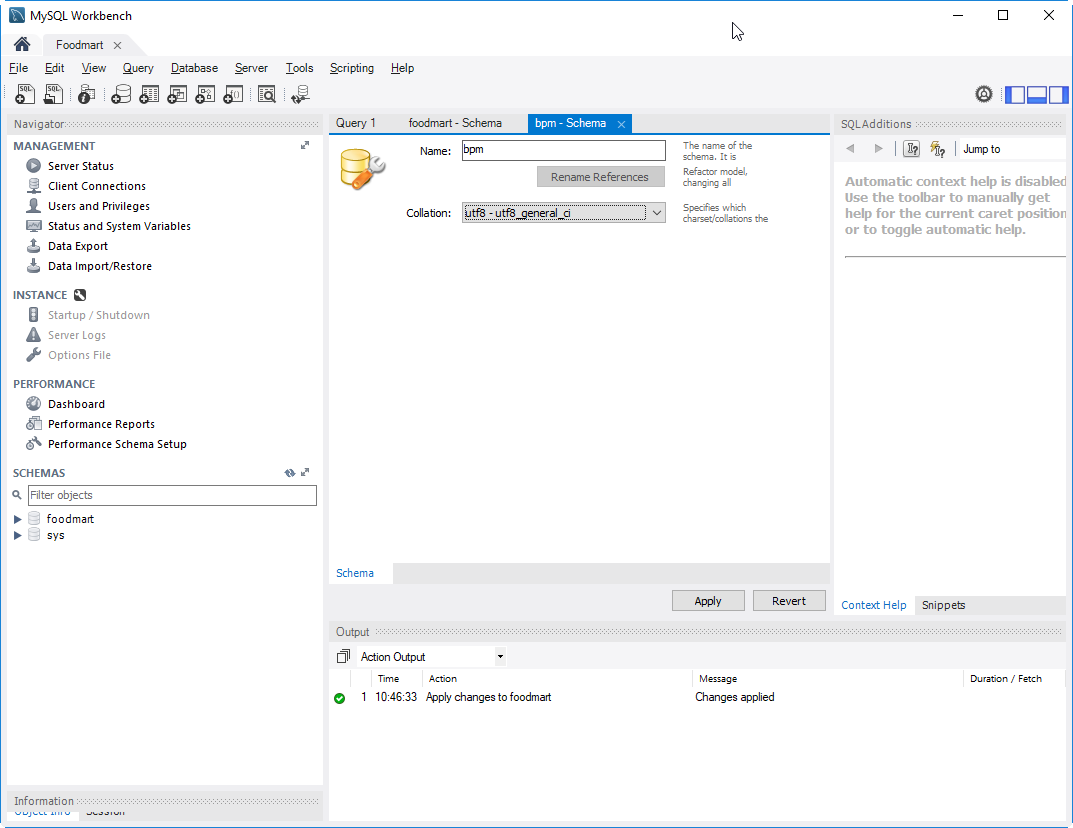
| + | Also create a '''bpm''' schema and follow the steps described before: | ||
| + | |||
| + | [[File:Osb_MySQL_Workbench_schema_bpm.png]] | ||
| + | |||
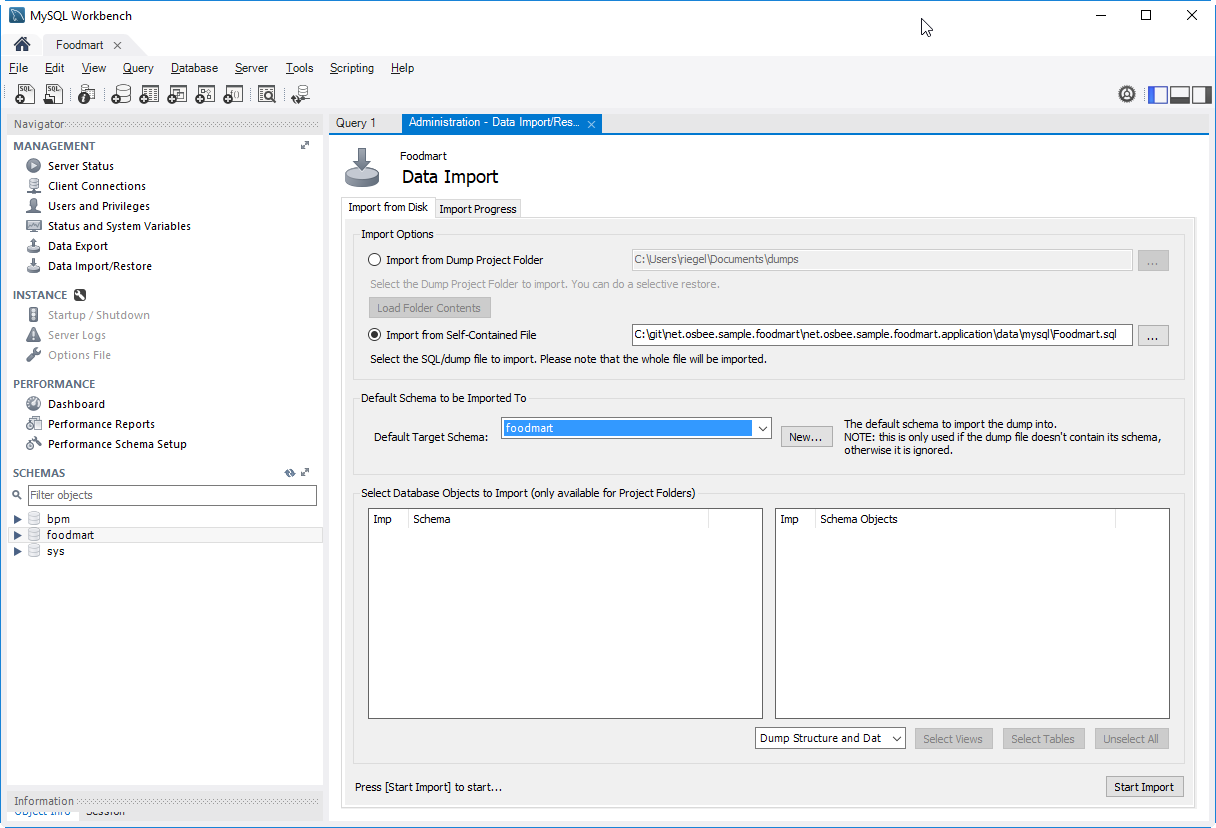
| + | Now you can start the data import with ''Server -> Data Import'': | ||
| + | |||
| + | [[File:Osb_MySQL_Workbench_Data_Import.png]] | ||
| + | |||
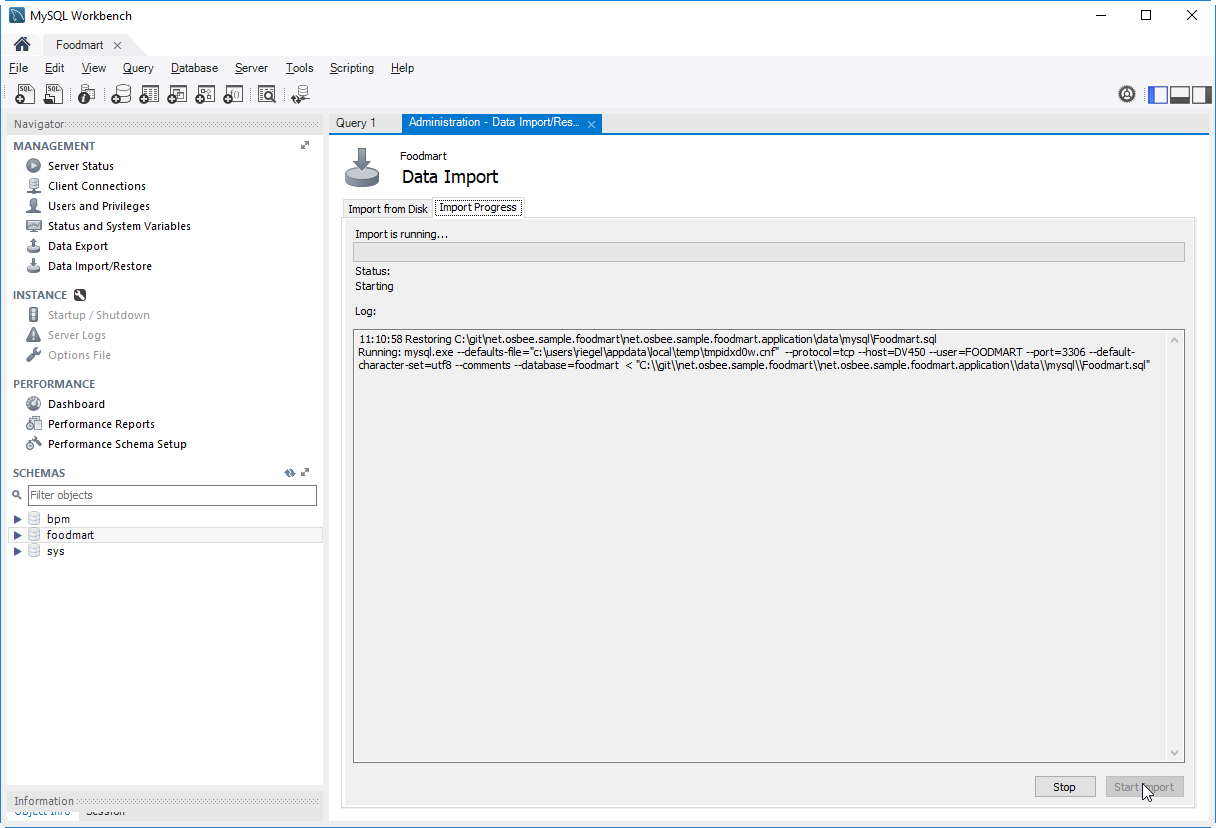
| + | Press "Start Import": | ||
| + | |||
| + | [[File:Osb_MySQL_Workbench_Data_Import_start.png]] | ||
| + | |||
| + | Now the database '''foodmart''' is filled with the appropriate data. | ||
| + | |||
| + | |||
| + | ===Setup Foodmart MySQL database and data--PART3=== | ||
| + | |||
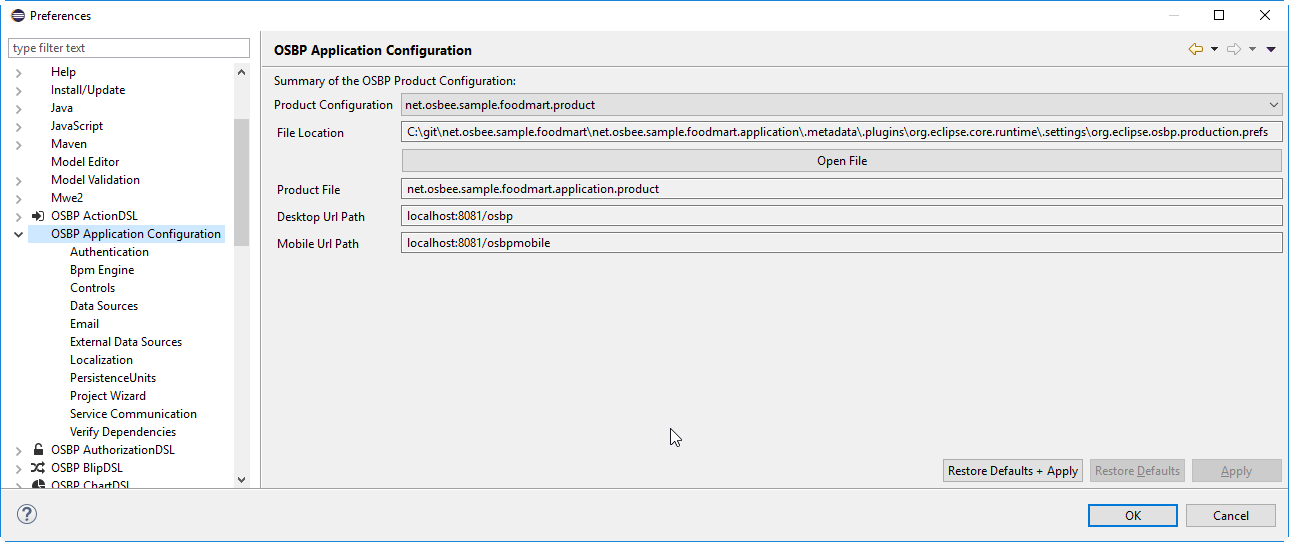
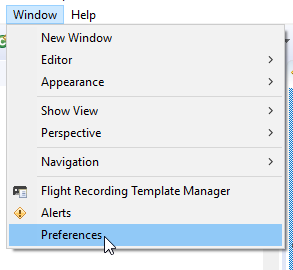
| + | After the database '''foodmart''' is filled, there are some settings to change for the first start of OS.bee with foodmart data. In your IDE open ''Window->Preferences->OSBP Application Configuration'': | ||
| + | |||
| + | [[File:Osb_IDE_OSBP_APP_Configuration.png]] | ||
| + | |||
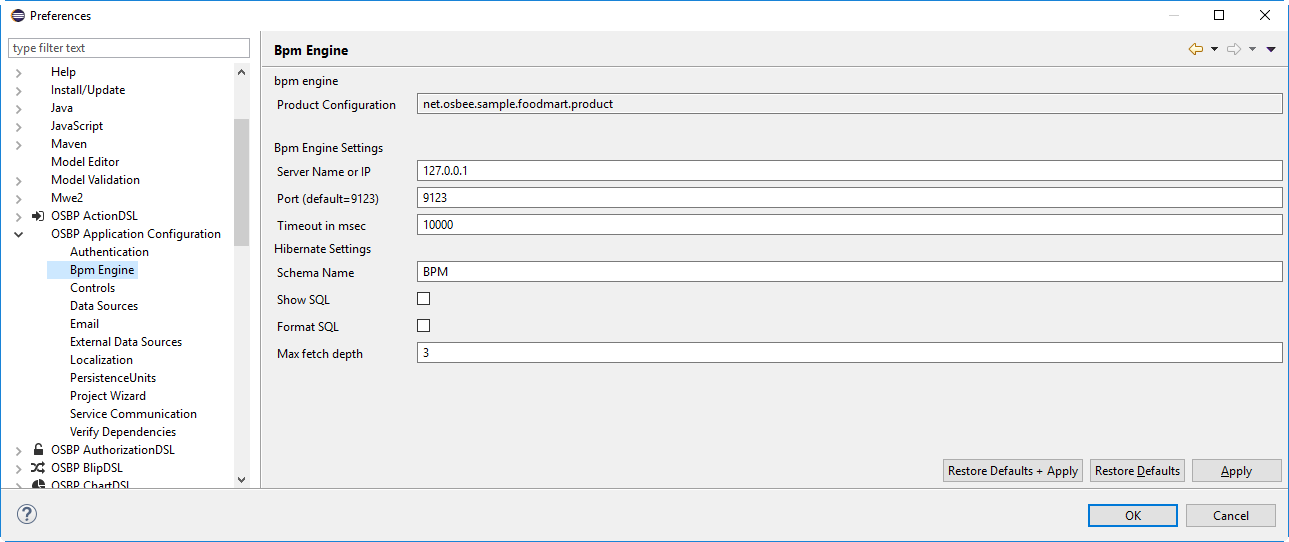
| + | Double check whether you selected the product in the configuration and '''NOT''' the workspace. Check the database name for the BPM settings to be '''BPM''' so it matches the MySQL database settings. | ||
| + | |||
| + | [[File:Osb_IDE_OSBP_APP_Configuration_Bpm_Engine.png]] | ||
| + | |||
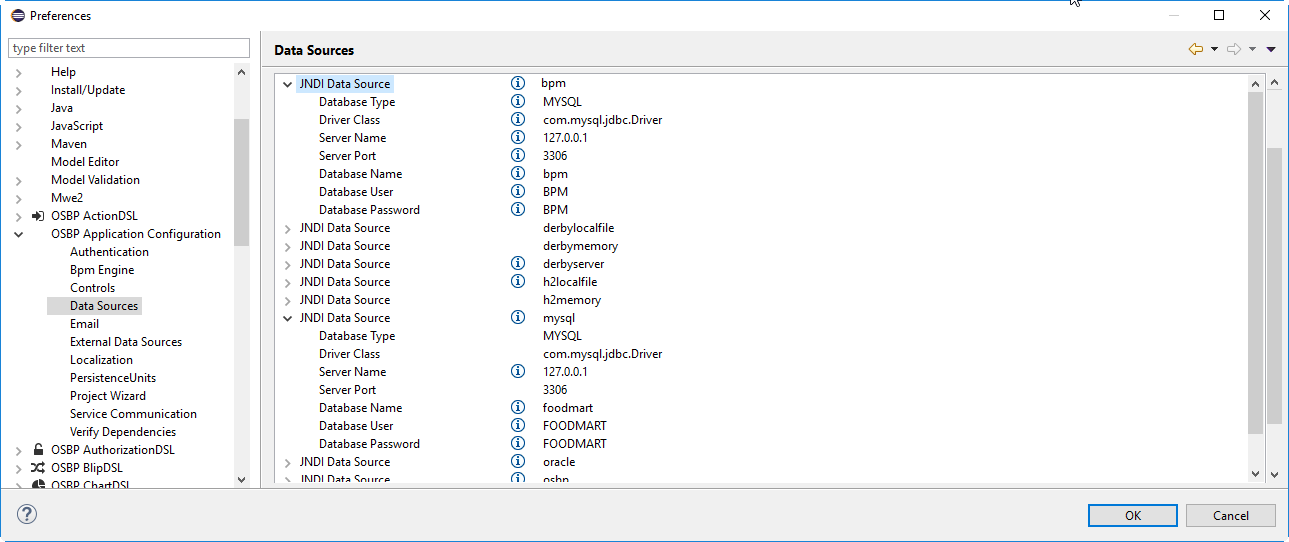
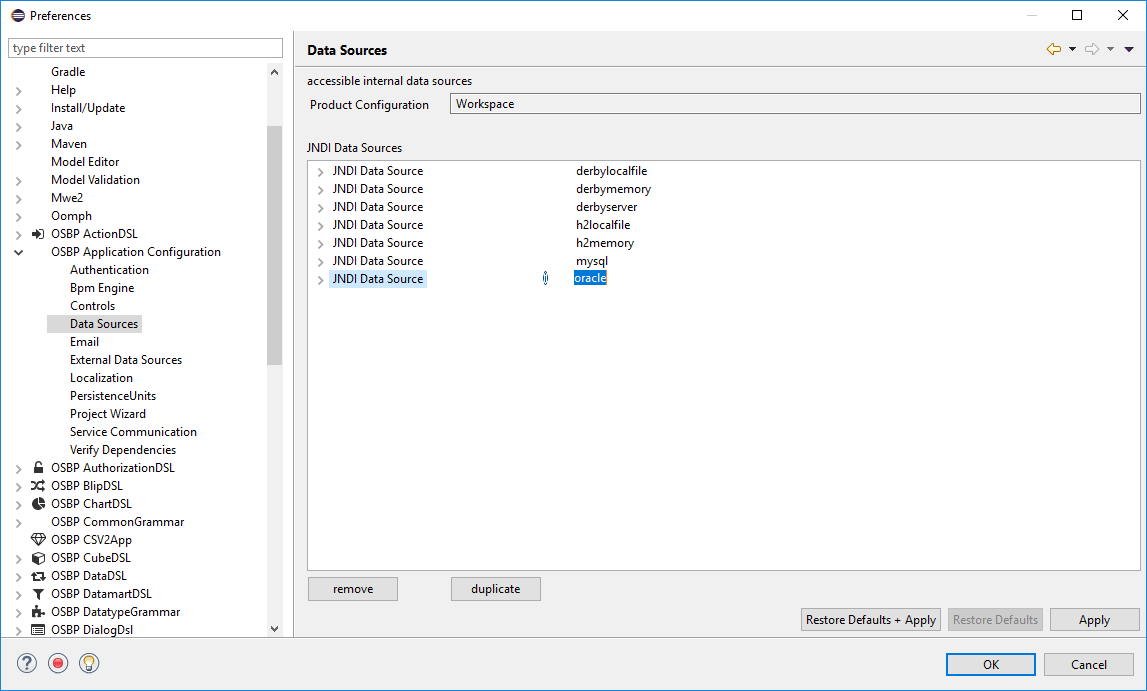
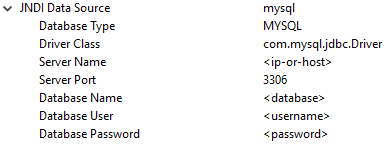
| + | Adjust the JNDI Data Source settings so that '''bpm''' and '''mysql''' have the right parameters: | ||
| + | |||
| + | [[File:Osb_IDE_OSBP_APP_Configuration_Data_Source.png]] | ||
| + | |||
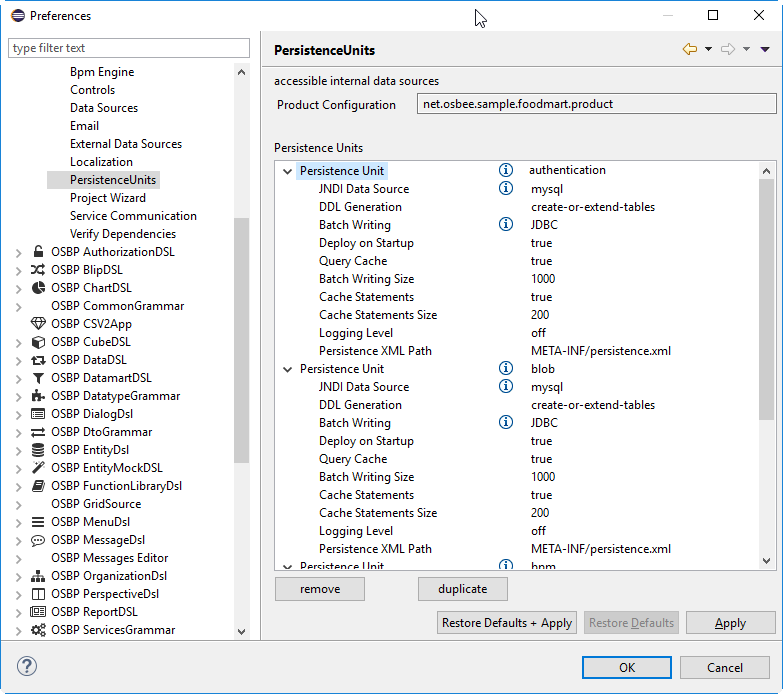
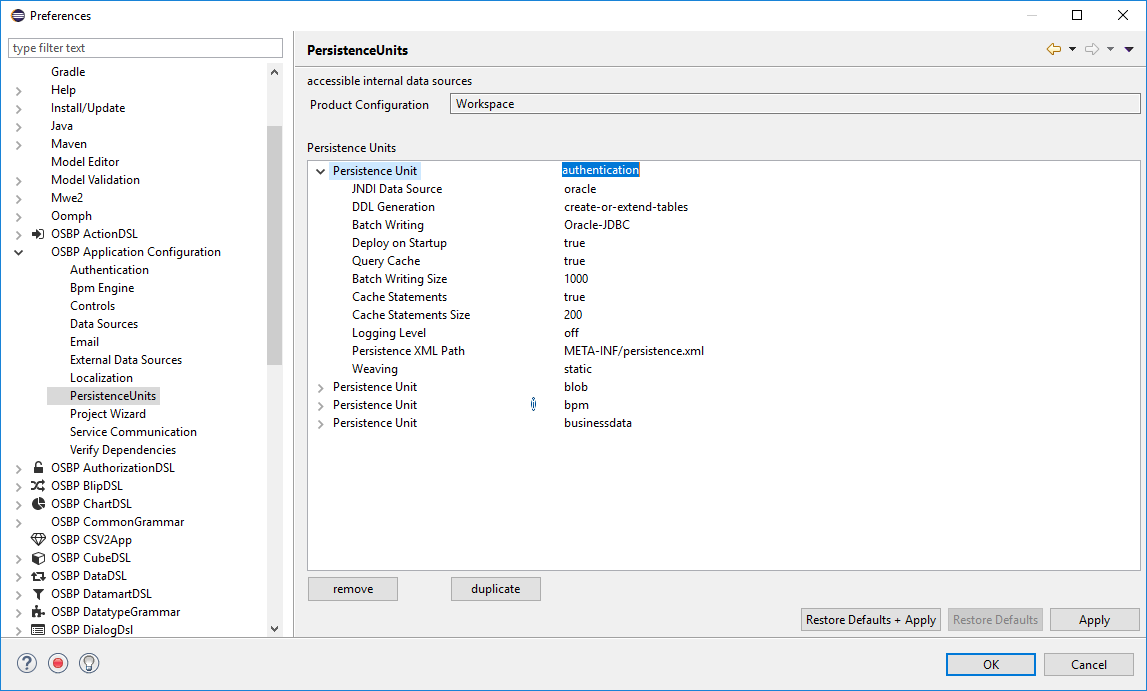
| + | There are 4 different Persistence Units that must be configured for OS.bee: | ||
| + | * authentication | ||
| + | * blob | ||
| + | * bpm | ||
| + | * businessdata | ||
| + | |||
| + | They must look like this for MySQL: | ||
| + | |||
| + | [[File:Osb_IDE_OSBP_APP_Configuration_PersistenceUnits.png]] | ||
| + | |||
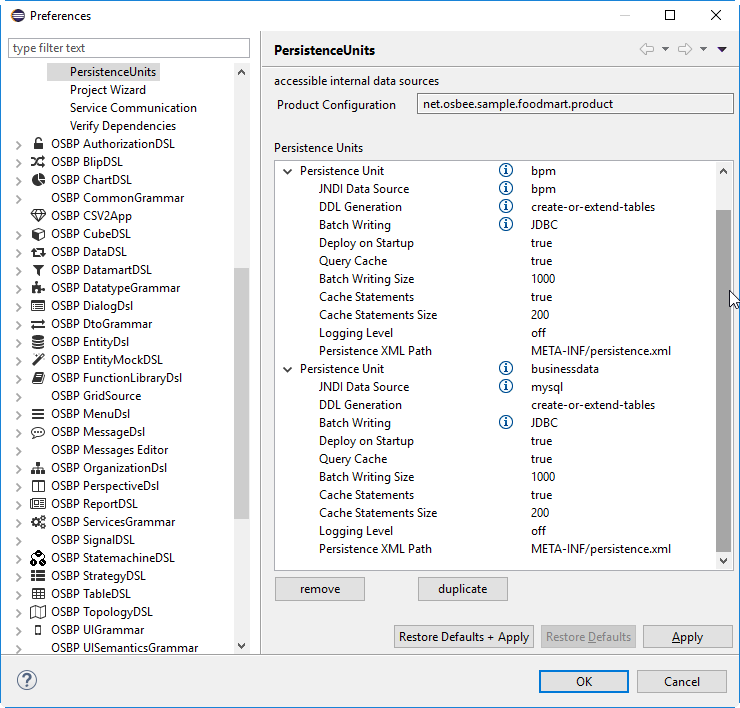
| + | For the first start you must force BPM to create new tables as we haven't already created them. '''DDL Generation''' must be set to '''create-or-extend-tables''' to do so. | ||
| + | |||
| + | [[File:Osb_IDE_OSBP_APP_Configuration_PersistenceUnits_bpm_coet.png]] | ||
| + | |||
| + | If you are ready with this, press '''Apply''' and then '''OK'''. ''You must press '''Apply''' before '''OK''' as there is still a bug in eclipse, that doesn't save everything if just press '''OK'''. '' | ||
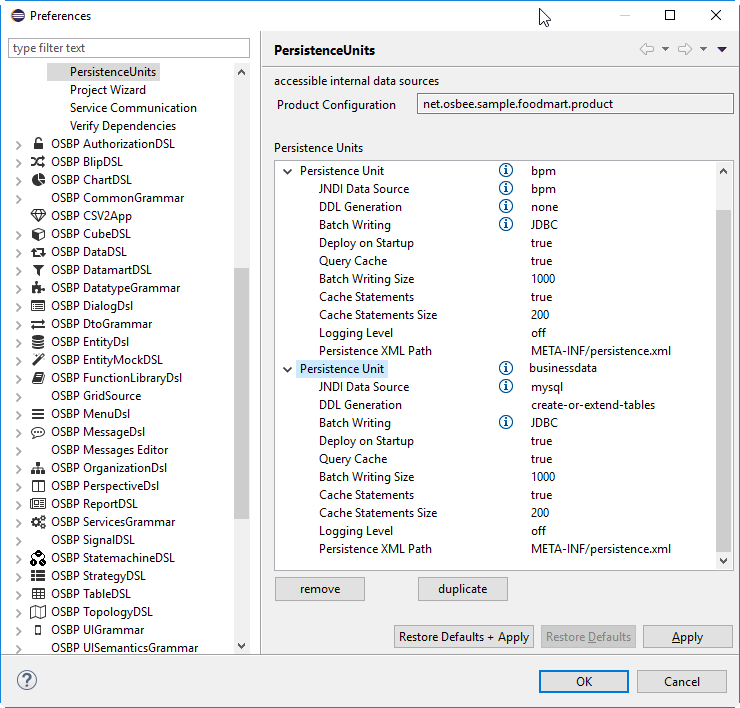
| + | Then start the application the first time. It will not come up after creation of the BPM-tables. You stop the application after a while and re-enter the ''Preferences->Persistence Units'' and change the '''BPM''' settings for '''DDL Generation''' to '''none'''. | ||
| + | |||
| + | [[File:Osb_IDE_OSBP_APP_Configuration_PersistenceUnits_bpm_none.png]] | ||
| + | |||
| + | The foodmart application should work now with your own MySQL database. | ||
| + | |||
| + | |||
| + | ===Working with the H2 DB=== | ||
| + | |||
| + | As you might know, [http://www.h2database.com/ H2] is a simple but effective small-footprint database without any effort installing it. OS.bee comes with the needed bundles anyway. H2 can be defined as an in-memory database or as a file-based database. If configured as in-memory database the content will be lost as soon as the OS.bee application server is shut down. | ||
| + | |||
| + | |||
| + | ;How to create a '''H2localFile''' data source | ||
| + | |||
| + | You can use '''H2localFile''' for all data sources but make sure to give each data source an individual database name. | ||
| + | In this example we want to configure a data source called '''bpm''' in order to use it as database for BPM persistence. | ||
| + | |||
| + | * Open ''Eclipse'' <code>Preferences</code> and select the <code>OSBP Application Configuration</code>. | ||
| + | *:[[File:Eclipse_Preferences_H2.png]] | ||
| + | |||
| + | |||
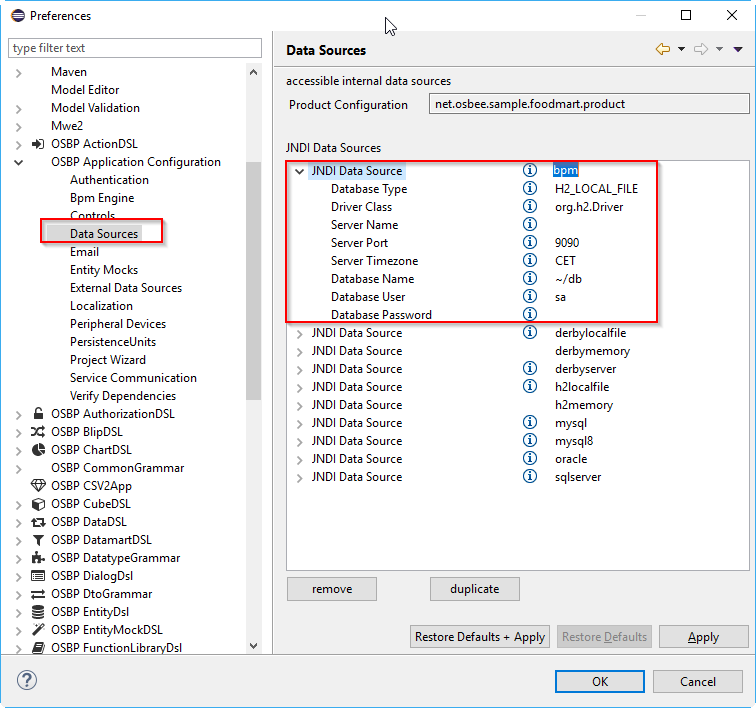
| + | * Switch to <code>Data Sources</code> and fill the fields according to the following image: | ||
| + | *:[[File:Eclipse_Preferences_DataSources_H2LocalFile.png]] | ||
| + | ** The database name "~/db" forces the database file to be created in the Windows user's home directory where he has appropriate file creation rights to do this. Of course you can use any directory if you have ensured appropriate rights for this directory. | ||
| + | ** User name and password can be chosen according to your own taste. | ||
| + | ** The port is free to choose but should not collide with other definitions in your system. The port+1 also should be unused by other services as it will be used by an internal H2 web server as you will see later on. | ||
| + | |||
| + | |||
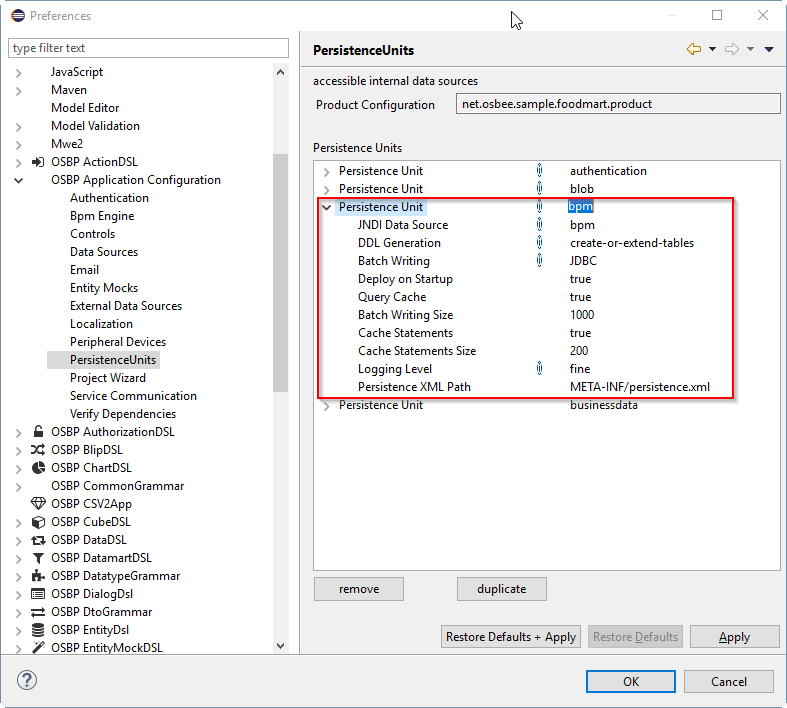
| + | * Done this, you must switch to <code>PersistenceUnits</code> and fill the fields for '''bpm''' according to the next image: | ||
| + | *:[[File:Eclipse_Preferences_PersistenceUnits_H2LocalFile.png]] | ||
| + | ** Make sure to have '''create-or-extend-tables''' selected for all persistence units. This will create all tables defined via ''EntityDSL'' and will keep them up-to-date as models evolve. | ||
| + | ** Logging level can be set to '''OFF''' after everything works as expected. | ||
| + | |||
| + | |||
| + | ;How to create a '''H2InMemory''' data source | ||
| + | |||
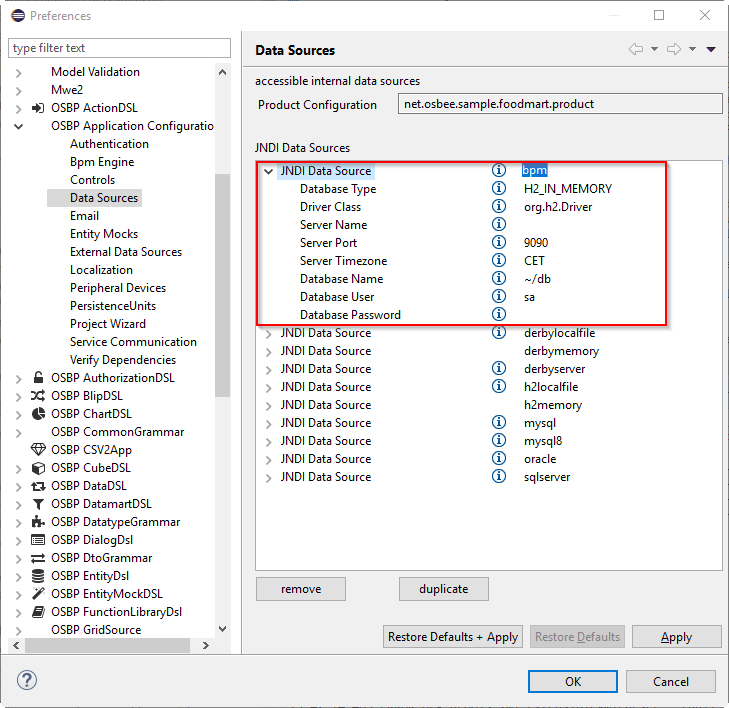
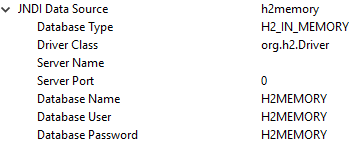
| + | * Use the following image to manage the '''data source settings'''. | ||
| + | *:[[File:Eclipse_Preferences_DataSources_H2InMemory.png]] | ||
| + | ** The only change is the database type. Although there is no physical file with in-memory databases, you have to have a name to identify the database as if it was lying in the user's home directory, if you want to access the in-memory database remotely later. | ||
| + | |||
| + | *'''Persistence unit settings''' are the same as above. | ||
| + | |||
| + | |||
| + | ;How to inspect H2 database content | ||
| + | |||
| + | If you want to emit sql-statements against the database by yourself, you can use the web-server that was automatically started when using H2. The port is the given port in the data source + 1. | ||
| + | |||
| + | If you open a browser with <code>localhost:<port></code>, in the example it is: <code>localhost:9091</code>, you will be prompted with this page: | ||
| + | |||
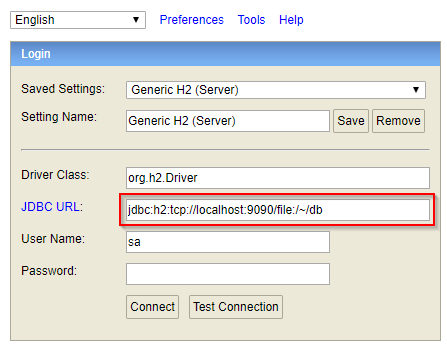
| + | [[File:Osb_H2_login_JDBC_URL_H2LocalFile.png]] | ||
| + | |||
| + | |||
| + | Select <code>Generic H2 (Server)</code> and modify the '''JDBC URL''' according the the data source settings. Set the '''port''' and the '''database path''' for the '''H2LocalFile''' type. | ||
| + | |||
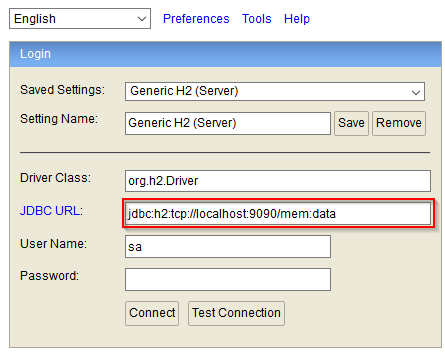
| + | [[File:Osb_H2_login_JDBC_URL_H2InMemory.png]] | ||
| + | |||
| + | Modify the '''JDBC URL''' according to the data source settings for the '''H2InMemory''' type: | ||
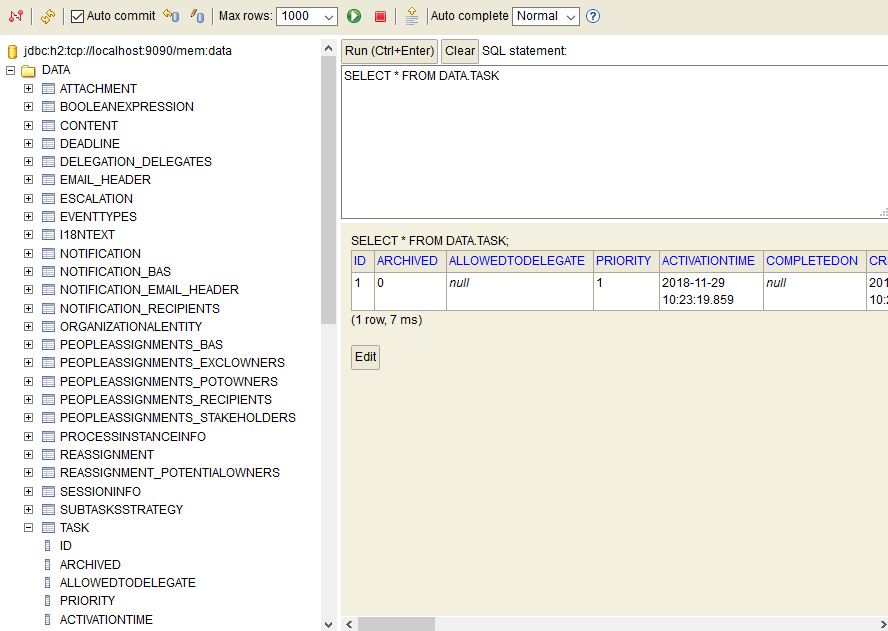
| + | * If the connection is successful for any setting, a new page will show up where the whole database model can be explored and sql statements against the database can be emitted. | ||
| + | |||
| + | [[File:Osb_H2_content_H2InMemory.png]] | ||
| + | |||
| + | |||
| + | ===Performance tuning for MySQL databases=== | ||
| + | |||
| + | This topic references the InnoDB version 8 implementation of MySQL. Most important: always use the latest version of MySQL. Versions before 8 are much slower. | ||
| + | |||
| + | ;Some simple rules for the design phase in EntityDSL: | ||
| + | |||
| + | # Always make an effort to hit an index with your where condition. Hit at least a reasonable quantity (<100) of entries matching with your index. | ||
| + | # Avoid calculations in your where condition as they are calculated for every row that must be selected (e.g. where a+b > 5). | ||
| + | # Do not fan out all possible combinations of indexes. Make one precise index that matches most of the time. | ||
| + | # Avoid repetitions of index segments like | ||
| + | #* index 1 a | ||
| + | #* index 2 a, b | ||
| + | #* index 3 a, b, c | ||
| + | #* etc. | ||
| + | #: as MySQL will fail to take the best one. Even if you do not have "c" in your condition only create index 3. | ||
| + | |||
| + | |||
| + | ;Datainterchange performance issues | ||
| + | |||
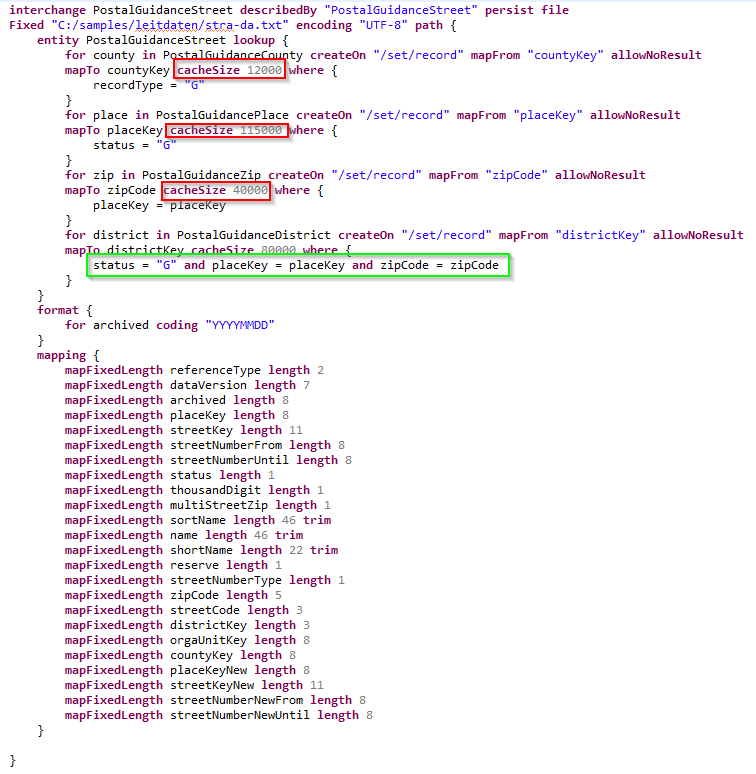
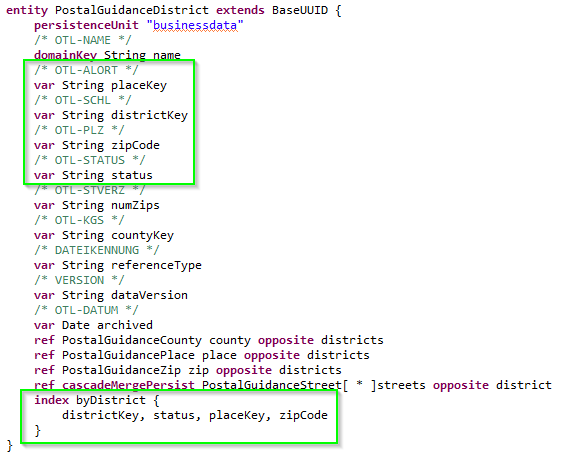
| + | If you make heavy use of the '''''DatainterchangeDSL''''' and your models use lookups to connect to other entities, be sure to use the so called '''second level cache'''. Here is an example extracted from the ''German DHL cargo'' address validation data: | ||
| + | |||
| + | [[File:Osb_datainterchange_PostalGuidanceStreet.png]] | ||
| + | |||
| + | |||
| + | As county, place and zip are selected for every row to be imported, it is useful to define a 2nd level cache of an appropriate size to hold all entries. Do not oversize the cache as this could result in a garbage collector (GC) exception from a memory full condition. Better a smaller cache than none or an exception during import. | ||
| + | |||
| + | The lookup to find the right district uses 4 values from the imported row. The best approach is to have all the requested fields in the index. For better performance and less problems while importing, it is good to allow duplicate keys here. External data sources are often not that unique as they should be. | ||
| + | |||
| + | [[File:Osb_entity_PostalGuidanceDistrict.png]] | ||
| + | |||
| + | |||
| + | The above described method converts given domain keys of the imported streets to surrogate key references via UUIDs. | ||
| + | |||
| + | |||
| + | ;MySQL settings | ||
| + | |||
| + | The mysql server comes with a settings file in the hidden windows directory <code>ProgramData</code>. For standard installations you'll find under <code>C:\ProgramData\MySQL Server 8.0</code> a file called <code>my.ini</code>. Here are changes to boost performance: | ||
| + | # Although it is not recommended by the comment above this setting, you should set | ||
| + | #: ''innodb_flush_log_at_trx_commit=0'' | ||
| + | # If you can afford it, increase the buffer pool size. Set | ||
| + | #: ''innodb_buffer_pool_size=1G'' | ||
| + | |||
| + | To make the changed settings to effective you must restart the MySQL80 service. | ||
==Modeling== | ==Modeling== | ||
| Line 116: | Line 333: | ||
This will lead to combo box entries that are combined of category and subcategory. | This will lead to combo box entries that are combined of category and subcategory. | ||
| + | |||
| + | ===Connecting different database products=== | ||
| + | |||
| + | You can easily use different database products as far they are supported by JPA and you have the appropriate driver at hand. For every different product you must have a different JNDI definition in your product preferences and you must define a different persistence unit per JNDI data source. Therefore it is not possible to share common relationships between different database products as JPA won't allow to navigate over persistence unit boundaries. | ||
| + | The only way to support those projects is to use an Application Server like WebLogic from Oracle or WebSphere by IBM. This is quite expensive for small installations. | ||
| + | |||
| + | |||
| + | ===Default Localization=== | ||
| + | |||
| + | '''Question''': | ||
| + | |||
| + | The Default Localization should be German - how is it adjustable? | ||
| + | |||
| + | |||
| + | '''Answer''': | ||
| + | |||
| + | Any application built with OS.bee first reads the localization properties of the browser the client is running on. This will be the default locale before a user logs in. Every user has its own user account that is serviced by the admin or the user itself when opening the user ''menu -> profile''. A user's preferred locale can be setup in the dialog. After signing in, the locale of the client will be switched to the given one. | ||
| + | |||
| + | |||
| + | ===CSVtoApp ... Column limitation?=== | ||
| + | |||
| + | '''Question''': | ||
| + | |||
| + | A CC article pool (article.bag) with all columns of the parameter table can be imported. All columns with content are displayed in Eclipse - but the Create App button does not work. Only when many columns (here from letter b) have been deleted does the button work and the entity is created. Is there a limit? And could the program give a meaningful message if it does not work? | ||
| + | |||
| + | '''Answer''': | ||
| + | |||
| + | There is no known limit with the numbers of columns being imported. But there is a drawback with column names that collide with reserved keywords either with java, models like entity, datamart or datainterchange. So it must be avoided to use names like new, entity, column, attribute and other reserved keywords. AppUpIn5 (formerly known as CSV2APP) will crash without notice if you violate this and there is no possibility to avoid the crash because it is a problem with the underlying framework xtext. | ||
| + | |||
| + | |||
| + | ===Entering a number without keypad=== | ||
| + | |||
| + | '''Question''': | ||
| + | |||
| + | I have a field for entering a number as e.g. Counted quantity. This quantity is not to be entered with the number keypad, but via a combo-box. How can I define this field so that the numbers 1 to 1000 are selectable? | ||
| + | |||
| + | |||
| + | '''Answer''': | ||
| + | |||
| + | A strange use-case indeed. Why forcing a user to select from a combo-box of 999 entries? You could validate the user's input more comfortable by using a validation expression in Datatype or Entity DSL. You could use this kind of syntax | ||
| + | * in Datatype DSL: | ||
| + | <syntaxhighlight lang="java"> | ||
| + | datatype one2thousand jvmType java.lang.Integer asPrimitive minNumber(01) maxNumber(1000) | ||
| + | </syntaxhighlight> | ||
| + | |||
| + | * in Entity DSL: | ||
| + | <syntaxhighlight lang="java"> | ||
| + | var int [minNumber(01) maxNumber(1000)] unitsPerCase | ||
| + | </syntaxhighlight> | ||
| + | |||
| + | ===Missing bundles after update and how to solve it=== | ||
| + | |||
| + | |||
| + | Sometimes, some bundles seem to be missing in the installation after an update has been made. | ||
| + | This might look like the following screenshot: | ||
| + | |||
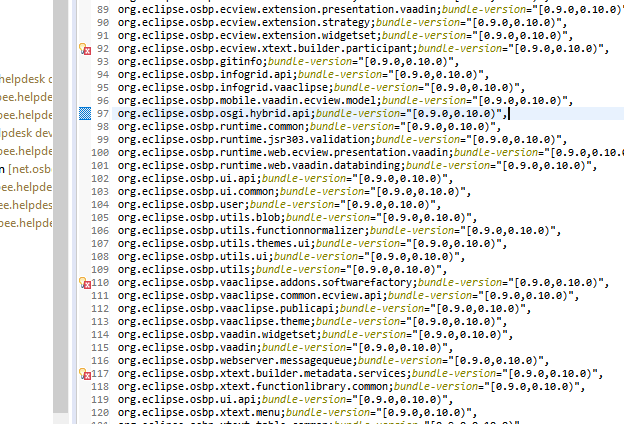
| + | [[File:Osb_IDE_error_missing_bundles.png]] | ||
| + | |||
| + | The solution is to check the target definition of the workspace and to update the target with the software from the same repository and the same date as the installation. | ||
| + | |||
| + | |||
| + | ===Creating CSV files as input for AppUpIn5Minutes with OS.bee=== | ||
| + | |||
| + | '''Question''': | ||
| + | |||
| + | * Do you have data in a persistence layer as a database that you want to introduce into the OS.bee system? | ||
| + | * Using OS.bee as tool for it? | ||
| + | |||
| + | |||
| + | '''Answer''': | ||
| + | |||
| + | Based on that task we will show it on the example to introduce [http://product-open-data.com POD data] into our OS.bee system. Therefor several steps are required. | ||
| + | |||
| + | The POD data consist of plenty entities but we will focus our attention only on the entities Brand, Brandowner, Brandtype, Gtin and Pkgtype. | ||
| + | |||
| + | The result of this task is to have CSV files as input for the AppUpIn5Minutes Tutorial. | ||
| + | |||
| + | '''''First step: data import''''' | ||
| + | |||
| + | :In our case the data is available via a SQL file and we have to create first a persistence layer (in our case a MySql database) and put the data into it. Existing a database with data already this first step is obsolete. | ||
| + | |||
| + | '''1. The first step is to get the original data and to put them into a persistence layer''' | ||
| + | :The POD data is provided via the [http://product-open-data.com/docs/pod_web_2014.01.01_01.sql.gz SQL file] | ||
| + | :We will use MySql as persistence layer and will run this SQL file on the for this occasion created schema '''pod'''. | ||
| + | :Now all the corresponding tables are created and filled with the data in our MySql Server. | ||
| + | |||
| + | '''2.The next step is to prepare the OS.bee Application to be able read the data from the persistence layer''' | ||
| + | :Running this file on a MySql database all entities are free from a technical key. So due to the requirements of JPA on which our database communication is based a ID is to be added. | ||
| + | :So for each created table from the first step an entity has to be defined manually within an EntityDSL instance.[ | ||
| + | :On the example of Brand it will be like this: | ||
| + | |||
| + | <syntaxhighlight lang="java"> | ||
| + | entity Brand { | ||
| + | persistenceUnit "businessdata" | ||
| + | var int brandtypecd | ||
| + | var String brandtype | ||
| + | var String brandnm | ||
| + | var String brandowner | ||
| + | var String bsin | ||
| + | uuid String id | ||
| + | var String brandlink | ||
| + | }</syntaxhighlight> | ||
| + | |||
| + | :As result a new but empty column '''ID''' will be added in the MySql table 'brand' once the OS.bee application will be started and database call for the entity was done. | ||
| + | :Existing relations between the entities we will consider corresponding foreign key columns have to also created manually. In our particular brand example the existing relations are from '''Brand''' to '''Brandowner''' and '''Brandtype''' and from '''Gtin''' to '''Brand''' and '''Packagetype'''. | ||
| + | |||
| + | :So the corresponding foreign key columns within the corresponding entity definitions have to be like this: | ||
| + | |||
| + | <syntaxhighlight lang="java"> | ||
| + | entity Brand { | ||
| + | ... | ||
| + | var String brandTypeId | ||
| + | var String brandOwnerId | ||
| + | } | ||
| + | |||
| + | entity Gtin { | ||
| + | ... | ||
| + | var String brandId | ||
| + | var String packageTypeId | ||
| + | }</syntaxhighlight> | ||
| + | |||
| + | :The easiest way to make a first call is to create a ''trigger view'' of all entities to ''export'' their data via ''datainterchange'' and starting an export as explained in the following steps. | ||
| + | |||
| + | :As result new but empty columns will be added once: | ||
| + | :* the columns '''gtin''' in the MySql table '''PACKAGE_TYPE_ID''' and '''BRAND_ID''' | ||
| + | :* the columns '''brand''' in the MySql table '''BRAND_OWNER_ID''' and '''BRAND_TYPE_ID'''. | ||
| + | :The OS.bee application will be started and database call for the entity was done. | ||
| + | |||
| + | '''''Second step: UI requisites''''' | ||
| + | |||
| + | '''3. Create a trigger view to export the data via datainterchange''' | ||
| + | |||
| + | :For the last step to export the structure and content of all the entities into CSV files for each of these CSV files one datainterchange definition in a DatainterchangeDSL instance is required. Therefor create respectively an entry like this: | ||
| + | |||
| + | <syntaxhighlight lang="java"> | ||
| + | interchange Brand merge file | ||
| + | CSV "C:/osbee/POD/POD_en/Brand.csv" delimiter ";" quoteCharacter """ skipLines 1 beans { | ||
| + | entity Brand | ||
| + | }</syntaxhighlight> | ||
| + | |||
| + | :To make this options visible in the OS.bee application a perspective within a menu is required. | ||
| + | :So we create a trigger view providing all the datainterchange definitions like this: | ||
| + | |||
| + | <syntaxhighlight lang="java"> | ||
| + | perspective Trigger { | ||
| + | sashContainer sash { | ||
| + | part pod view dataInterchange datainterchanges | ||
| + | } | ||
| + | } </syntaxhighlight> | ||
| + | |||
| + | :And this perspective we put into a menu like this: | ||
| + | |||
| + | <syntaxhighlight lang="java"> | ||
| + | entry Menu { | ||
| + | entry Item { | ||
| + | entry POD perspective Trigger | ||
| + | } | ||
| + | } </syntaxhighlight> | ||
| + | |||
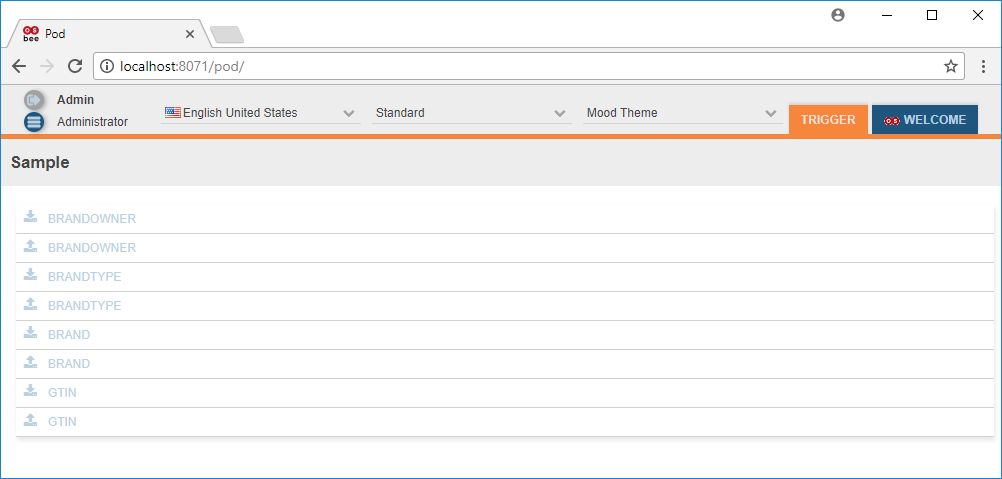
| + | :The result of the view on which an export action will be a database call and so a change on the tables on the MySql server is: | ||
| + | |||
| + | [[File:Osb_pod_sample.jpg]] | ||
| + | |||
| + | '''''Third step: Data enhancements''''' | ||
| + | |||
| + | '''4. The following step is to fill the empty UUID columns with data''' | ||
| + | |||
| + | :To be able to work properly with JPA and to use relations we decided to use UUIDs. So the first step is fill the empty column '''ID''' with UUIDs generated from the MySql database with the following command: | ||
| + | |||
| + | <syntaxhighlight lang="java"> | ||
| + | UPDATE YourTable set guid_column = (SELECT UUID()); | ||
| + | </syntaxhighlight> | ||
| + | |||
| + | :In case of our example '''brand''', it will be: | ||
| + | |||
| + | <syntaxhighlight lang="java"> | ||
| + | UPDATE pod.brand SET ID = (SELECT UUID()); | ||
| + | </syntaxhighlight> | ||
| + | |||
| + | :After that the corresponding relations have to be transformed into UUID foreign keys. Therefor the existing weakly relations have to be used to make strong foreign key constraints. As first step we will fill the foreign key columns of the table '''gtin'''. | ||
| + | |||
| + | :The existing relation between '''Brand''' and '''Gtin''' is based on the attribute '''Bsin'''. So the creation of the corresponding foreign key column '''BRAND_ID''' have to be done like this: | ||
| + | |||
| + | <syntaxhighlight lang="java"> | ||
| + | DELETE FROM pod.gtin WHERE bsin IS NULL; UPDATE pod.gtin g SET brand_id = (SELECT id FROM pod.brand b WHERE g.BSIN = b.BSIN); | ||
| + | </syntaxhighlight> | ||
| + | |||
| + | :And for the corresponding foreign key column '''PACKAGE_TYPE_ID''' like this: | ||
| + | |||
| + | <syntaxhighlight lang="java"> | ||
| + | UPDATE pod.gtin g SET package_type_id = (SELECT id FROM pod.pkg_type t WHERE g.PKG_TYPE_CD IS NOT NULL AND g.PKG_TYPE_CD = t.pkg_type_cd); | ||
| + | </syntaxhighlight> | ||
| + | |||
| + | :The next relation between '''Brand''' and '''Brandtype''' is based on the attribute '''brandTypeCd'''. So the creation of the corresponding foreign key column '''BRAND_TYPE_ID''' have to be done like this: | ||
| + | |||
| + | <syntaxhighlight lang="java"> | ||
| + | UPDATE pod.brand b SET brand_type_id = (SELECT id FROM pod.brand_type bt WHERE b.BRAND_TYPE_CD IS NOT NULL AND b.BRAND_TYPE_CD = bt.BRAND_TYPE_CD); | ||
| + | </syntaxhighlight> | ||
| + | |||
| + | :And finally as the relation between '''Brand''' and '''Brandowner''' is defined over a helper table '''brand_owner_bsin''', the creation of the corresponding foreign key column '''BRAND_OWNER_ID''' have to be done like this: | ||
| + | |||
| + | <syntaxhighlight lang="java"> | ||
| + | UPDATE pod.brand b SET brand_owner_id=(SELECT id FROM pod.brand_owner bo WHERE bo.OWNER_CD IS NOT NULL AND bo.OWNER_CD=(SELECT owner_cd FROM pod.brand_owner_bsin bob WHERE b.BSIN = bob.BSIN)); | ||
| + | </syntaxhighlight> | ||
| + | |||
| + | '''''Forth step: Export into CSV files''''' | ||
| + | |||
| + | '''5. The final step is to export all the actual entity structure and their content into CSV files''' | ||
| + | |||
| + | :Now all the datainterchange entries in the trigger view have to be used to export the corresponding entity structure and their content into the corresponding CSV files. | ||
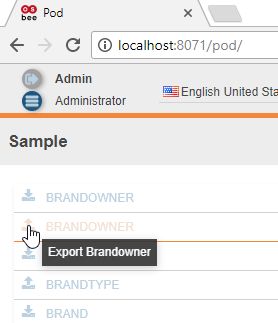
| + | :Simply push the export button as shown for Brandowner as follows: | ||
| + | |||
| + | [[File:Osb_pod_sample_export_brandowner.jpg]] | ||
| + | |||
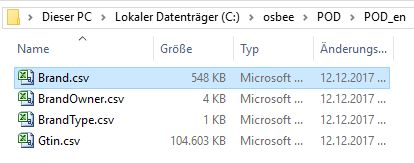
| + | :The corresponding CSV files output as shown here: | ||
| + | |||
| + | [[File:Osb_pod_export_CSV.jpg]] | ||
| + | |||
| + | ===import declartion used in most DSL=== | ||
| + | |||
| + | '''Question''': | ||
| + | |||
| + | Is there an easy way to handle the needed Import declaration? | ||
| + | Do we have to begin with the Import declaration while creating a new model can we start with other main semantic Elements of the DSL? | ||
| + | |||
| + | |||
| + | '''Answer''': | ||
| + | |||
| + | Yes - there is an easy way to create the import declarations. You don't have to begin with the declarations. | ||
| + | You can use '''SHIFT-CTRL-O''' to update the import declarations at any time in a model instance or simply see them showing up during entering the model code. | ||
| + | Just start writing your model code, use the built-in lookup functionality with '''CTRL-<SPACE>''' to find the available keywords or referable objects and get the imports added during typing. To check if everything is OK use '''SHIFT-CTRL-O''' to update the import statements. | ||
| + | |||
| + | ===Entity DSL (DomainKey DomainDescription)=== | ||
| + | |||
| + | '''Question''': | ||
| + | |||
| + | What is the effect of using '''domainKey''' and '''domainDescription''' inside the application? | ||
| + | The Documentation shows only the syntax. | ||
| + | |||
| + | |||
| + | '''Answer''': | ||
| + | |||
| + | '''domainKey''' and '''domainDescription''' classify what describes the description or the key of the domain. As primary keys are always UUID or ID as integer and do not represent human understandable objects, one can use these two keywords. | ||
| + | Technically, either the '''domainKey''' or the '''domainDescription''' leads to a '''suggestTextField''' in a dialog rendered via autobinding. '''SuggestTextField''' let the user type some letters and will popup a suggestion to be selected. | ||
| + | Whenever a reference to an entity with a '''domainKey''' or '''domainDescription''' is rendered with a comboBox, the classified attribute is used to identify the relationship to the user. If the domain classification is not given, the relationship is not linkable via a comboBox as the system doesn't know which attribute to present to the user. This fact can be used with intent, whenever a relationship is not meant to be changed or seen by a user. | ||
| + | |||
| + | |||
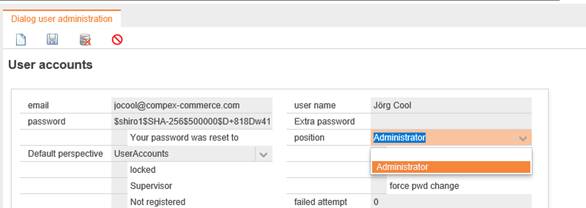
| + | ===assignment user -> position=== | ||
| + | |||
| + | '''Question''': | ||
| + | |||
| + | We defined an organisational structure using the DSL organization. | ||
| + | While maintaining a user (dialog), the defined positions are not shown in the drop-down list. | ||
| + | A dialog base on a predefined dto (org.eclipse.osbp.authentication.account.dtos.UserAccountDto) is used. | ||
| + | Is there anything to consider? | ||
| + | |||
| + | <syntaxhighlight lang="java"> | ||
| + | organization portal Title "Organigramm Portal" { | ||
| + | position Administrator alias "Administrator_1" { | ||
| + | role AdminIT | ||
| + | } | ||
| + | position projectleadinternal alias "Project Lead Internal" superiorPos Administrator { | ||
| + | } | ||
| + | position projectleadexternal alias "Project Lead External" superiorPos Administrator { | ||
| + | } | ||
| + | position projectmemberexternal alias "Project Member External" superiorPos projectleadexternal { | ||
| + | } | ||
| + | |||
| + | } | ||
| + | </syntaxhighlight> | ||
| + | |||
| + | [[File:Osb_dialog_User_accounts.jpg]] | ||
| + | |||
| + | '''Answer''': | ||
| + | |||
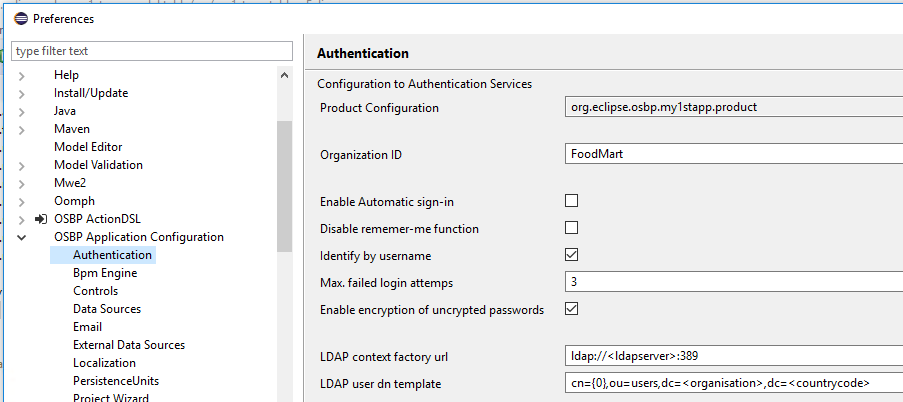
| + | The combo box only shows positions from the Organization DSL if the "Organization and Authorization" component was licensed. If this is not the fact, the default role '''Administrator''' is shown as every user has administrator rights without this component. This could happen if you installed OSBP instead of OS.Bee. | ||
| + | Otherwise, the name of the organization has to be deposited in the eclipse ''Preferences --> OSBP Application Configuration --> Authentication'', in field '''Organization ID''': | ||
| + | |||
| + | [[File:Osb_IDE_preferences_Authentication.png]] | ||
===I18N.properties (Reorganization of obsoleted values)=== | ===I18N.properties (Reorganization of obsoleted values)=== | ||
| Line 776: | Line 1,272: | ||
IMPORTANT: you must modify your build.properties like described [[OS.bee_Documentation_for_Designer#Update_build.properties_to_make_use_of_new_feature|here]]. | IMPORTANT: you must modify your build.properties like described [[OS.bee_Documentation_for_Designer#Update_build.properties_to_make_use_of_new_feature|here]]. | ||
| + | |||
| + | |||
| + | ===Validation=== | ||
| + | |||
| + | If you deal with storing data for later usage, you'll be confronted with the fact that users or imports sometimes enter data that could be invalid for later processing. To avoid these problems you must validate data before it is stored. The necessity of a generic validation upon bean-data was detected in 2009 and the JSR303 was created. Built on this specification Apache created a framework to fullfil the specification BeanValidation. | ||
| + | |||
| + | OS.bee exploits this framework and grants access to some validation annotations by using a grammar extension in DatatypeDSL and EntityDSL. Therefore a kind of business logic is implemented by using validations. Naturally validation keywords are datatype specific and not all can be used everywhere. | ||
| + | |||
| + | The violation of a validation can be signalled to the user in 3 different levels of severity: | ||
| + | * INFO | ||
| + | * WARN | ||
| + | * ERROR | ||
| + | where only ERROR prevents data from saving to database. | ||
| + | |||
| + | The following validations per datatype can be used (either in DatatypeDSL or in EntityDSL): | ||
| + | * For all datatypes | ||
| + | ** isNull invalid if value was set | ||
| + | ** isNotNull invalid if value was never set | ||
| + | |||
| + | * Boolean | ||
| + | ** isFalse invalid if value is true | ||
| + | ** isTrue invalid if value is false | ||
| + | |||
| + | * Date/Time/Timestamp | ||
| + | ** isPast invalid if date lies in the past in reference of today | ||
| + | ** isFuture invalid if date lies in the future in reference of today | ||
| + | |||
| + | * Decimal (1.1, 1.12 ...) | ||
| + | ** maxDecimal invalid if decimal exceeds the given value | ||
| + | ** minDecimal invalid if decimal underruns the given value | ||
| + | ** digits invalid if decimal has more digits or more fraction digits than the given 2 values | ||
| + | ** regex invalid if the value does not match the given regular expression | ||
| + | |||
| + | * Numeric (1, 2, ...) | ||
| + | ** maxNumber invalid if number exceeds the given value | ||
| + | ** minNumber invalid if number underruns the given value | ||
| + | ** minMaxSize invalid if number is not in the given range of 2 values | ||
| + | ** regex invalid if the value does not match the given regular expression | ||
| + | |||
| + | * String | ||
| + | ** regex invalid if the value does not match the given regular expression | ||
| + | |||
| + | The messages prompted to the user come in a localized form out of the Apache framework. | ||
| + | |||
| + | An example for a regular expression is this: | ||
| + | <syntaxhighlight lang="java"> | ||
| + | var String[ regex( "M|F" [severity=error]) ]gender | ||
| + | </syntaxhighlight> | ||
| + | |||
| + | Here an example for a date validation: | ||
| + | <syntaxhighlight lang="java"> | ||
| + | datatype BirthDate dateType date isNotNull isPast[severity=error] | ||
| + | </syntaxhighlight> | ||
| + | |||
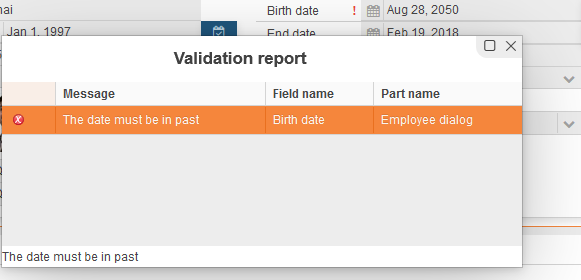
| + | The violation of this rule looks like this: | ||
| + | [[File:osb_validation_report_birthday.png]] | ||
| + | |||
| + | If you point at the exclamation mark beside this field after closing the Validation report you will see: | ||
| + | [[File:osb_validation_tip_birthday.png]] | ||
| + | |||
| + | For EntityDSL there is an extra keyword to validate if an entry is already in the database or not. You can use it if you want '''unique entries''' in a certain field. | ||
| + | <syntaxhighlight lang="java"> | ||
| + | domainKey unique String full_name | ||
| + | </syntaxhighlight> | ||
| + | |||
| + | If there is a violation of this rule, the dialog looks like this: | ||
| + | [[File:osb_validation_tip_name.png]] | ||
| + | |||
| + | This also works for normal fields that are not domainKeys. | ||
| + | |||
| + | |||
| + | ===Extended Validation=== | ||
| + | |||
| + | To enforce business rules can be a sophisticated task for traditional software projects. With OS.bee it is possible to create a DTO validation with the FunctionLibraryDSL with less effort. As DTO build up dialogs in autobinded mode, you get a dialog validator for free. | ||
| + | |||
| + | These are the steps to create one: | ||
| + | * '''create a validation group''' in the FunctionLibraryDSL and name it like the DTO that you want to validate followed by the token Validations: | ||
| + | ::<syntaxhighlight lang="java"> | ||
| + | validation MemployeeDtoValidations { ... }</syntaxhighlight> | ||
| + | ::MemployeeDto would be the '''DTO to validate'''. | ||
| + | |||
| + | * '''create inside the named validation group methods''' that should be processed every time a save button on a dialog is pressed or validate is called from somewhere else: | ||
| + | ::<syntaxhighlight lang="java"> | ||
| + | validate highSalary(Object clazz, Map<String, Object> properties) { ... }</syntaxhighlight> | ||
| + | ::In '''clazz''' the '''DTO to validate''' is given. You could access data that is related to this '''DTO to validate''' e.g. the max salary allowed like this: | ||
| + | ::<syntaxhighlight lang="java"> | ||
| + | var dto = clazz as MemployeeDto | ||
| + | if(dto.salary > dto.position.max_scale) { ... }</syntaxhighlight> | ||
| + | |||
| + | The properties map can be used to get some contextual information and services. | ||
| + | <syntaxhighlight lang="java"> | ||
| + | properties.get("viewcontext.service.provider.thirdparty") | ||
| + | </syntaxhighlight> | ||
| + | gives access to the EclipseContext and therefore to a lot of services registrated there. Use the debugger to get more information. | ||
| + | <syntaxhighlight lang="java"> | ||
| + | var map = properties.get("viewcontext.services") as Map<String,Object> | ||
| + | var user = map.get("org.eclipse.osbp.ui.api.user.IUser") as IUser | ||
| + | </syntaxhighlight> | ||
| + | gives access to the current user's data. To distinct the validation for a certain user role, you could use this code: | ||
| + | <syntaxhighlight lang="java"> | ||
| + | if(!user.roles.contains("Sales")) { ... } | ||
| + | </syntaxhighlight> | ||
| + | |||
| + | Every validate method must return either null if there is no validation rule violated or a Status. The Status is created as following: | ||
| + | <syntaxhighlight lang="java"> | ||
| + | var status = Status.createStatus("", null, IStatus.Severity.ERROR, "salaryTooHigh", dto.salary) | ||
| + | </syntaxhighlight> | ||
| + | |||
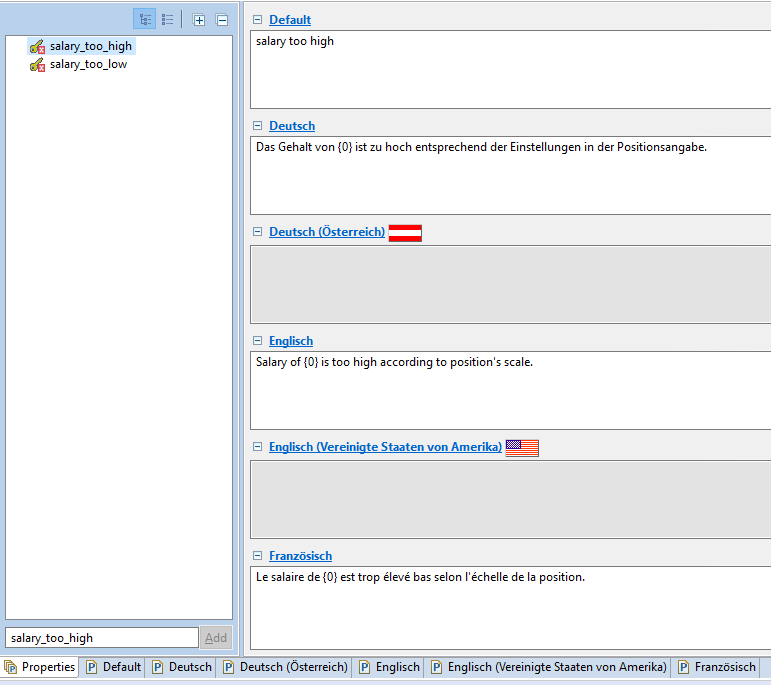
| + | where the first 2 parameters are optional and not explained here. The 3. parameter selects severity (here: error). The 4. parameter is the translation key for the properties file and the last parameter is an optional value that could be integrated into the translated message. Remember that all translation keys are decomposed into lowercase keys with underscores for compatibility reasons. So the key "salaryTooHigh" results in a key "salary_too_high". You could than create a translation like this: | ||
| + | [[File:osb_salary_translation.png]] | ||
| + | |||
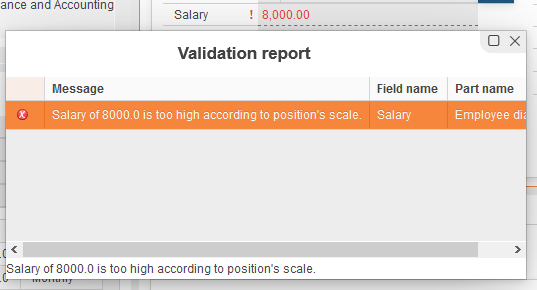
| + | {0} works as placeholder where the last parameter is inset. The appropriate message looks like this in the dialog: | ||
| + | [[File:osb_validation_report_salary.png]] | ||
| + | |||
| + | So, the complete code for the business rule: | ||
| + | "Salaries must be in a range defined by the employee's position record and can't be violated except for users with the role "Sales" who can exceed the upper limit but not below the lower limit." | ||
| + | looks like this: | ||
| + | <syntaxhighlight lang="java"> | ||
| + | validation MemployeeDtoValidations { | ||
| + | validate highSalary(Object clazz, Map<String, Object> properties) { | ||
| + | var dto = clazz as MemployeeDto | ||
| + | if(dto.salary > dto.position.max_scale) { | ||
| + | var map = properties.get("viewcontext.services") as Map<String,Object> | ||
| + | var user = map.get("org.eclipse.osbp.ui.api.user.IUser") as IUser | ||
| + | var IStatus status | ||
| + | if(user.roles.contains("Sales")) { | ||
| + | status = Status.createStatus("", null, IStatus.Severity.ERROR, "salaryTooHigh", dto.salary) | ||
| + | } | ||
| + | status.putProperty(IStatus.PROP_JAVAX_PROPERTY_PATH, "salary"); | ||
| + | return status | ||
| + | } | ||
| + | return null | ||
| + | } | ||
| + | validate lowSalary(Object clazz, Map<String, Object> properties) { | ||
| + | var dto = clazz as MemployeeDto | ||
| + | if(dto.salary < dto.position.min_scale) { | ||
| + | var status = Status.createStatus("", null, IStatus.Severity.ERROR, "salaryTooLow", dto.salary) | ||
| + | status.putProperty(IStatus.PROP_JAVAX_PROPERTY_PATH, "salary"); | ||
| + | return status | ||
| + | } | ||
| + | return null | ||
| + | } | ||
| + | } | ||
| + | </syntaxhighlight> | ||
| + | |||
| + | ===Reset cached data=== | ||
| + | |||
| + | In order to provide a responsive and modifiable user interface, some data is cached while some data is stored to the database. In case you need to reset this data, there is a new keyword in MenuDSL to provide a small dialog where this can be done. | ||
| + | <syntaxhighlight lang="java"> | ||
| + | category Settings systemSettings | ||
| + | </syntaxhighlight> | ||
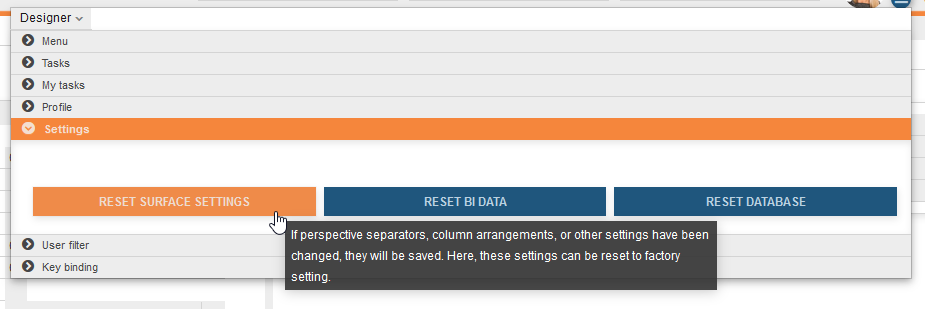
| + | If you have done so, the resulting menu will look like this: | ||
| + | [[File:osb_reset_cached_data.png]] | ||
| + | |||
| + | The tooltip will provide additional information about what can be reset here. | ||
| + | For the moment there are 3 option: | ||
| + | * reset surface settings | ||
| + | *:modifications done by the current user during runtime are stored and restored with the next usage of the application. Modifications comprise | ||
| + | ** splitter positions in perspectives | ||
| + | ** column order in tables | ||
| + | ** column width in tables | ||
| + | ** column hiding intables | ||
| + | |||
| + | * reset BI data | ||
| + | *:the underlying framework for BI data is Mondrian that makes heavy use of caches for cube related data. Whenever data changes through the use of external tools, the cache will not be reset automatically. This can be done here. | ||
| + | |||
| + | * reset database | ||
| + | *:the underlying framework JPA als makes use of caches. For the same reason as with Mondrian, its cache can be reset here. | ||
| + | |||
| + | Therefore, it is no longer needed to restart the application server if data was changed by SQLDeveloper or TOAD or similar tools, just press reset caches here. And, if you are unsatisfied with your private settings for the surface, reset it here to factory settings. | ||
| + | |||
| + | '''WARNING''': If you press "reset database" or "reset BI", the reset comprises the whole application with all currently connected sessions and users. BI analytics and database access will react delayed until all caches are rebuilt. | ||
| + | |||
| + | ===ReportDSL: How to get a checkbox for a Boolean attribute=== | ||
| + | |||
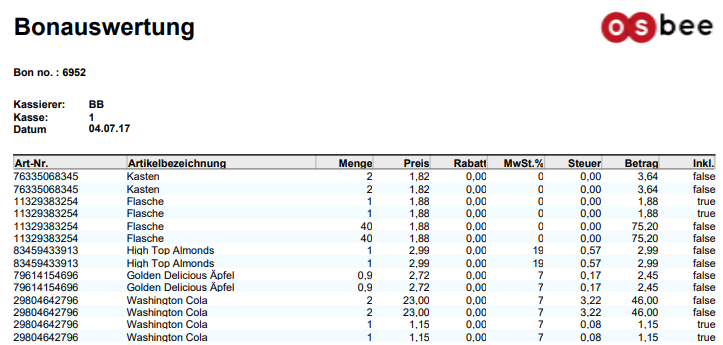
| + | The common outputs for a boolean attribute are the strings "true" or "false". | ||
| + | As you can see in the following report using the attribute: | ||
| + | <syntaxhighlight lang="java"> | ||
| + | entity CashPosition ... { | ||
| + | ... | ||
| + | var boolean taxIncluded | ||
| + | ... | ||
| + | } | ||
| + | </syntaxhighlight> | ||
| + | [[File:osb_report_boolean_taxIncluded.png]] | ||
| + | |||
| + | |||
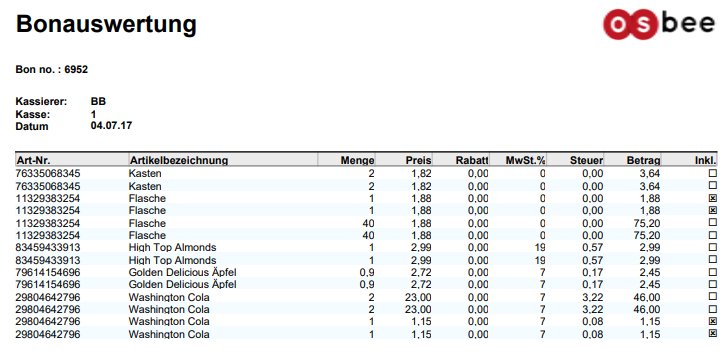
| + | But enhancing the attribute with the property '''checkbox''' as shown here: | ||
| + | <syntaxhighlight lang="java"> | ||
| + | entity CashPosition ... { | ||
| + | ... | ||
| + | var boolean taxIncluded properties ( key = "checkbox" value = "" ) | ||
| + | ... | ||
| + | } | ||
| + | </syntaxhighlight> | ||
| + | |||
| + | the report output for the same boolean attribute is like this: | ||
| + | [[File:osb_report_boolean_checkbox_taxIncluded.png]] | ||
| + | |||
| + | ===How to collect business data and presenting meaningful statistics with OS.bee - INTRODUCTION=== | ||
| + | |||
| + | Before one can present and interpret information, there has to be a process of gathering and sorting data. Just as trees are the raw material from which paper is produced, so too, can data be viewed as the raw material from which information is obtained. | ||
| + | |||
| + | In fact, a good definition of '''data''' is '''"facts or figures from which conclusions can be drawn"'''. | ||
| + | |||
| + | Data can take various forms, but are often numerical. As such, data can relate to an enormous variety of aspects, for example: | ||
| + | * the daily weight measurements of each individual in a region | ||
| + | * the number of movie rentals per month for each household | ||
| + | * the city's hourly temperature for a one-week period | ||
| + | |||
| + | Once data have been collected and processed, they are ready to be organized into information. Indeed, it is hard to imagine reasons for collecting data other than to provide information. This information leads to knowledge about issues, and helps individuals and groups make informed decisions. | ||
| + | |||
| + | Statistics represent a common method of presenting information. In general, statistics relate to numerical data, and can refer to the science of dealing with the numerical data itself. Above all, statistics aim to provide useful information by means of numbers. | ||
| + | |||
| + | Therefore, a good definition of '''statistics'''' is '''"a type of information obtained through mathematical operations on numerical data"'''. | ||
| + | |||
| + | {| class="wikitable" | ||
| + | |- | ||
| + | ! Information !! Statistics | ||
| + | |- | ||
| + | | the number of persons in a group in each weight category (20 to 25 kg, 26 to 30 kg, etc.) || the average weight of colleages in your company | ||
| + | |- | ||
| + | | the total number of households that did not rent a movie during the last month || the minimum number of rentals your household had to make to be in the top 5% of renters for the last month | ||
| + | |- | ||
| + | | the number of days during the week where the temperature went above 20°C || the minimum and maximum temperature observed each day of the week | ||
| + | |} | ||
| + | |||
| + | |||
| + | '''Business analysis''' is the term used to describe visualizing data in a multidimensional manner. Query and report data typically is presented in row after row of two-dimensional data. The first dimension is the headings for the data columns and the second dimension is the actual data listed below those column headings, called the measures. Business analysis allows the user to plot data in row and column coordinates to further understand the intersecting points. But more than 2 dimensions usually apply to business data. You could analyze data along coordinates as time, geography, classification, person, position and many more. | ||
| + | |||
| + | '''OS.bee''' is designed for '''Online analytical processing (OLAP)''' using a multidimensional data model, allowing for complex analytical and ad hoc queries with a rapid execution time. Typical applications of OLAP include business reporting for sales, marketing, management reporting, business process management (BPM), budgeting and forecasting, financial reporting and similar areas. | ||
| + | |||
| + | Study this excellent guide for a deeper understanding of cubes, dimensions, hierarchies and measures:[https://www.ibm.com/communities/analytics/planning-analytics-blog/the-beginners-guide-to-olap-modeling-and-modeling-concepts/ Beginner's guide to OLAP] . | ||
| + | |||
| + | ===How to collect business data and presenting meaningful statistics with OS.bee – PART1=== | ||
| + | |||
| + | '''The storage and retrieval containers''' | ||
| + | |||
| + | In a nutshell: | ||
| + | * we store data using entities and relationships | ||
| + | * we retrieve information using cubes and dimensions. | ||
| + | |||
| + | '''Storage with entities ''' | ||
| + | |||
| + | The backbone of statistics is a container for quantitative facts. | ||
| + | In this tutorial we want to create statistical data upon cash-register sales. We call the container for these facts '''SalesFact'''. It inherits from BaseUUID therefore providing a primary key and some database information and saves data within the persistence unit '''businessdata'': | ||
| + | <syntaxhighlight lang="java"> | ||
| + | entity SalesFact extends BaseUUID { | ||
| + | persistenceUnit "businessdata" | ||
| + | /* actual net revenue */ | ||
| + | var double sales | ||
| + | /* net costs of the goods and costs for storage */ | ||
| + | var double costs | ||
| + | /* quantity of goods sold */ | ||
| + | var double units | ||
| + | } | ||
| + | </syntaxhighlight> | ||
| + | |||
| + | Leaving the container as is we could aggregate some measurements but we have no idea of when, where and what was sold. So we need additional information related to this event of sale. We call it a coordinate system for measures or just a '''dimension'''. | ||
| + | <syntaxhighlight lang="java"> | ||
| + | entity SalesFact extends BaseUUID { | ||
| + | persistenceUnit "businessdata" | ||
| + | /* actual net revenue */ | ||
| + | var double sales | ||
| + | /* net costs of the goods and costs for storage */ | ||
| + | var double costs | ||
| + | /* quantity of goods sold */ | ||
| + | var double units | ||
| + | /* what product was sold */ | ||
| + | ref Mproduct product opposite salesFact | ||
| + | /* when was it sold */ | ||
| + | ref MtimeByDay thattime opposite salesFact | ||
| + | /* to whom it was sold */ | ||
| + | ref Mcustomer customer opposite salesFact | ||
| + | /* was it sold during a promotional campaign */ | ||
| + | ref Mpromotion promotion opposite salesFact | ||
| + | /* where was it sold */ | ||
| + | ref Mstore store opposite salesFact | ||
| + | /* which slip positions were aggregated to this measure (one to many relationship) */ | ||
| + | ref CashPosition[ * ]cashPositions opposite salesFact | ||
| + | /* which cash-register created the sale */ | ||
| + | ref CashRegister register opposite salesFact | ||
| + | } | ||
| + | </syntaxhighlight> | ||
| + | |||
| + | Please don't forget to supply the '''opposite sides of the reference''' (relation) with the backward's references: | ||
| + | <syntaxhighlight lang="java"> | ||
| + | ref SalesFact[ * ]salesFact opposite product | ||
| + | ... | ||
| + | ref SalesFact[ * ]salesFact opposite thattime | ||
| + | ... | ||
| + | ref SalesFact[ * ]salesFact opposite customer | ||
| + | ... | ||
| + | ref SalesFact[ * ]salesFact opposite promotion | ||
| + | ... | ||
| + | ref SalesFact[ * ]salesFact opposite store | ||
| + | ... | ||
| + | ref SalesFact[*] salesFact opposite register | ||
| + | ... | ||
| + | ref SalesFact salesFact opposite cashPositions | ||
| + | </syntaxhighlight> | ||
| + | |||
| + | Let's have a look at a very special container, '''the time'''. The date attribute is not enough. You must amend some additional information and therefore functionality so it becomes a usable dimension: | ||
| + | <syntaxhighlight lang="java"> | ||
| + | entity MtimeByDay extends BaseID { | ||
| + | persistenceUnit "businessdata" | ||
| + | var Date theDate | ||
| + | var String theDay | ||
| + | var String theMonth | ||
| + | var String theYear | ||
| + | var String theWeek | ||
| + | var int dayOfMonth | ||
| + | var int weekOfYear | ||
| + | var int monthOfYear | ||
| + | var String quarter | ||
| + | ref SalesFact[ * ]salesFact opposite thattime | ||
| + | @PrePersist | ||
| + | def void onPersist() { | ||
| + | var dt = new DateTime(theDate) | ||
| + | theDay = dt.dayOfWeek().asText | ||
| + | theWeek = dt.weekOfWeekyear().asText | ||
| + | theMonth = dt.monthOfYear().asText | ||
| + | theYear = dt.year().asText | ||
| + | weekOfYear = dt.weekOfWeekyear().get | ||
| + | dayOfMonth = dt.dayOfMonth().get | ||
| + | monthOfYear = dt.monthOfYear().get | ||
| + | quarter = 'Q'+((month_of_year/3)+01) | ||
| + | } | ||
| + | |||
| + | index byTheDate { | ||
| + | theDate | ||
| + | } | ||
| + | } | ||
| + | </syntaxhighlight> | ||
| + | |||
| + | As you can see from the code, the given date '''theDate''' is used to calculate other values that are useful for retrieving aggregates of measures using a dimension like time with the level '''quarter''' or '''theYear'''. If we want to use a "Timeline" as dimension for statistics from OLAP, we also need to create an entry and a relation to the MtimeByDay entity. | ||
| + | |||
| + | '''How are these calculations invoked?''' | ||
| + | |||
| + | Due to the annotation @PrePersist at the method declaration of '''onPersist''', JPA calls this method every time before a new entry in MtyimeByDay is inserted. Be careful inside these methods: if an exception is thrown due to sloppy programming (e.g. null pointer exception), nothing in the method will be evaluated. | ||
| + | Here are the other entities we need later: | ||
| + | <syntaxhighlight lang="java"> | ||
| + | entity ProductClass extends BaseUUID { | ||
| + | persistenceUnit "businessdata" | ||
| + | domainKey String productSubcategory | ||
| + | var String productCategory | ||
| + | var String productDepartment | ||
| + | var String productFamily | ||
| + | ref Mproduct[ * ]products opposite productClass | ||
| + | } | ||
| + | entity Product extends BaseUUID { | ||
| + | persistenceUnit "businessdata" | ||
| + | domainKey String productName | ||
| + | var String brandName | ||
| + | var String sku | ||
| + | var double srp | ||
| + | var boolean recyclablePackage | ||
| + | var boolean lowFat | ||
| + | ref ProductClass productClass opposite products | ||
| + | ref InventoryFact[ * ]inventories opposite product | ||
| + | ref SalesFact[ * ]salesFact opposite product | ||
| + | ref CashPosition[ * ]cashPositions opposite product | ||
| + | } | ||
| + | entity Customer extends BaseUUID { | ||
| + | persistenceUnit "businessdata" | ||
| + | var String maritalStatus | ||
| + | var String yearlyIncome | ||
| + | var String education | ||
| + | ref SalesFact[ * ]salesFact opposite customer | ||
| + | ref CashSlip[ * ]slips opposite customer | ||
| + | } | ||
| + | entity Promotion extends BaseUUID { | ||
| + | persistenceUnit "businessdata" | ||
| + | domainKey String promotion_name | ||
| + | var String mediaType | ||
| + | var double cost | ||
| + | var Date startDate | ||
| + | var Date endDate | ||
| + | ref SalesFact[ * ]salesFact opposite promotion | ||
| + | } | ||
| + | entity Store extends BaseUUID { | ||
| + | persistenceUnit "businessdata" | ||
| + | domainKey String storeName | ||
| + | var int storeNumber | ||
| + | var String storeType | ||
| + | var String storeCity | ||
| + | var String storeStreetAddress | ||
| + | var String storeState | ||
| + | var String storePostalCode | ||
| + | var String storeCountry | ||
| + | var String storeManager | ||
| + | var String storePhone | ||
| + | var String storeFax | ||
| + | ref InventoryFact[ * ]inventories opposite store | ||
| + | ref SalesFact[ * ]salesFact opposite store | ||
| + | ref CashRegister[ * ]registers opposite store | ||
| + | } | ||
| + | entity InventoryFact extends BaseUUID { | ||
| + | persistenceUnit "businessdata" | ||
| + | var int unitsOrdered | ||
| + | var int unitsShipped | ||
| + | var int supplyTime | ||
| + | var double storeInvoice | ||
| + | ref Product product opposite inventories | ||
| + | ref TimeByDay thattime opposite inventories | ||
| + | ref Store store opposite inventories | ||
| + | } | ||
| + | entity CashRegister extends BaseUUID { | ||
| + | persistenceUnit "businessdata" | ||
| + | domainKey unique String num | ||
| + | var unique String ip | ||
| + | var unique String location | ||
| + | var Date currentDay | ||
| + | ref CashSlip[*]slips opposite register | ||
| + | ref Store store opposite registers | ||
| + | ref SalesFact[*] salesFact opposite register | ||
| + | } | ||
| + | entity CashSlip extends BaseUUID { | ||
| + | persistenceUnit "businessdata" | ||
| + | var Date currentDay | ||
| + | var Timestamp now | ||
| + | var String cashier | ||
| + | var Price total | ||
| + | @ GeneratedValue var long serial | ||
| + | var boolean payed | ||
| + | var boolean posted | ||
| + | ref CashPosition[ * ]positions opposite slip | ||
| + | ref Customer customer opposite slips | ||
| + | ref CashRegister register opposite slips | ||
| + | } | ||
| + | |||
| + | entity CashPosition extends BaseUUID { | ||
| + | persistenceUnit "businessdata" | ||
| + | var Timestamp now | ||
| + | var double quantity | ||
| + | var Price price | ||
| + | var Price amount | ||
| + | ref CashSlip slip opposite positions | ||
| + | ref Product product opposite cashPositions | ||
| + | ref SalesFact salesFact opposite cashPositions | ||
| + | } | ||
| + | </syntaxhighlight> | ||
| + | |||
| + | The mapped superclass from which all entities inherit is this: | ||
| + | <syntaxhighlight lang="java"> | ||
| + | mappedSuperclass BaseUUID { | ||
| + | uuid String id | ||
| + | version int version | ||
| + | } | ||
| + | </syntaxhighlight> | ||
| + | |||
| + | ===How to collect business data and presenting meaningful statistics with OS.bee – PART2=== | ||
| + | |||
| + | '''Retrieval with MDX''' | ||
| + | |||
| + | The framework used to retrieve OLAP data is [https://mondrian.pentaho.com/documentation/schema.php Mondrian from Pentaho]. You'll find a complete documentation with this link. The language to retrieve multi-dimensional data was originally defined by [https://docs.microsoft.com/de-de/sql/analysis-services/multidimensional-models/mdx/mdx-query-the-basic-query?view=sql-server-2017 Microsoft ]and an introduction to the MDX languge can be found there. For the moment not all features of Mondrian are implemented yet. E.g. among others: properties of levels, inline tables, functional dependency and other optimizations, and virtual cubes. | ||
| + | |||
| + | '''Dimensions''' | ||
| + | |||
| + | These dimensions presuppose that you already defined the appropriate entities and data inside. | ||
| + | |||
| + | '''''At what point in time was the sale?''''' | ||
| + | |||
| + | In Cube DSL I define the time dimension as following: | ||
| + | <syntaxhighlight lang="java"> | ||
| + | dimension TheTime typeTime { | ||
| + | hierarchy hasAll allMemberName "All Times" { | ||
| + | entity TimeByDay { | ||
| + | level Year column theYear uniqueMembers levelType TimeYears | ||
| + | level Month column monthOfYear levelType TimeMonths | ||
| + | level Day column dayOfMonth levelType TimeDays | ||
| + | } | ||
| + | } | ||
| + | hierarchy Quarterly hasAll allMemberName "All Times" { | ||
| + | entity TimeByDay { | ||
| + | level Year column theYear uniqueMembers levelType TimeYears | ||
| + | level Quarter column quarter levelType TimeQuarters | ||
| + | level Month column monthOfYear levelType TimeMonths | ||
| + | level Day column dayOfMonth levelType TimeDays | ||
| + | } | ||
| + | } | ||
| + | hierarchy Weekly hasAll allMemberName "All Times" { | ||
| + | entity TimeByDay { | ||
| + | level Year column theYear uniqueMembers levelType TimeYears | ||
| + | level Week column weekOfYear levelType TimeWeeks | ||
| + | level Day column dayOfMonth levelType TimeDays | ||
| + | } | ||
| + | } | ||
| + | } | ||
| + | </syntaxhighlight> | ||
| + | |||
| + | The time dimension consists of several hierarchies. The reason for this is that weeks don't align to month boundaries. Therefore there is no real hierachical structure in this combination. The solution to this is to seperate the dimension in several hierarchies. If a hierarchy has no name by its own, the name is identical to the dimension's name. It is not necessary to define hierarchies but they are very common for many business cases. | ||
| + | |||
| + | Each hierarchy consists of one or more levels of aggregation. The levels should be sorted from the most general to the most specific. Levels have relationships with one another. A day has 24 hours, an hour has 60 minutes, and a minute has 60 seconds. When the levels are organized in order to represent their relationship with one another, a hierarchy is formed. If a measure is stored by using the time in seconds, the cube is able to return all aggregates of this measure per minute, per hour and day. It is not possible to synthesize the more specific level though. This is true for all dimensions, hierarchies and their levels. Levels link to attributes of entities. Best for performance is a so called "star schema" where all levels are united into one entity. The other way is a "snowflake schema" where levels are to be evaluated by navigation through may-to-one relationships. For Mondrian, there is only one level up allowed. | ||
| + | |||
| + | Special for all time related dimensions is that the levels must be classified with an extra keyword to describe the type (TimeYears, TimeMonths, TimeDays, etc.). | ||
| + | |||
| + | '''''Where was the sale?''''' | ||
| + | |||
| + | The dimension for '''Store''' looks like this: | ||
| + | <syntaxhighlight lang="java"> | ||
| + | dimension Store { | ||
| + | hierarchy hasAll allMemberName "All Stores" { | ||
| + | entity Store { | ||
| + | level StoreCountry column storeCountry uniqueMembers | ||
| + | level StoreState column storeState uniqueMembers | ||
| + | level StoreCity column storeCity | ||
| + | level StoreName column storeName uniqueMembers | ||
| + | } | ||
| + | } | ||
| + | } | ||
| + | </syntaxhighlight> | ||
| + | |||
| + | Best practice for levels is to provide the keyword hasAll together with the allMembername. Doing so will enable you to leave the dimension completely by using the '''allMember''' aggregate or to use the '''Children''' (Mondrian) function by using the '''detailed''' keyword in Datamart DSL. The uniqueMembers attribute is used to optimize SQL generation. If you know that the values of a given level column in the dimension table are unique across all the other values in that column across the parent levels, then set '''uniqueMembers="true"''', otherwise, set to '''"false"'''. For example, a time dimension like ''[Year].[Month]'' will have '''uniqueMembers="false"''' at the Month level, as the same month appears in different years. On the other hand, if you had a [Product Class].[Product Name] hierarchy, and you were sure that ''[Product Name]'' was unique, then you can set '''uniqueMembers="true"'''. If you are not sure, then always set '''uniqueMembers="false"'''. At the top level, this will always be '''uniqueMembers="true"''', as there is no parent level. | ||
| + | |||
| + | '''''What was the sale about?''''' | ||
| + | |||
| + | Here is the '''Product''' dimension: | ||
| + | <syntaxhighlight lang="java"> | ||
| + | dimension Product { | ||
| + | hierarchy hasAll allMemberName "All Products" { | ||
| + | entity Product { | ||
| + | level ProductName column productName uniqueMembers | ||
| + | entity ProductClass { | ||
| + | over productClass | ||
| + | level ProductFamily column productFamily uniqueMembers | ||
| + | level ProductDepartment column productDepartment | ||
| + | level ProductCategory column productCategory | ||
| + | level ProductSubcategory column productSubcategory | ||
| + | } | ||
| + | } | ||
| + | } | ||
| + | } | ||
| + | </syntaxhighlight> | ||
| + | |||
| + | '''''Was the sale inside a promotional period?''''' | ||
| + | |||
| + | And the '''Promotions''' dimension: | ||
| + | <syntaxhighlight lang="java"> | ||
| + | dimension Promotions { | ||
| + | hierarchy hasAll allMemberName "All Promotions" { | ||
| + | entity Promotion { | ||
| + | level PromotionName column promotionName uniqueMembers | ||
| + | } | ||
| + | } | ||
| + | } | ||
| + | </syntaxhighlight> | ||
| + | |||
| + | '''''Who was the customer of this sale?''''' | ||
| + | |||
| + | At last the '''Customers''' dimensions: | ||
| + | <syntaxhighlight lang="java"> | ||
| + | dimension Customers { | ||
| + | hierarchy hasAll allMemberName "All Customers" { | ||
| + | entity Customer { | ||
| + | level Country column country uniqueMembers | ||
| + | level StateProvince column stateProvince uniqueMembers | ||
| + | level City column city | ||
| + | } | ||
| + | } | ||
| + | } | ||
| + | dimension EducationLevel { | ||
| + | hierarchy hasAll allMemberName "All Grades" { | ||
| + | entity Customer { | ||
| + | level EducationLevel column education uniqueMembers | ||
| + | } | ||
| + | } | ||
| + | } | ||
| + | dimension MaritalStatus { | ||
| + | hierarchy hasAll allMemberName "All Marital Status" { | ||
| + | entity Customer { | ||
| + | level MaritalStatus column maritalStatus uniqueMembers | ||
| + | } | ||
| + | } | ||
| + | } | ||
| + | dimension YearlyIncome { | ||
| + | hierarchy hasAll allMemberName "All Incomes" { | ||
| + | entity Customer { | ||
| + | level YearlyIncome column yearlyIncome uniqueMembers | ||
| + | } | ||
| + | } | ||
| + | } | ||
| + | </syntaxhighlight> | ||
| + | With the last dimensions: "Education Level, Marital Status and Yearly Income" you can classify the sale in detail and draw conclusions what group of costumers is the most likely to buy a certain product class. | ||
| + | |||
| + | ===How to collect business data and presenting meaningful statistics with OS.bee – PART3=== | ||
| + | |||
| + | '''Putting data inside the storage entities''' | ||
| + | |||
| + | As mentioned in a previous entry, I cannot supply necessary data for all entities that will be referenced to build up dimensions. Also, it is assumed that you have some valid inventory-facts data and sales in your cash-register entities. | ||
| + | |||
| + | In this entry I explain how to collect and enrich data from multiple sources and to insert them using the batch-writing mechanism from JPA. It is vital to your application's OLAP performance to concentrate statistical data to a single entity per topic and cube. The resulting code can be executed manually or in a timer-scheduled manner. | ||
| + | |||
| + | First of all you must define a new '''action''' in your FunctionLibrary DSL file. In this case we want to create a button on the cashregister dialog that, once pressed, will post all sales in the statistical entity and change the current cash-register day to today. For every action class 2 methods must be defined: | ||
| + | * canExecute | ||
| + | : this function is invoked by OS.bee to decide the state of the toolbar button: active (method returns true) or disabled (method returns false). | ||
| + | * execute | ||
| + | : this method holds the code that shall be executed when the enabled button is pressed. | ||
| + | <syntaxhighlight lang="java"> | ||
| + | action CashNewDay { | ||
| + | canExecute canChangeDay( IEclipseContext context ) { | ||
| + | return true | ||
| + | } | ||
| + | execute doNewDay( IEclipseContext context ) { | ||
| + | } | ||
| + | </syntaxhighlight> | ||
| + | |||
| + | Be sure to have IEclipseContext as parameter for both methods, as we will need them later on. | ||
| + | |||
| + | ===How to collect business data and presenting meaningful statistics with OS.bee – PART4=== | ||
| + | |||
| + | '''Use MDX to generate statistics''' | ||
| + | |||
| + | If you reach this part, all needed containers have been defined and filled with data in order to enable business analysis as described in this part. Retrieval of data is defined with Datamart DSL. Datamart DSL eases the way you can define queries and mdx statements. | ||
| + | |||
| + | Let's say you have the following requirement: | ||
| + | |||
| + | '''''show aggregated sales and costs in a table and a diagram of the top 10 products in sales amount by selecting a month and one or many product categories''''' | ||
| + | |||
| + | How would you solve the requirement with sql? This wouldn't be easy. With MDX you can use powerful aggregators that will help you to solve the requirement with just a few words. The correct syntax would be (''the part inside [ ] shows where the selected values have to be inserted''): | ||
| + | <syntaxhighlight lang="java"> | ||
| + | select Non Empty{[Measures].[StoreSales],[Measures].[StoreCost]} on columns, | ||
| + | Non Empty TOPCOUNT([Product].[ProductCategory],10,[Measures].[StoreSales]) | ||
| + | on rows from Sales where ([TheTime].[Month]) | ||
| + | </syntaxhighlight> | ||
| + | |||
| + | The parameter ''[TheTime].[Month]'' for example must be replaced by ''[1997].[3]''. This syntactical element is called a '''slicer''' because it makes a slice through the cube only showing filtered aspects according to that slice. | ||
| + | |||
| + | With the help of Datamart DSL, the model code looks like this: | ||
| + | <syntaxhighlight lang="java"> | ||
| + | datamart SalesTop10ProductTime using cube Sales nonempty { | ||
| + | axis columns { | ||
| + | measure StoreSales | ||
| + | measure StoreCost | ||
| + | } | ||
| + | axis rows { | ||
| + | topcount( 10 ) of hierarchy Product level ProductCategory selected detailed over measure StoreSales | ||
| + | } | ||
| + | slicer hierarchy TheTime level Month filtered | ||
| + | } | ||
| + | </syntaxhighlight> | ||
| + | |||
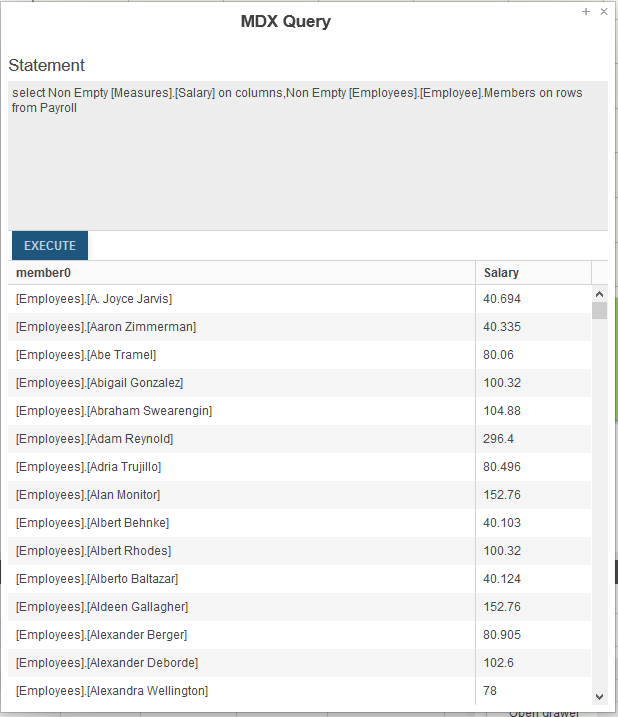
| + | The model contains more keywords than the real MDX but for the sake of simplyfication. And the DSL guides through all possible keywords and references avoiding the error prone process of formulating a correct MDX statement. You can try to enter a MDX statement directly into OS.bee. You can press STRG-ALT+M if a part has the current focus. A dialog pops up with a prepared and valid MDX statement to test connectivity and you can experiment with MDX here. | ||
| + | |||
| + | [[File:Osb_MDX_query.png]] | ||
| + | |||
| + | If you want to show the result of the datamart result in a table, you can enter the following model phrase in Table DSL: | ||
| + | <syntaxhighlight lang="java"> | ||
| + | table SalesTop10ProductTime describedBy "salesTop10Product" as readOnly filtering rowHeader indexed | ||
| + | using datamart SalesTop10ProductTime | ||
| + | </syntaxhighlight> | ||
| + | |||
| + | The table renders like this: | ||
| + | |||
| + | [[File:Osb_table_salesTop10Product.png]] | ||
| + | |||
| + | |||
| + | Let's make a diagram out of these results using Chart DSL. The model phrase looks like this: | ||
| + | <syntaxhighlight lang="java"> | ||
| + | chart SalesTop10ProductTime describedBy "salesTop10Product" as bar | ||
| + | animated shaded using datamart SalesTop10ProductTime { | ||
| + | axis columns renders linear | ||
| + | axis rows renders category shortLabel angle 90 | ||
| + | legend inside toggle replot fast | ||
| + | tooltip north-west inside | ||
| + | } | ||
| + | </syntaxhighlight> | ||
| + | |||
| + | The keyword '''angle''' rotates tick labels by the given value in degrees. | ||
| + | |||
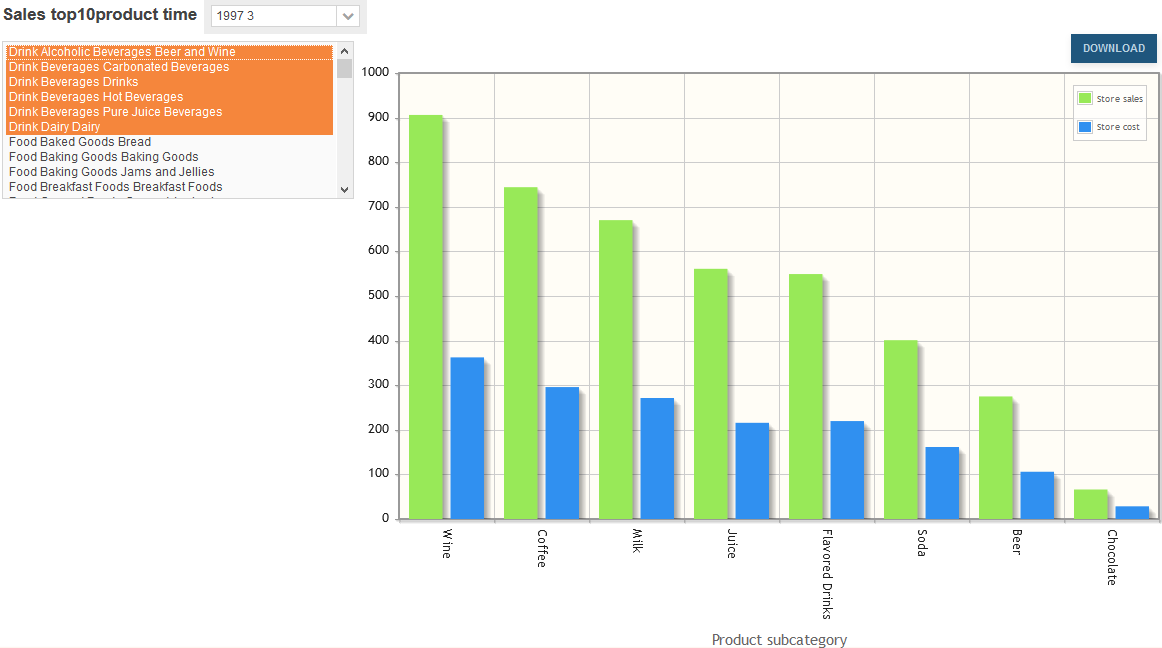
| + | This is how the chart will looks like: | ||
| + | |||
| + | [[File:Osb_chart_salesTop10Product_angle90.png]] | ||
| + | |||
| + | Another requirement against the same cube could sound like this: | ||
| + | |||
| + | '''''Show aggregated sales and costs in a table and a diagram splitted by sales regions and product departments by selecting a month. Some selectable product departments must be excepted from displaying. The exception list must be long enough to see all product departments.''''' | ||
| + | |||
| + | The new requirement requires a multi-dimensional view on information. The datamart model looks similar than the example before except for a new axis representing the extra dimension and the exception filter: | ||
| + | <syntaxhighlight lang="java"> | ||
| + | datamart SalesByProductDepartmentRegionTime showFilterCaptions numberOfMultiSelectionRows 30 using cube Sales { | ||
| + | axis columns { | ||
| + | measure StoreSales | ||
| + | measure StoreCost | ||
| + | } | ||
| + | axis rows { | ||
| + | hierarchy Product level ProductDepartment except ProductDepartment | ||
| + | } | ||
| + | axis pages { | ||
| + | hierarchy Geography level Region | ||
| + | } | ||
| + | slicer hierarchy TheTime level Month filtered | ||
| + | } | ||
| + | </syntaxhighlight> | ||
| + | |||
| + | Axes with increasing dimension are named like this: columns, rows, pages, chapters and sections. For the moment, the number of dimensions to be displayed simultaneously is limited to 5. | ||
| + | The keyword '''showFilterCaptions''' displays a label for the selector additionally to the tooltip, whereas '''numberOfMultiSelectionRows''' followed by a number widens the list to the number of entries given. | ||
| + | |||
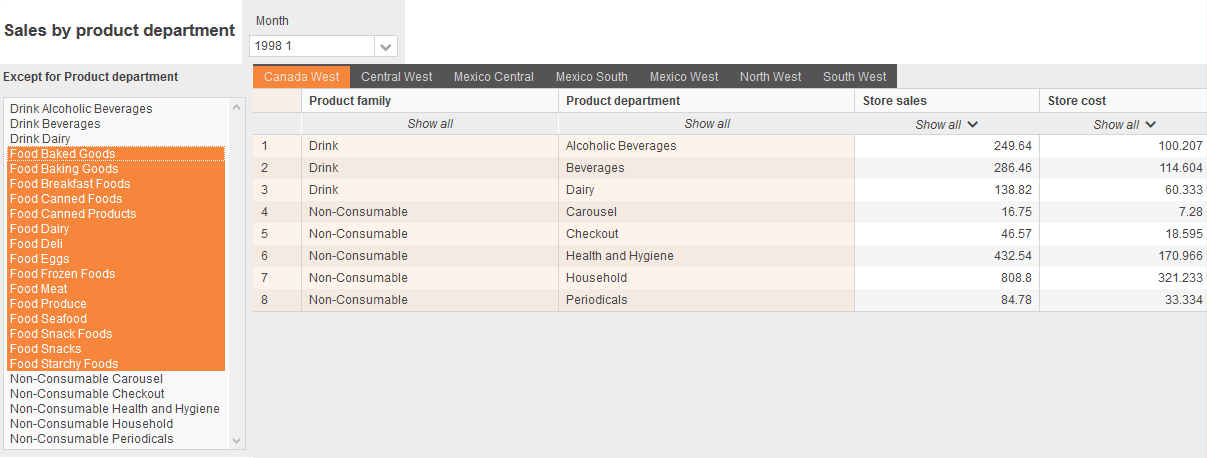
| + | The table's model phrase looks like this: | ||
| + | <syntaxhighlight lang="java"> | ||
| + | table SalesByProductDepartmentRegionTime describedBy "salesByProductDepartment" as readOnly filtering rowHeader indexed using datamart SalesByProductDepartmentRegionTime | ||
| + | </syntaxhighlight> | ||
| + | |||
| + | The '''indexed''' keyword adds a column to show the original sorting from the cube. | ||
| + | |||
| + | [[File:Osb_table_salesByProductDepartmentRegionTime.png]] | ||
| + | |||
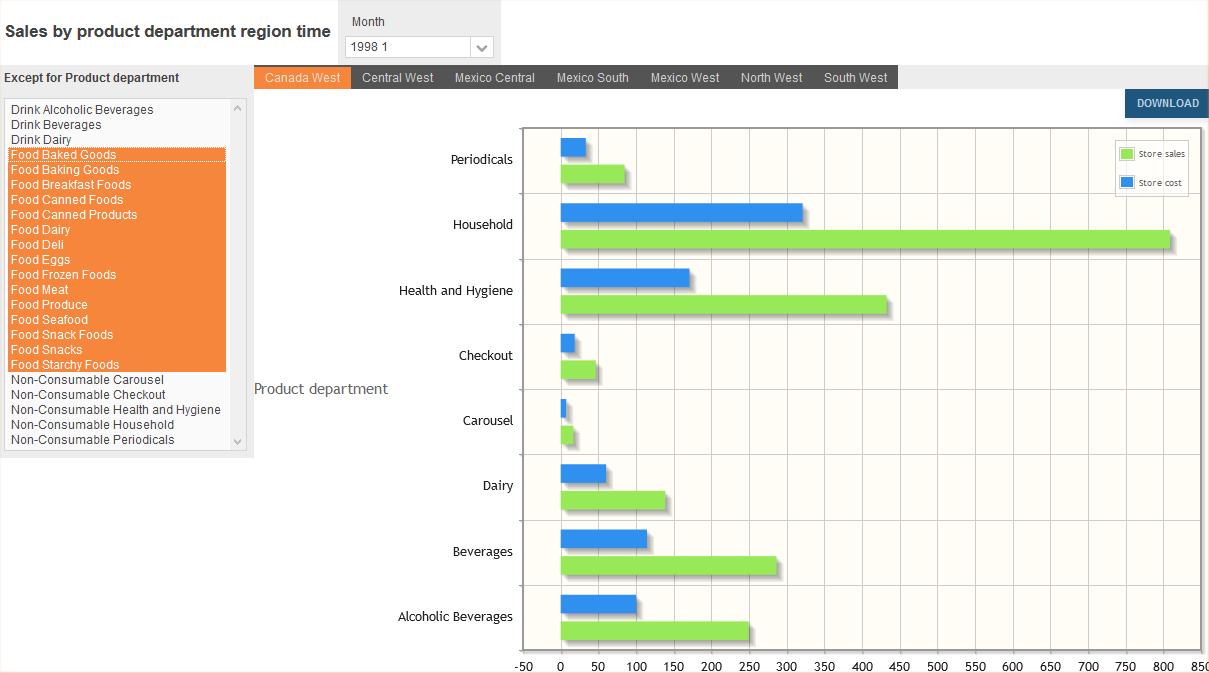
| + | The chart's model phrase is this: | ||
| + | <syntaxhighlight lang="java"> | ||
| + | chart SalesByProductDepartmentRegionTime describedBy "salesByProductDepartment" as bar | ||
| + | animated swapped using datamart SalesByProductDepartmentRegionTime { | ||
| + | axis columns renders linear | ||
| + | axis rows renders category shortLabel | ||
| + | legend inside toggle replot fast | ||
| + | tooltip north-west inside | ||
| + | } | ||
| + | </syntaxhighlight> | ||
| + | |||
| + | The keyword '''shortLabel''' helps to keep the chart clear: it suppresses the long description of dimension level and only shows the last level instead of all supplemental levels above. But there could be reasons to show the fully qualified level-name at the category axis. The keyword '''swapped''' swaps the x-axis with the y-axis. By clicking on an entry from the legend, you can toggle the data series. This is enabled by '''toggle'''. | ||
| + | |||
| + | [[File:Osb_chart_salesByProductDepartmentRegionTime.png]] | ||
| + | |||
| + | As you can see, all "Food" departments are removed from the chart. | ||
| + | |||
| + | ===Surrogate or natural keys in entity models?=== | ||
| + | |||
| + | Nearly every day in my work I'm confronted with the question: | ||
| + | |||
| + | '''''Wouldn't it be better to use the natural key (domain key) than a synthetical UUID ([http://guid.one/guid GUID]) or a generated number?'''' | ||
| + | |||
| + | I found this excellent article that explains in detail the pros and cons: | ||
| + | '''[https://www.zdnet.de/41553179/surrogat-oder-natuerlicher-schluessel-so-trifft-man-die-richtige-entscheidung/ Surrogate or natural key: How to make the right decision]''' | ||
| + | |||
| + | : The superiority of surrogate keys compared to natural keys is a much debated issue among database developers. ZDNet provides tips on when and why which type of key should be preferred. | ||
| + | :: ''by Susan Harkins on May 19, 2011, 4:00 pm'' | ||
| + | |||
| + | According to relational database theory, a correctly normalized table must have a primary key. However, database developers are arguing over whether surrogate keys or natural keys are better. Data contains a natural key. A surrogate key is a meaningless value that is usually generated by the system. Some developers use both types of keys, depending on the application and data, while others strictly adhere to a key type. | ||
| + | |||
| + | The following tips mostly prefer surrogate keys (as the author does), but there should be no stiffening on a key type. It is best to be practical, reasonable and realistic and to use the key that suits you best. However, every developer should keep in mind that he chooses to make a long-term choice, which affects others as well. | ||
| + | # '''A primary key must be unique''' | ||
| + | #: A primary key uniquely identifies each entry in a table and links the entries to other data stored in other tables. A natural key may require multiple fields to create a unique identity for each entry. A surrogate key is already unique. | ||
| + | # '''The primary key should be as compact as possible''' | ||
| + | #: In this case, compact means that not too many fields should be required to uniquely identify each entry. To obtain reliable data, multiple fields may be required. Developers who think natural keys are better often point out that using a primary key with multiple fields is no more difficult than working with a single-field primary key. In fact, it can be quite simple at times, but it can also make you desperate. | ||
| + | #: A primary key should be compact and contain as few fields as possible. A natural key may require many fields. A surrogate key requires only one field. | ||
| + | # '''There can be natural keys with only one field''' | ||
| + | #: Sometimes data has a primary key with only one field. Company codes, part numbers, seminar numbersand ISO standardized articles are examples of this. In these cases, adding a surrogate key may seem superfluous, but you should weigh your final decision carefully. Even if the data seems stable for the moment, appearances can be deceptive. Data and rules change (see point 4). | ||
| + | # '''Primary key values should be stable''' | ||
| + | #: A primary key must be stable. The value of a primary key should not be changed. Unfortunately, data is not stable. In addition, natural data is subject to business rules and other influences beyond the control of the developer. Developers know and accept that. | ||
| + | #: A surrogate key is a meaningless value without any relationship to the data, so there is no reason to ever change it. So when you're forced to change the value of a surrogate key, it means something has been wronged. | ||
| + | # '''Know the value of the primary key to create the entry''' | ||
| + | #: The value of a primary key can never be zero. This means knowing the value of the primary key to create an entry. Should an entry be created before the value of the primary key is known? In theory, the answer to this is no. However, practice sometimes forces one to do so. | ||
| + | #: The system creates surrogate key values when a new entry is created so that the value of the primary key exists as soon as the entry exists. | ||
| + | # '''No duplicate entries are allowed''' | ||
| + | #: A normalized table can not contain duplicate entries. Although this is possible from a mechanical point of view, it contradicts relational theory. Also, a primary key can not contain duplicate values, with a unique index preventing duplicate values. These two rules complement each other and are often cited as arguments for natural keys. The proponents of natural keys point out that a surrogate key allows for duplicate entries. If you want to use a surrogate primary key, just apply an index to the corresponding fields and the problem is solved. | ||
| + | # '''Users want to see the primary key''' | ||
| + | #: There is a misunderstanding about the user's need to know the value of the primary key. There is no reason, theoretical or otherwise, for users to see the primary key value of an entry. In fact, users do not even need to know that such a value exists. It is active in the background and has no meaning to the user as he enters and updates this data, runs reports, and so on. There is no need to map the primary key value to the entry itself. Once you've got rid of the idea that users need the primary key value, you're more open to using a surrogate key. | ||
| + | # '''Surrogate keys add an unnecessary field''' | ||
| + | #: Using a surrogate key requires an extra field, which some consider a waste of space. Ultimately, everything needed to uniquely identify the entry and associate it with data in other tables already exists in the entry. So why add an extra column of data to accomplish what the data alone can do? | ||
| + | #: The cost of a self-generating value field is minimal and requires no maintenance. Taken alone, this is not a sufficient reason for recommending a natural key, but it is a good argument. | ||
| + | # '''Do not systems make mistakes?''' | ||
| + | #: Not everyone trusts system-generated values. Systems can make mistakes. This basically never happens, but it is theoretically possible. On the other hand, a system susceptible to this type of disturbance can also have problems of natural value. To be clear, the best way to protect a complete database, not just the primary key values, is to make regular backups of it. Natural data is also no more reliable than a system-generated value. | ||
| + | # '''Some circumstances seem to require a natural key''' | ||
| + | #: The only reason a natural key might be required is for integrated system entries. In other words, sometimes applications that share similar tables create new entries independently. If you do not make any arrangements, the two databases will probably generate the same values. A natural key in this case would prevent any duplicate primary key values. | ||
| + | #: There are simple tricks to use a surrogate key here. Each system can be given a different starting value, but even that can cause problems. GUIDs work, but often affect performance. Another alternative would be a combined field from the system-generated field of the entry and a source code that is used only when connecting the databases. There are other possibilities, although a natural key seems to be the most reasonable option in this situation. | ||
| + | |||
| + | |||
| + | ''After reading this article you probably wouldn't ask me again, would you? You would, I know it.'' | ||
| + | |||
| + | ===Using "embedded" entities=== | ||
| + | |||
| + | Embeddables are an option to use composition when implementing your entities. They enable you to define a reusable set of attributes. In contrast to association mappings, the embeddable becomes part of the entity and has no persistent identity on its own. In other words it works as if you would literally copy all the fields into the entity that contains embedded object. | ||
| + | |||
| + | Sometimes you have a huge table with several columns. However some columns are logically tied to each other. When you don't want to create an object with all the fields, you create an embedded Address bean. This way you logically group address columns into an object instead of having equally huge entity with a flat list of fields. | ||
| + | |||
| + | Using embedded objects is considered a good practice, especially when strong 1-1 relationship is discovered. | ||
| + | |||
| + | You'll mostly want to use them to reduce duplication or separating concerns. Value objects such as date range, values linked to units of measurement, names (first, middle and last-name) or address are the primary use case for this feature. | ||
| + | |||
| + | The advantage of embedded beans over one-to-one relationsships is higher performance on loading. | ||
| + | |||
| + | Embedded beans used by multiple entities: | ||
| + | [[File:Osb_embedded_beans_multiple_entities.jpg]] | ||
| + | |||
| + | The same entity can use the embedded bean for multiple use: | ||
| + | [[File:Osb_embedded_bean_multiple_use.jpg]] | ||
| + | |||
| + | You can even have a relationship inside an embedded bean: | ||
| + | [[File:Osb_relationship_inside_embedded_bean.jpg]] | ||
| + | |||
| + | In OS.bee there is no need to specify the embeddable annotation as described in JPA documents. As soon as you use '''bean''' keyword it is clear that you mean an embeddable object. If you use it inside an entity, the "embedded" annotation is inserted behind the scenes. Also the annotation '''AttributeOverrides''' is used automatically for embeddable beans embedded multiple times under different names. | ||
| + | These are entities from the '''FoodMart''' example: | ||
| + | <syntaxhighlight lang="java"> | ||
| + | bean Address onTab { | ||
| + | var String country | ||
| + | var String stateProvince | ||
| + | var String postalCode | ||
| + | var String city | ||
| + | var String street | ||
| + | var String number | ||
| + | var String phone | ||
| + | var String fax | ||
| + | } | ||
| + | </syntaxhighlight> | ||
| + | |||
| + | As a default, embedded beans are rendered in a group just like the other groups too. The title of the group is the name of the bean. If you supply the keyword '''onTab''' in the definition of the bean, it is rendered on a separate tab just like references using the keyword '''asGrid'''. | ||
| + | |||
| + | <syntaxhighlight lang="java"> | ||
| + | bean Bank { | ||
| + | var String bankName | ||
| + | var String iban | ||
| + | var String bic | ||
| + | } | ||
| + | entity Company extends BaseUUID { | ||
| + | persistenceUnit "businessdata" | ||
| + | domainKey String companyName | ||
| + | var BlobMapping signingImage group images | ||
| + | var BlobMapping companyImage group images | ||
| + | var Slider_1000_2000 slideDelay group images | ||
| + | var Address delivery | ||
| + | var Address invoice | ||
| + | var Bank bank1 | ||
| + | var Bank bank2 | ||
| + | ref Department[*] departments opposite company asTable | ||
| + | ref AdvertisingSlide[*] slides opposite company asTable | ||
| + | ref Store[*] stores opposite company asTable | ||
| + | } | ||
| + | </syntaxhighlight> | ||
| + | |||
| + | As you can see above, Company has two addresses: one for deliveries and one to send the invoices to. Company has two bank accounts too: bank1 and bank2. | ||
| + | The way to access the iban field of bank2 would be: | ||
| + | <syntaxhighlight lang="java"> | ||
| + | company.bank2.iban = "123456789" | ||
| + | </syntaxhighlight> | ||
| + | |||
| + | This is how the dialog for company looks like using the above definition: | ||
| + | [[File:Osb_dialog_company_embedded_bean.png]] | ||
| + | |||
| + | The '''delivery''' tab: | ||
| + | [[File:Osb_dialog_delivery_embedded_bean.png]] | ||
| + | |||
| + | The '''invoice''' tab: | ||
| + | [[File:Osb_dialog_invoice_embedded_bean.png]] | ||
| + | |||
| + | This is how the entity looks in a database as table: | ||
| + | [[File:Osb_database_embedded_bean.png]] | ||
| + | |||
| + | ===Improve toolbar functionality=== | ||
| + | |||
| + | Two new features are available to enhance the guidance of users with toolbars: | ||
| + | #'''insert a spacer between toolbar items''' | ||
| + | : useful to put some buttons together to one functional group | ||
| + | #'''insert a dialog's state indicators groupinsert a dialog's state indicators group''' | ||
| + | : shows the current state of the related dialog | ||
| + | |||
| + | If you create an Action DSL model like this: | ||
| + | <syntaxhighlight lang="java"> | ||
| + | toolbar Dialog describedBy "Toolbar for dialogs" items { | ||
| + | item newItem command newItem icon "dsnew" | ||
| + | spacer | ||
| + | item saveItem command saveItem icon "dssave" | ||
| + | item saveAndNew command saveAndNew icon "dssaveandnew" | ||
| + | item saveAsNew command saveAsNew icon "dssaveasnew" | ||
| + | spacer | ||
| + | item deleteItem command deleteItem icon "dsdelete" | ||
| + | item cancelItem command cancelItem icon "dscancel" | ||
| + | item databaseInfo command databaseInfo icon "dbinfo" | ||
| + | spacer | ||
| + | state | ||
| + | } | ||
| + | </syntaxhighlight> | ||
| + | |||
| + | The model will result in this: | ||
| + | |||
| + | [[File:Osb_toolbar_imporve_unmodified.png]] | ||
| + | |||
| + | If you add a new entry and violate a constraint it looks like: | ||
| + | |||
| + | [[File:Osb_toolbar_imporve_changed.png]] | ||
| + | |||
| + | ===Fill a new DTO entry with default values=== | ||
| + | |||
| + | As implementation of ticket #797, a new feature is available for the Dialog DSL. | ||
| + | |||
| + | Dialog DSL has a new keyword '''initialization''' to point to an initialization function in FunctionLibrary DSL. This class/method will be executed each time the '''new entry''' button is pressed. The method is designated to put some values into the given dto object. | ||
| + | |||
| + | '''Why is this new feature situated at dialog level and not at entity/DTO level?''' | ||
| + | |||
| + | Because it is more flexible there. You can define different dialogs based on the same DTO/Entity but each of them behaving differently. The context where the initialization was called can be taken into account to calculate different default values. | ||
| + | |||
| + | '''''Here is an example:''''' | ||
| + | |||
| + | In the FunctionLibrary DSL there is a new group keyword called '''initialization''' where all methods to provide default values to DTOs can be collected. Let's say we want, every time the '''new entry''' button is pressed, the field '''fullname''' be preset to '''New Employee''' and the hire date be set to today. As minimum wage we assume 5000 bucks. So the initialization method must look like this: | ||
| + | <syntaxhighlight lang="java"> | ||
| + | initialization Initializations { | ||
| + | initialize initEmployee( Object clazz, Map < String, Object > properties ) { | ||
| + | var dto = clazz as EmployeeDto | ||
| + | dto.fullName = "New Employee" | ||
| + | dto.salary = 5000 | ||
| + | dto.hireDate = DateTime.now.toDate | ||
| + | return true | ||
| + | } | ||
| + | } | ||
| + | </syntaxhighlight> | ||
| + | |||
| + | The method must return true if it was successful. The method can return false as well if an operation failed and you want signal the failure to the user. | ||
| + | |||
| + | '''''Important:''' Never call a class '''class''' inside FunctionLibrary as you must avoid using reserved words of Java, use '''clazz''' instead.'' | ||
| + | |||
| + | If we reference this definition in Dialog DSL, we must type a model phrase like this: | ||
| + | <syntaxhighlight lang="java"> | ||
| + | dialog Employee autobinding EmployeeDto toolbar Employee initialization Initializations.initEmployee | ||
| + | </syntaxhighlight> | ||
| + | As you can see, we arrange the group name and the method name with a dot in between. | ||
| + | |||
| + | That's all. The dialog, if the '''new entry''' button was pressed, looks like this: | ||
| + | |||
| + | [[File:Osb_dialog_Employee_new_entry_default_value.png]] | ||
| + | |||
| + | ===Prevent visibility or editability in general=== | ||
| + | |||
| + | That visibility and editability is controllable by the Authorization-DSL is well known. New is the feature to supply keywords at Entity DSL - level to control these properties upfront. Even if an authorization tells another thing, these fields won't change. | ||
| + | |||
| + | *; hidden | ||
| + | : will make the field for this attribute invisible to all renderer* (dialog, table, report, etc.) | ||
| + | *; readOnly | ||
| + | : will make the field for this attribute not editable on dialogs | ||
| + | |||
| + | (* a software or hardware process that generates a visual image from a model.) | ||
| + | |||
| + | '''''Here is an example:''''' | ||
| + | |||
| + | [[File:Osb_dialog_Employee_original.png]] | ||
| + | |||
| + | Let's say that our employee is only activatable or deactivatable through a process and not by humans using this dialog. The day of dismissal comes from an external software program by interface and cannot be changed here. So we would modify the entity model like this: | ||
| + | <syntaxhighlight lang="java"> | ||
| + | var hidden Boolean active group business | ||
| + | var readOnly Date endDate group business | ||
| + | </syntaxhighlight> | ||
| + | |||
| + | The newly rendered dialog would look like this: | ||
| + | |||
| + | [[File:Osb_dialog_Employee_hidden_readOnly.png]] | ||
| + | |||
| + | As you can see, the '''active''' checkbox is missing and '''end date''' can no longer be manipulated from here. | ||
| + | |||
| + | |||
| + | ===Parameterized Report=== | ||
| + | |||
| + | Resolving the ticket #912 a new kind of report dsl model definition is available now: | ||
| + | |||
| + | <syntaxhighlight lang="java"> | ||
| + | report <ReportID> { | ||
| + | rendering pdf parametrized | ||
| + | } | ||
| + | </syntaxhighlight> | ||
| + | |||
| + | This parameterized report only requires the 'rendering' option and the new keyword '''parametrized''' as its report definition (the rpt-design file) will not be generated by the ReportDSL as the already existing reports but it requires an already existing "handmade" report design as rpt-design file. | ||
| + | |||
| + | Furthermore, it does not use a datamart as data source, so no datamart definition is necessary. | ||
| + | |||
| + | This report only works with an existing report design based on a JDBC connection as data source and with a parameterized SQL command to collect the required data. And this report design file must have as file name the defined 'ReportID' in the report dsl model instance. | ||
| + | |||
| + | In addition, it must be stored in the rptdesign directory of the report models bundle and within the sub-directory structure that the defined package in the report dsl model instance indicates. | ||
| + | |||
| + | With a parameterized report defined as this: | ||
| + | |||
| + | <syntaxhighlight lang="java"> | ||
| + | package org.eclipse.osbp.my1stapp.model.reports { | ||
| + | report BirtParametrizedPersonsBirthdate { | ||
| + | rendering pdf parametrized | ||
| + | } | ||
| + | } | ||
| + | </syntaxhighlight> | ||
| + | |||
| + | located in the wizard created '''MY1APP''' application a corresponding rpt-design file named '''BirtParametrizedPersonsBirthdate.rptdesign''' has to be created in | ||
| + | ''/org.eclipse.osbp.my1stapp.model.report/rptdesign/org/eclipse/osbp/my1stapp/model/reports/BirtParametrizedPersonsBirthdate.rptdesign''. | ||
| + | |||
| + | The corresponding example of a defined JDBC data source to a MYSQL database and the parameterized SQL command in a report design could be like this: | ||
| + | |||
| + | <syntaxhighlight lang="java"> | ||
| + | <data-sources> | ||
| + | <oda-data-source extensionID="org.eclipse.birt.report.data.oda.jdbc" name="cxdb" id="493"> | ||
| + | <property name="odaDriverClass">com.mysql.jdbc.Driver</property> | ||
| + | <property name="odaURL">jdbc:mysql://localhost:3306/my1stapp</property> | ||
| + | <property name="odaUser">root</property> | ||
| + | <encrypted-property name="odaPassword" encryptionID="base64">bXlzcWw=</encrypted-property> | ||
| + | </oda-data-source> | ||
| + | </data-sources> | ||
| + | <data-sets> | ||
| + | <oda-data-set extensionID="org.eclipse.birt.report.data.oda.jdbc.JdbcSelectDataSet" name="DataSet_Person" id="3"> | ||
| + | <list-property name="parameters"> | ||
| + | <structure> | ||
| + | <property name="name">param_1</property> | ||
| + | <property name="paramName">PersonLastName</property> | ||
| + | <property name="dataType">string</property> | ||
| + | <property name="position">1</property> | ||
| + | <property name="isInput">true</property> | ||
| + | <property name="isOutput">false</property> | ||
| + | </structure> | ||
| + | <structure> | ||
| + | <property name="name">param_2</property> | ||
| + | <property name="paramName">BirthdateFromDate</property> | ||
| + | <property name="dataType">date</property> | ||
| + | <property name="position">2</property> | ||
| + | <property name="isInput">true</property> | ||
| + | <property name="isOutput">false</property> | ||
| + | </structure> | ||
| + | <structure> | ||
| + | <property name="name">param_3</property> | ||
| + | <property name="paramName">BirthdateToDate</property> | ||
| + | <property name="dataType">date</property> | ||
| + | <property name="position">3</property> | ||
| + | <property name="isInput">true</property> | ||
| + | <property name="isOutput">false</property> | ||
| + | </structure> | ||
| + | </list-property> | ||
| + | <structure name="cachedMetaData"> | ||
| + | <list-property name="resultSet"> | ||
| + | <structure> | ||
| + | <property name="position">1</property> | ||
| + | <property name="name">first_name</property> | ||
| + | <property name="dataType">string</property> | ||
| + | <property name="nativeDataType">1</property> | ||
| + | </structure> | ||
| + | <structure> | ||
| + | <property name="position">2</property> | ||
| + | <property name="name">last_name</property> | ||
| + | <property name="dataType">string</property> | ||
| + | <property name="nativeDataType">1</property> | ||
| + | </structure> | ||
| + | <structure> | ||
| + | <property name="position">3</property> | ||
| + | <property name="name">birthdate</property> | ||
| + | <property name="dataType">date</property> | ||
| + | <property name="nativeDataType">91</property> | ||
| + | </structure> | ||
| + | </list-property> | ||
| + | </structure> | ||
| + | <property name="dataSource">cxdb</property> | ||
| + | <list-property name="resultSet"> | ||
| + | <structure> | ||
| + | <property name="position">1</property> | ||
| + | <property name="name">first_name</property> | ||
| + | <property name="nativeName">first_name</property> | ||
| + | <property name="dataType">string</property> | ||
| + | <property name="nativeDataType">1</property> | ||
| + | </structure> | ||
| + | <structure> | ||
| + | <property name="position">2</property> | ||
| + | <property name="name">last_name</property> | ||
| + | <property name="nativeName">last_name</property> | ||
| + | <property name="dataType">string</property> | ||
| + | <property name="nativeDataType">1</property> | ||
| + | </structure> | ||
| + | <structure> | ||
| + | <property name="position">3</property> | ||
| + | <property name="name">birthdate</property> | ||
| + | <property name="nativeName">birthdate</property> | ||
| + | <property name="dataType">date</property> | ||
| + | <property name="nativeDataType">91</property> | ||
| + | </structure> | ||
| + | </list-property> | ||
| + | <xml-property name="queryText"><![CDATA[select first_name,last_name,birthdate from Person where (last_name = ?) and (birthdate between ? and ?)]]></xml-property> | ||
| + | </oda-data-set> | ||
| + | </data-sets> | ||
| + | </syntaxhighlight> | ||
| + | |||
| + | As this report design works with 3 parameters ('''PersonLastName''' - datatype string, '''BirthdateFromDate''' - datatype date, '''BirthdateToDate''' - datatype date) as input these have to be provided. Therefore first of all a '''ideview''' within a ui dsl model instance has to be defined with the required ui elements for the 3 required input parameters. | ||
| + | |||
| + | So the new ideview in a ui dsl model instance could be like this: | ||
| + | |||
| + | <syntaxhighlight lang="java"> | ||
| + | ideview BirtParametrizedPersonsBirthdate { | ||
| + | datasource person:PersonDto | ||
| + | datasource birthdateFrom:Date | ||
| + | datasource birthdateTo:Date | ||
| + | horizontalLayout HL { | ||
| + | form VL { | ||
| + | combo Person { | ||
| + | type PersonDto | ||
| + | captionField lastName useBeanService | ||
| + | } | ||
| + | datefield BirthdateFrom | ||
| + | datefield BirthdateTo | ||
| + | } | ||
| + | } | ||
| + | bind person <-- [this.HL.VL.Person].selection | ||
| + | bind birthdateFrom <-- [this.HL.VL.BirthdateFrom].value | ||
| + | bind birthdateTo <-- [this.HL.VL.BirthdateTo].value | ||
| + | } | ||
| + | </syntaxhighlight> | ||
| + | |||
| + | In this view 3 data container ('''person''', '''birthdateFrom''', '''birthdateTo''') are defined to caught the required data that has to provided to the report. | ||
| + | Besides, it defined layouts to structure the view and within the layouts 3 ui components as interaction interface with the user who provides the input data for the request to the parameterized report. | ||
| + | At least the 3 ui elements are binded to the 3 data container from where the corresponding data can be fetched. | ||
| + | |||
| + | To get this data a new functional action with an execute command specially adapted to the corresponding ideview and report has to be defined in a functional dsl model instance. That command has to get the data from the ui elements and provide them as parameters to the corresponding report via event dispatcher. | ||
| + | |||
| + | That new functional action with its corresponding execute command in a functionlibrary dsl model instance could be like this: | ||
| + | |||
| + | <syntaxhighlight lang="java"> | ||
| + | action ParametrizedReports { | ||
| + | execute sendPersonsBirthdate (IEclipseContext context) { | ||
| + | var viewContext = context.get(typeof(IViewContext)) | ||
| + | var eventDispatcher = context.get(typeof(IEventDispatcher)) | ||
| + | var person = viewContext.getBean("person") as PersonDto | ||
| + | var birthdateFrom = viewContext.getBean("birthdateFrom") | ||
| + | var birthdateTo = viewContext.getBean("birthdateTo") | ||
| + | var parameterPerson = new Parameter("PersonLastName", person.lastName, "Person") | ||
| + | var parameterBirthdateFrom = new Parameter("BirthdateFromDate", birthdateFrom, "Birthdate from") | ||
| + | var parameterBirthdateTo = new Parameter("BirthdateToDate", birthdateTo, "Birthdate to") | ||
| + | var parameterList = <Parameter>newArrayList() | ||
| + | parameterList.add(parameterPerson) | ||
| + | parameterList.add(parameterBirthdateFrom) | ||
| + | parameterList.add(parameterBirthdateTo) | ||
| + | var evnt = new EventDispatcherEvent(EventDispatcherCommand.ACTION, "org.eclipse.osbp.my1stapp.model.reports.BirtParametrizedPersonsBirthdateReport", "org.eclipse.osbp.my1stapp.model.functionlibraries.ParametrizedReports.sendPersonsBirthdate"); | ||
| + | evnt.addItem(EventDispatcherDataTag.OBJECT, parameterList) | ||
| + | eventDispatcher.sendEvent(evnt) | ||
| + | return false | ||
| + | } | ||
| + | } | ||
| + | </syntaxhighlight> | ||
| + | |||
| + | The 3 data container ('''person''', ''' birthdateFrom''', '''birthdateTo''') defined in the ideview are used to get the required data for the report. That data is used to create a parameter list with the 3 required report parameters ('''PersonLastName''', '''BirthdateFromDate''', '''BirthdateToDate''') and to sent them within an event dispatcher event. | ||
| + | This event must have '''EventDispatcherCommand.ACTION''' as event dispatcher command tag, the full qualified name of the receiving report (''org.eclipse.osbp.my1stapp.model.reports.BirtParametrizedPersonsBirthdateReport'') for this event and the full qualified name of the sending execute action (''org.eclipse.osbp.my1stapp.model.functionlibraries.ParametrizedReports.sendPersonsBirthdate''). | ||
| + | So the corresponding receiving report can get this parameters, execute its SQL command and show the result as a BIRT report. | ||
| + | |||
| + | But to be able to execute that command in an action dsl model instance a command using that corresponding functional action and a corresponding toolbar using that command has to be defined. | ||
| + | |||
| + | That new command and toolbar in a action dsl model instance could be like this: | ||
| + | |||
| + | <syntaxhighlight lang="java"> | ||
| + | command sendParametrizedPersonsBirthdateReport functionalAction group ParametrizedReports canExecute canSend executeImmediate sendPersonsBirthdate | ||
| + | toolbar ParametrizedPersonsBirthdateReport describedBy "Toolbar to send a parametrized report of persons within a range of birthdates" items { | ||
| + | item sendReport command sendParametrizedPersonsBirthdateReport icon "para_report" | ||
| + | } | ||
| + | </syntaxhighlight> | ||
| + | |||
| + | The command refers to the above mentioned functional action group '''ParametrizedReports''' and the immediate call of the execute command '''sendPersonsBirthdate'''. | ||
| + | And the toolbar keeps the command. | ||
| + | |||
| + | Now we have defined a parameterized report (ReportDSL), an ideview for the input fields (UiDSL), a functional action to provide the parameters (FuntionLibraryDSL) and a toolbar keeping a command to start the parameter sending event (ActionDSL). | ||
| + | |||
| + | After all, all these individual components have to be put together into one unit. | ||
| + | |||
| + | So first, the toolbar and the ideview are brought together within a dialog defined in a dialog dsl model instance like this: | ||
| + | |||
| + | <syntaxhighlight lang="java"> | ||
| + | dialog BirtParametrizedPersonsBirthdate view BirtParametrizedPersonsBirthdate parametrized toolbar ParametrizedPersonsBirthdateReport | ||
| + | </syntaxhighlight> | ||
| + | |||
| + | That dialog and the corresponding receiving report are put together in one perspective like this: | ||
| + | |||
| + | <syntaxhighlight lang="java"> | ||
| + | perspective BirtParametrizedPersonsBirthdate iconURI "para_report" { | ||
| + | sashContainer BirtParametrizedPersonsBirthdateContainer orientation horizontal { | ||
| + | part BirtParametrizedPersonsBirthdateDialog view dialog BirtParametrizedPersonsBirthdate | ||
| + | part BirtParametrizedPersonsBirthdateReport view report BirtParametrizedPersonsBirthdate | ||
| + | } | ||
| + | } | ||
| + | </syntaxhighlight> | ||
| + | |||
| + | And finally that perspective defined as menu entry like this: | ||
| + | <syntaxhighlight lang="java"> | ||
| + | entry BirtParametrizedPersonsBirthdate perspective BirtParametrizedPersonsBirthdate | ||
| + | </syntaxhighlight> | ||
| + | |||
| + | So the result could be like this: | ||
| + | |||
| + | [[File:Osb_Parametrized_Report.png]] | ||
| + | |||
| + | |||
| + | ===How to manage generated numbers with OS.bee=== | ||
| + | |||
| + | Generated numbers can be implemented by using annotations in the entity model. | ||
| + | A complete definition consists of 3 components: | ||
| + | * the attribute of an entity, which contains a numeric value | ||
| + | * one annotation containing the strategy (Generated Value) for the generation of the value | ||
| + | * one annotation containing the generator itself (TableGenerator). | ||
| + | |||
| + | Example in the entity DSL: | ||
| + | |||
| + | <syntaxhighlight lang="java"> | ||
| + | @ TableGenerator ( name="GEN_ID", | ||
| + | initialValue=500, | ||
| + | table="NUMBERRANGETABLE", | ||
| + | pkColumnName="keycolumn", | ||
| + | valueColumnName="valuecolumn", | ||
| + | allocationSize=01) | ||
| + | @ GeneratedValue ( strategy=TABLE, | ||
| + | generator="GEN_ID") | ||
| + | var Long idNumber | ||
| + | </syntaxhighlight> | ||
| + | |||
| + | In this example we have a numeric attribute called '''idNumber''', which will contain the number out of a specified number range. | ||
| + | |||
| + | '''@ GeneratedValue''' | ||
| + | The user has to place an annotation called '''@ GeneratedValue''' exactly in the line before the attribute definition. This annotation contains the strategy, in which way the system should generate a number range – there are the posssibilities TABLE (which is in the example), SEQUENCE, IDENTITY and AUTO. The second information contains the name of the generator , which must be given in the option '''generator'''. If the user has chosen TABLE there must be an additional annotation called '''@ TableGenerator''' (In case of a strategy – definition SEQUENCE there must be inserted a '''@SequenceGenerator'''. IDENTITY has been not used until now). | ||
| + | |||
| + | '''@ TableGenerator''' | ||
| + | This section defines the way of generating the number range. '''initialValue''' contains the starting value, which will be taken at first to fill the attribute idNumber. In our case it contains the value 500. AllocationSize=01 (simply 1 leads to an errormessage) defines how many values are taken at once. AllocationSize 1 increments the attribute '''idNumber''' for each row. In this examle the recent number is stored in a table in the database named by the option '''table'''. The column names are given in '''pkColumnName''' and valueColumnName. | ||
| + | The example leads to a new table named '''numberrangeTable''', which contains the attributes '''keyColumn''' as the primary key, which contains the string '''GEN_ID''' and the '''valueColumn''', which contains the recent value. | ||
| + | |||
| + | Of course it is possible to create a dialogue or a table based on corresponding dto in order to display the values in this table. | ||
| + | |||
| + | <syntaxhighlight lang="java"> | ||
| + | entity numberrangeTable { | ||
| + | persistenceUnit "businessdata" | ||
| + | uuid String keycolumn | ||
| + | var String keyname | ||
| + | var Long valuecolumn | ||
| + | @PrePersist | ||
| + | @PreSave | ||
| + | @PostLoad | ||
| + | def void calculations () { | ||
| + | keyname = keycolumn | ||
| + | } | ||
| + | } | ||
| + | </syntaxhighlight> | ||
| + | |||
| + | ===Enter new data using a "sidekick"=== | ||
| + | |||
| + | Sometimes, if large amounts of data must be entered into the database, a problem arises: you need an owner (the one side of a one-to-many-relationship) which is not yet in the database. Best case you already have the possibility to use a dialog on the current perspective without the need to open another perspective. But this could not be the case. The advanced modeler can now solve this problem and allow a '''sidekick''' option in the entity model (EntityDSL). | ||
| + | |||
| + | This is a dialog on a perspective to enter data for stores. Every store has to be linked to a region and a company. This is done using the appropriate combo-boxes that make up the relationship. | ||
| + | |||
| + | [[File:Osb_dialog_store_without_sidekick.png]] | ||
| + | |||
| + | The current entity model looks like this: | ||
| + | |||
| + | <syntaxhighlight lang="java"> | ||
| + | entity Store extends BaseID { | ||
| + | persistenceUnit "businessdata" | ||
| + | domainKey String storeName group basic | ||
| + | var int storeNumber group basic | ||
| + | var String storeType group type | ||
| + | var String storeCity group address | ||
| + | var String storeStreetAddress group address | ||
| + | var String storeState group address | ||
| + | var String storePostalCode group address | ||
| + | var String storeCountry group address | ||
| + | var String storeManager group basic | ||
| + | var String storePhone group basic | ||
| + | var String storeFax group basic | ||
| + | var Date firstOpenedDate group type | ||
| + | var Date lastRemodelDate group type | ||
| + | var int storeSqft group type | ||
| + | var int grocerySqft group type | ||
| + | var double frozenSqft group type | ||
| + | var double meatSqft group type | ||
| + | var boolean coffeeBar group type | ||
| + | var boolean videoStore group type | ||
| + | var boolean saladBar group type | ||
| + | var boolean preparedFood group type | ||
| + | var boolean florist group type | ||
| + | ref Region region opposite stores group address | ||
| + | ref cascadeMergePersist Warehouse[ * ]warehouses opposite store asGrid | ||
| + | ref Employee [ * ] employees opposite store asTable | ||
| + | ref ReserveEmployee[ * ]reserveEmployees opposite store | ||
| + | ref InventoryFact[ * ]inventories opposite store | ||
| + | ref ExpenseFact[ * ]expenses opposite store | ||
| + | ref SalesFact[ * ]sales opposite store | ||
| + | ref CashRegister[ * ]registers opposite store asGrid | ||
| + | ref Company company opposite stores group basic | ||
| + | } | ||
| + | </syntaxhighlight> | ||
| + | |||
| + | If you add the '''sideKick''' keyword near the relationship definition '''ref''' the modified model lines looks like this: | ||
| + | |||
| + | <syntaxhighlight lang="java"> | ||
| + | ref Region region opposite stores sideKick group address | ||
| + | ref Company company opposite stores sideKick group basic | ||
| + | </syntaxhighlight> | ||
| + | |||
| + | The rendering will change and supply extra buttons to perform the sidekick action for this relationships. | ||
| + | |||
| + | [[File:Osb_dialog_store_sidekick.png]] | ||
| + | |||
| + | Presumed, you already defined an autobinded dialog for company and region, you can enter new data or even change existing. | ||
| + | |||
| + | Dialog model: | ||
| + | |||
| + | <syntaxhighlight lang="java"> | ||
| + | dialog Company describedBy "Company" autobinding CompanyDto toolbar Dialog numColumns 1 | ||
| + | dialog Region describedBy "Region" autobinding RegionDto toolbar Dialog numColumns 1 | ||
| + | </syntaxhighlight> | ||
| + | |||
| + | The rendering engine will look for suitable dialogs and display them if the button is pressed. | ||
| + | |||
| + | [[File:Osb_sidekick_company_region.png]] | ||
| + | |||
| + | If you use the suggest button at the domain-key field, you can load existing data into the sidekick-dialog or just enter new data. If new data is ready to persist, press the update button. | ||
| + | |||
| + | [[File:Osb_sidekick_company_region_filled.png]] | ||
| + | |||
| + | Sidekick-dialogs pop up in '''modal''' mode. So you must first close the dialog before you can reach other elements on the current perspective. The company sidekick button looks similar and is a clone of the dialog already present on the current perspective. | ||
| + | |||
| + | [[File:Osb_sidekick_company.png]] | ||
| + | |||
| + | |||
| + | ===Faster development on perspectives=== | ||
| + | |||
| + | Perspectives in OS.bee arrange screen areas by assigning sash containers, part stacks and parts to the visible area. It is somehow difficult to imagine the resulting layout and it takes some time to see the changes. You had to restart the application server. | ||
| + | |||
| + | Here are good news: perspectives can now be reloaded without restarting the server. The drop-down menu <code>designer</code> shows a new menu-item called <code>reload perspectives</code>: | ||
| + | |||
| + | [[File:Osb_designer_menu_reload_perspectives.png]] | ||
| + | |||
| + | |||
| + | Whenever you change one or more perspective layouts, open them and open the user menu. Click on <code>Reload perspectives</code>. Under the hood, the current perspective model is unloaded from the Xtext resource set and all opened perspectives are closed. After that all perspectives are opened again automatically. As they render the new model is loaded and displayed. | ||
| + | |||
| + | |||
| + | ===How to filter references=== | ||
| + | |||
| + | ;What are references in general | ||
| + | |||
| + | References in the EntityDSL are transformed to relationships at the database layer. It is easy to work with relationships through the use of references in OS.bee. References enable the designer to build trees of relationships between entities. OS.bee uses references defined in 2 ways. One way defines the ownership of another entity like in '''is member of'''. The other way defines the membership like in '''is owner of'''. Therefore references build up associations that describes the function of that relationship. This is called '''degree of relationship'''or '''cardinality'''. Common cardinalities are '''one-to-one''', '''one-to-many''' and '''many-to-many'''. The cardinality of '''many-to-one''' is just the opposite view of a '''one-to-many''' relationship. | ||
| + | |||
| + | |||
| + | ;References in the UI | ||
| + | |||
| + | When a reference '''many-to-one''' is used in EntityDSL, the UI-renderer creates a combo-box to enable the user to select one owner of this relationship. The referenced '''owner''' must have either a '''domainKey''' or a '''domainDescription''' definition at any string-typed attribute. This attribute is displayed as significant selectable attribute of the owner relationship. If the current user does not have link/unlink grants to this relationship, a read-only text field is displayed. | ||
| + | |||
| + | [[File:Osb_dialog_category_ProductClass.png]] | ||
| + | [[File:Osb_entity_ref_ProductClass_product.png]] | ||
| + | [[File:Osb_entity_ProductClass.png]] | ||
| + | |||
| + | |||
| + | When a reference '''one-to-many'''" is used and you use the keyword '''asGrid''' a collection of '''members''' will be displayed on a tab of the current dialog. | ||
| + | |||
| + | [[File:Osb_dialog_ProductClass_Product.png]] | ||
| + | [[File:Osb_entity_ref_product_ProductClass.png]] | ||
| + | |||
| + | This was not much effort to gain this complex UI, was it? | ||
| + | |||
| + | |||
| + | ;Filter references | ||
| + | |||
| + | Sometimes it is necessary to have multiple references to the same target entity showing different aspects of the '''owners'''. Think about units of measurement where you only want allow a subset of all members. For this purpose you can add an additional filter to the reference. The filter must refer to an enum attribute in the target entity. | ||
| + | |||
| + | The syntax may be like this: | ||
| + | |||
| + | [[File:Osb_entity_ref_UnitOfMeasure.png]] | ||
| + | |||
| + | |||
| + | The target entity could be defined like this: | ||
| + | |||
| + | [[File:Osb_entity_enum_UomType_entity_UnitOfMeasure.png]] | ||
| + | |||
| + | |||
| + | In the UI you are then forced to pick '''owners''' of this type '''"piece''' only: | ||
| + | |||
| + | [[File:Osb_dialog_UOM_Product.png]] | ||
| + | |||
| + | |||
| + | ===Enumerations as converters=== | ||
| + | |||
| + | |||
| + | From time to time it happens, that you connect to a database where some distinct values are encoded as strings. Normally enumerations are encoded/decoded to/from database by their ordinal number, or if any by an integer, or by its exact literal. | ||
| + | |||
| + | Now there is a new feature: encoding/decoding by kind of a string lookup list. | ||
| + | |||
| + | Let's say we have gender and marital status encoded as letters. This is what the syntax in EntityDSL would look like: | ||
| + | |||
| + | <syntaxhighlight lang="java"> | ||
| + | enum MaritalStatus { | ||
| + | MARRIED = "M", | ||
| + | SINGLE = "S", | ||
| + | DEVORCED = "D" | ||
| + | } | ||
| + | |||
| + | enum Gender { | ||
| + | Female = "F", | ||
| + | Male = "M", | ||
| + | Indifferent = "I" | ||
| + | } | ||
| + | </syntaxhighlight> | ||
| + | |||
| + | |||
| + | You are using this enumerations with your employee entity like this: | ||
| + | |||
| + | <syntaxhighlight lang="java"> | ||
| + | entity Employee extends BaseUUID { | ||
| + | ... | ||
| + | var MaritalStatus maritalStatus group personal | ||
| + | var Gender gender group personal | ||
| + | ... | ||
| + | } | ||
| + | </syntaxhighlight> | ||
| + | |||
| + | Together with the icons you have supplied for the enums: | ||
| + | |||
| + | [[File:Osb_enum_icons.png]] | ||
| + | |||
| + | ...and with the translations you supplied for every language your application supports: | ||
| + | |||
| + | [[File:Osb_eclipse_i18n.png]] | ||
| + | |||
| + | ...the user interface looks like this in french language: | ||
| + | |||
| + | [[File:Osb_UI_fr_1.png]] | ||
| + | |||
| + | [[File:Osb_UI_fr_2.png]] | ||
| + | |||
| + | [[File:Osb_UI_fr_3.png]] | ||
| + | |||
| + | ===State-Machines, UI, REST Api and free programming=== | ||
| + | |||
| + | |||
| + | Working with OS.bee means creating software applications with much less effort than ever before. | ||
| + | To prove this claim, I show the steps to implement a [https://vaadin.com/ browser-based UI] for access control with a [https://en.wikipedia.org/wiki/Representational_state_transfer REST] web service for checking loyalty cards using a so called [https://en.wikipedia.org/wiki/Finite-state_machine finite-state-machine]. The whole thing will need approximately 360 lines of code, some of them just commenting the code. Impressive enough? | ||
| + | To create the [https://en.wikipedia.org/wiki/Glue_code glue-code] that cannot be generated using models, OS.bee uses [https://en.wikipedia.org/wiki/Xtend Xtend] allowing "free programming". As Xtend is closely integrated, all model-generated artifacts can be accessed as they are stored inside [https://en.wikipedia.org/wiki/Java_virtual_machine JVM]. Xtend tries to get the best of Java, but reduce syntactic noise and add new features to allow for shorter and better readable code. So everybody who knows Java is able to program using Xtend. If you like lambda-expressions is even better. | ||
| + | |||
| + | |||
| + | ;Entity model | ||
| + | |||
| + | Assumed you have a company and a store entity already, we need for the previously described application an entity model that looks like this: | ||
| + | |||
| + | <syntaxhighlight lang="java"> | ||
| + | entity Company extends BaseUUID { | ||
| + | ... | ||
| + | var BlobMapping welcomeImage group images | ||
| + | ref Store[ * ]stores opposite company asTable | ||
| + | ... | ||
| + | } | ||
| + | entity Store extends BaseID { | ||
| + | ... | ||
| + | /* the web service credentials */ | ||
| + | var String entranceHost group webservice | ||
| + | var int entrancePort group webservice | ||
| + | ... | ||
| + | /* a store has many gates */ | ||
| + | ref EntranceGate[ * ]gates opposite store asGrid | ||
| + | ... | ||
| + | } | ||
| + | /* this record is small and should be fast - we use 2.level caching here */ | ||
| + | cacheable entity EntranceGate extends BaseUUID { | ||
| + | persistenceUnit "businessdata" | ||
| + | domainKey String num | ||
| + | /* ip-address should be unique system-wide */ | ||
| + | var unique String ip | ||
| + | var String location | ||
| + | /* a store has many gates */ | ||
| + | ref Store store opposite gates | ||
| + | /* a gate has many protocol records - this should be a strong association, so we can persist protocol updating its gate */ | ||
| + | ref cascadeMergePersist EntranceProtocol[ * ]protocols opposite gate | ||
| + | /* some indices for fast retrieval */ | ||
| + | unique index gateIpIndex { | ||
| + | ip | ||
| + | } | ||
| + | unique index gateNumIndex { | ||
| + | num | ||
| + | } | ||
| + | } | ||
| + | entity EntranceProtocol extends BaseUUID { | ||
| + | persistenceUnit "businessdata" | ||
| + | /* the point in time of the access */ | ||
| + | var Date entry | ||
| + | /* who was it */ | ||
| + | var int customerId | ||
| + | /* with which card id */ | ||
| + | var long cardId | ||
| + | /* the response of the web service */ | ||
| + | var String message | ||
| + | /* a gate has many protocol records */ | ||
| + | ref EntranceGate gate opposite protocols | ||
| + | /* some indices for fast retrieval */ | ||
| + | index ByDate { | ||
| + | entry | ||
| + | } | ||
| + | index ByCustomerId { | ||
| + | customerId | ||
| + | } | ||
| + | index ByCardId { | ||
| + | cardId | ||
| + | } | ||
| + | } | ||
| + | </syntaxhighlight> | ||
| + | |||
| + | |||
| + | ;DTO model | ||
| + | |||
| + | In order to consume REST responses, it is a good idea to have some container (classes or types) to map the response to. These could be nested types. Here is an example for a certain web service that has a json-like response like this: | ||
| + | |||
| + | <code>{'customer': {'customer_id': 10000, 'blocked': 1}, 'credit': {'amount': 0, 'customer_id': 10000, 'control_credit': 0}, 'response': 0, 'card': {'in_use': 0, 'card_id': 5000000000001, 'blocked': 1}}</code> | ||
| + | |||
| + | <syntaxhighlight lang="java"> | ||
| + | dto WSCustomerDto { | ||
| + | var int customer_id | ||
| + | var int blocked | ||
| + | } | ||
| + | dto WSCreditDto { | ||
| + | var double amount | ||
| + | var int customer_id | ||
| + | var int control_credit | ||
| + | } | ||
| + | dto WSResponseDto { | ||
| + | var int response | ||
| + | } | ||
| + | dto WSCardDto { | ||
| + | var int in_use | ||
| + | var long card_id | ||
| + | var int blocked | ||
| + | } | ||
| + | dto WSCustomerStatusDto { | ||
| + | ref WSCustomerDto customer | ||
| + | ref WSCreditDto credit | ||
| + | ref WSResponseDto response | ||
| + | ref WSCardDto card | ||
| + | } | ||
| + | </syntaxhighlight> | ||
| + | '''''Hint:''' names of manually created DTO must end with "Dto".'' | ||
| + | |||
| + | |||
| + | ;Statemachine model | ||
| + | |||
| + | For a basic understanding you must know that state transitions are triggered by events and lead to some action on entry and/or exit of its state. Actions interact with controls. These can be data objects (DTO), schedulers, fields, buttons, layouts and peripheral devices. Data objects, fields and layouts are usually bound to one or more UI components (e.g. table, textfield, horizontallayout). Tables can be bound to collections from data objects, the other components are bound by properties like value, visibility, style and much more. Transitions are guarded by code written in Xtext in the FunctionLibrary DSL. All used text fragments are localized through the I18N-Properties of this bundle. | ||
| + | |||
| + | The model is self-explanating: | ||
| + | |||
| + | <syntaxhighlight lang="java"> | ||
| + | statemachine Entrance describedBy "Entrance" initialState IDLE initialEvent onStartUp | ||
| + | events { | ||
| + | event onStartUp | ||
| + | event onCheckCard | ||
| + | event onIsPassed | ||
| + | event onGateOpened | ||
| + | event onGateClosed | ||
| + | event onGateOpenError | ||
| + | event onGateCloseError | ||
| + | event onGatePassed | ||
| + | event onErrorResume | ||
| + | } | ||
| + | controls { | ||
| + | scheduler Schedulers { | ||
| + | scheduler toStart delay 100 send onStartUp | ||
| + | scheduler toErrorResume delay 3000 send onErrorResume | ||
| + | scheduler toGateTimeout delay 5000 send onGatePassed | ||
| + | } | ||
| + | fields UIfields { | ||
| + | layout buttons | ||
| + | field info type String | ||
| + | field cardId type String | ||
| + | } | ||
| + | keypad Buttons event trigger { | ||
| + | button passGate event onIsPassed | ||
| + | button gateIsOpen event onGateOpened | ||
| + | button gateOpenError event onGateOpenError | ||
| + | button gateIsClosed event onGateClosed | ||
| + | button gateCloseError event onGateCloseError | ||
| + | } | ||
| + | dataProvider Data { | ||
| + | dto gateDto type EntranceGateDto | ||
| + | } | ||
| + | } | ||
| + | states { | ||
| + | state IDLE { | ||
| + | triggers { | ||
| + | trigger onStartUp guards { | ||
| + | guard Entrance.hasGate onFail caption "master data" description "wrong ip" type error | ||
| + | } | ||
| + | actions transition WELCOME | ||
| + | } | ||
| + | } | ||
| + | state WELCOME { | ||
| + | entryActions { | ||
| + | invisible buttons | ||
| + | visible info | ||
| + | visible cardId | ||
| + | invisible passGate | ||
| + | clear cardId | ||
| + | set "welcome" @ info | ||
| + | } | ||
| + | keystroke @ cardId | ||
| + | functionalKeystroke enterKey sends onCheckCard | ||
| + | triggers { | ||
| + | trigger onCheckCard actions { | ||
| + | transition OPEN_GATE guard Entrance.checkCustomer { | ||
| + | clear cardId | ||
| + | invisible cardId | ||
| + | set "opening gate" @ info | ||
| + | // open the gate here | ||
| + | } | ||
| + | } | ||
| + | } | ||
| + | } | ||
| + | state OPEN_GATE { | ||
| + | // wait for feedback event that gate is open | ||
| + | entryActions { | ||
| + | visible buttons | ||
| + | invisible Buttons | ||
| + | visible gateOpenError | ||
| + | visible gateIsOpen | ||
| + | } | ||
| + | triggers { | ||
| + | trigger onGateOpened actions transition GATE_OPEN | ||
| + | trigger onGateOpenError actions { | ||
| + | set "gate open error - try again" @ info | ||
| + | schedule toErrorResume | ||
| + | } | ||
| + | trigger onErrorResume actions transition WELCOME | ||
| + | } | ||
| + | } | ||
| + | state GATE_OPEN { | ||
| + | entryActions { | ||
| + | set "pass gate" @ info | ||
| + | visible buttons | ||
| + | invisible Buttons | ||
| + | visible passGate | ||
| + | schedule toGateTimeout | ||
| + | } | ||
| + | triggers { | ||
| + | trigger onIsPassed actions transition CLOSE_GATE | ||
| + | } | ||
| + | } | ||
| + | state CLOSE_GATE { | ||
| + | entryActions { | ||
| + | set "gate closes" @ info | ||
| + | visible buttons | ||
| + | invisible Buttons | ||
| + | visible gateCloseError | ||
| + | visible gateIsClosed | ||
| + | // close gate now | ||
| + | } | ||
| + | triggers { | ||
| + | trigger onGateClosed actions transition WELCOME | ||
| + | trigger onGateCloseError actions { | ||
| + | set "gate close error - try again" @ info | ||
| + | schedule toErrorResume | ||
| + | } | ||
| + | trigger onErrorResume actions transition WELCOME | ||
| + | } | ||
| + | } | ||
| + | } | ||
| + | </syntaxhighlight> | ||
| + | |||
| + | |||
| + | ;FunctionLibrary model | ||
| + | |||
| + | The "free coding" in Xtend for a statemachine is prefixed with "statemachine" and looks like this: | ||
| + | |||
| + | <syntaxhighlight lang="java"> | ||
| + | statemachine Entrance { | ||
| + | /** | ||
| + | * guard to initially position the gate record if any and put it in-memory. | ||
| + | */ | ||
| + | guard hasGate( IStateMachine stateMachine ) { | ||
| + | // is EntranceGateDto already in memory? | ||
| + | if( stateMachine.get( "gateDto" ) === null ) { | ||
| + | // find EntranceGateDto by the browser's ip | ||
| + | stateMachine.find( "gateDto", "ip", stateMachine.hostName ) | ||
| + | } | ||
| + | // get the in-memory instance from stateMachine | ||
| + | var entranceGate = stateMachine.get( "gateDto" ) as EntranceGateDto | ||
| + | // if the ip could not be found in record - return false | ||
| + | if( entranceGate === null ) { | ||
| + | return false | ||
| + | } | ||
| + | return true | ||
| + | } | ||
| + | /** | ||
| + | * guard to prevent entrance if either customer or card are blocked and protocols the try. | ||
| + | * returns true if entrance is granted. | ||
| + | */ | ||
| + | guard checkCustomer( IStateMachine stateMachine ) { | ||
| + | // get the in-memory instance of EntranceGateDto from stateMachine | ||
| + | var entranceGate = stateMachine.get( "gateDto" ) as EntranceGateDto | ||
| + | // supply all rest parameters - the first one is a fake parameter carrying the python-program-name | ||
| + | var paras = <String,String>newHashMap | ||
| + | paras.put("ws_getCustomerStatus", null) | ||
| + | // all parameters must be Strings | ||
| + | paras.put("card_id", stateMachine.get("cardId") as String) | ||
| + | // override the default parameter separator to slash and emit the get command using the host and port settings from the gate owning store | ||
| + | var response = HttpClient.httpGet(entranceGate.store.entranceHost, entranceGate.store.entrancePort, "/cgi-osbee/cxsblht", paras, '/') | ||
| + | // create an instance of the magic object-mapper from jackson fastxml | ||
| + | var mapper = new ObjectMapper | ||
| + | // try to reflect the response in the WSCustomerStatusDto structure | ||
| + | var customerStatusDto = mapper.readValue(response, WSCustomerStatusDto) | ||
| + | // write a protocol entry of this try of entrance | ||
| + | return protocolEntrance(stateMachine, entranceGate, customerStatusDto, response) | ||
| + | } | ||
| + | |||
| + | /** | ||
| + | * function to create a protocol record and check relevant flags. | ||
| + | * returns true if entrance is granted. | ||
| + | */ | ||
| + | function protocolEntrance(IStateMachine stateMachine, EntranceGateDto entranceGate, WSCustomerStatusDto customerStatusDto, String response) returns Boolean { | ||
| + | // create a new protocol entry | ||
| + | var proto = new EntranceProtocolDto | ||
| + | // link with the gate instance | ||
| + | proto.gate = entranceGate | ||
| + | // supply all fields | ||
| + | proto.customerId = customerStatusDto.customer.customer_id | ||
| + | proto.cardId = customerStatusDto.card.card_id | ||
| + | proto.message = response | ||
| + | // get the dto-service from context | ||
| + | var dtoService = DtoServiceAccess.getService(typeof(EntranceGateDto)) | ||
| + | // update the gate with the new member | ||
| + | dtoService.update(entranceGate) | ||
| + | // return true if both customer and card are unblocked | ||
| + | return customerStatusDto.customer.blocked==0 && customerStatusDto.card.blocked==0 | ||
| + | } | ||
| + | } | ||
| + | </syntaxhighlight> | ||
| + | |||
| + | As you can see the REST Api is called statically using HttpClient. There are methods for GET, PUT and POST commands. | ||
| + | |||
| + | |||
| + | ;UI model | ||
| + | |||
| + | From a technical point of view UI is a node that combines different models to a system using [https://docs.oracle.com/javafx/2/binding/jfxpub-binding.htm JavaFX] binding mechanisms. Mostly DTODSL and StatemachineDSL create objects that must be bound in a certain way. Take a look at the model: | ||
| + | |||
| + | <syntaxhighlight lang="java"> | ||
| + | /** | ||
| + | * ui for the entrance application | ||
| + | */ | ||
| + | ideview Entrance { | ||
| + | // get the entrance state-machine | ||
| + | datasource statemachine:Entrance | ||
| + | // get the scheduler control objects and bind the state-machine | ||
| + | datasource scheduler:Schedulers | ||
| + | bind statemachine --> scheduler.statemachine | ||
| + | // get the data control objects and bind the state-machine | ||
| + | datasource data:Data | ||
| + | bind statemachine --> data.statemachine | ||
| + | // get the field control objects and bind the state-machine | ||
| + | datasource uifields:UIfields | ||
| + | bind statemachine --> uifields.statemachine | ||
| + | // get the buttons control objects and bind the state-machine | ||
| + | datasource buttons:Buttons | ||
| + | bind statemachine --> buttons.statemachine | ||
| + | // create a dto instance and bind the data controller | ||
| + | datasource gateDto:EntranceGateDto | ||
| + | bind data.gateDto <--> gateDto | ||
| + | // create a blob-to-image converter | ||
| + | datasource img:BlobConverter | ||
| + | verticalLayout(styles "os-entrance-welcome") welcome { | ||
| + | horizontalLayout images { | ||
| + | // create an image component into the images layout | ||
| + | image welcomeImage | ||
| + | // bind the blob-to-image converter. input is a BlobMapping attribute. | ||
| + | bind img.input <-- gateDto.store.company.welcomeImage | ||
| + | // bind output to the image-resource property | ||
| + | bind [this.welcomeImage].resource <-- img.output | ||
| + | } | ||
| + | horizontalLayout text { | ||
| + | textfield(styles "os-span-v-double os-span-h-double") info align middle-center | ||
| + | // bind the field "info" to the textfield component's property "value" | ||
| + | bind [this.info].value <-- uifields.info | ||
| + | // bind the field property "enabled" of "info" to the textfield component's property "visible" | ||
| + | bind [this.info].visible <-- uifields.infoEnabled | ||
| + | } | ||
| + | horizontalLayout inputOuter { | ||
| + | verticalLayout inputInner { | ||
| + | textfield(styles "os-span-v-double os-span-h-double") cardId align middle-center | ||
| + | // simulate the gate's events by buttons - arrange buttons in a grid by 3 columns | ||
| + | gridlayout(columns= 3 styles "os-button-v-double os-font-flex") buttons { | ||
| + | // create buttons - the above visible style controls sizes and layouts | ||
| + | button gateIsOpen | ||
| + | button gateOpenError | ||
| + | button gateIsClosed | ||
| + | button gateCloseError | ||
| + | button passGate | ||
| + | // bind the click-event of the button component to the button controller | ||
| + | bind [this.gateIsOpen].onClick --> buttons.gateIsOpen | ||
| + | // bind the visibility of the button component to the button controller | ||
| + | bind [this.gateIsOpen].visible <-- buttons.gateIsOpenEnabled | ||
| + | bind [this.gateOpenError].onClick --> buttons.gateOpenError | ||
| + | bind [this.gateOpenError].visible <-- buttons.gateOpenErrorEnabled | ||
| + | bind [this.gateIsClosed].onClick --> buttons.gateIsClosed | ||
| + | bind [this.gateIsClosed].visible <-- buttons.gateIsClosedEnabled | ||
| + | bind [this.gateCloseError].onClick --> buttons.gateCloseError | ||
| + | bind [this.gateCloseError].visible <-- buttons.gateCloseErrorEnabled | ||
| + | bind [this.passGate].onClick --> buttons.passGate | ||
| + | bind [this.passGate].visible <-- buttons.passGateEnabled | ||
| + | } | ||
| + | bind [this.buttons].visible <-- uifields.buttonsEnabled | ||
| + | // bind the cardId bi-directional so we can set values from the state-machine and get values from the user | ||
| + | bind [this.cardId].value <--> uifields.cardId | ||
| + | bind [this.cardId].visible <-- uifields.cardIdEnabled | ||
| + | } | ||
| + | } | ||
| + | } | ||
| + | } | ||
| + | </syntaxhighlight> | ||
| + | |||
| + | |||
| + | ;Master data UI | ||
| + | |||
| + | At this point all important models are created to form a browser-based access control system. What still lacks is an interface to create all the necessary master data. It is assumpted that you already have a dialog for company and store, so these will be extended automatically. What we need is a dialog for the EntranceGate entity, the browser-frontend and a report to print the protocol. The whole thing must be assembled in a perspective and inserted in the menu. | ||
| + | |||
| + | |||
| + | ;Dialog model | ||
| + | |||
| + | <syntaxhighlight lang="java"> | ||
| + | dialog Entrance view Entrance stateful | ||
| + | dialog EntranceGate autobinding EntranceGateDto toolbar Dialog numColumns 1 | ||
| + | </syntaxhighlight> | ||
| + | Create a definition for the stateful browser-frontend "Entrance" and a master data dialog for "EntranceGate". | ||
| + | |||
| + | |||
| + | ;Datamart model | ||
| + | |||
| + | For the report we need a new datamart like this: | ||
| + | |||
| + | <syntaxhighlight lang="java"> | ||
| + | datamart EntranceProtocol using entity EntranceProtocol | ||
| + | </syntaxhighlight> | ||
| + | |||
| + | |||
| + | ;Report model | ||
| + | |||
| + | The protocol report: | ||
| + | |||
| + | <syntaxhighlight lang="java"> | ||
| + | report EntranceProtocol { | ||
| + | rendering pdf datamart EntranceProtocol pagetemplate A4Portrait media small | ||
| + | template { | ||
| + | header { | ||
| + | showOnFirst height 14 | ||
| + | label "Protocol" | ||
| + | } | ||
| + | detail { | ||
| + | table style bootstrap { | ||
| + | details style defaultrow { | ||
| + | attribute entry style ^date | ||
| + | attribute customerId | ||
| + | attribute message | ||
| + | } | ||
| + | } | ||
| + | } | ||
| + | } | ||
| + | } | ||
| + | </syntaxhighlight> | ||
| + | |||
| + | |||
| + | ;Perspective model | ||
| + | |||
| + | Let's assemble all parts in a nifty UI structure: | ||
| + | |||
| + | <syntaxhighlight lang="java"> | ||
| + | perspective EntranceMasterData iconURI "welcome" { | ||
| + | sashContainer outer orientation vertical { | ||
| + | sashContainer upper spaceVolume "70" orientation horizontal { | ||
| + | sashContainer topLeft orientation vertical { | ||
| + | part CompanyTable spaceVolume "20" view readOnlyTable Company | ||
| + | part CompanyDialog spaceVolume "70" view dialog Company | ||
| + | } | ||
| + | sashContainer webservice orientation vertical { | ||
| + | part StoreGrid view readOnlyTable Store spaceVolume "20" | ||
| + | part StoreDialog view dialog Store spaceVolume "70" | ||
| + | } | ||
| + | } | ||
| + | sashContainer store orientation horizontal spaceVolume "30" { | ||
| + | partStack gate spaceVolume "40" { | ||
| + | part EntranceGateDialog view dialog EntranceGate | ||
| + | part EntranceProtocol view report EntranceProtocol | ||
| + | } | ||
| + | } | ||
| + | } | ||
| + | } | ||
| + | </syntaxhighlight> | ||
| + | |||
| + | |||
| + | ;How does it look like at runtime? | ||
| + | |||
| + | [[File:Osb_UI_runtime_State-Machine.png]] | ||
| + | |||
| + | The browser-frontend in the "welcome"-state: | ||
| + | |||
| + | [[File:Osb_UI_runtime_browser_State-Machine.png]] | ||
| + | |||
| + | Give it a try - OS.bee really makes it easier for you to develop. | ||
| + | |||
| + | |||
| + | ===Execute something by pressing a toolbar button=== | ||
| + | |||
| + | People often ask me how it is possible to create a complete application without programming and just using models. The answer is: sometimes you can't do it without some kind of programming and without basic programming knowledge about. The good news is: there is an expression language embedded in the OSBP model environment. The DSL is called Function Library and offers a wide range of possibilities to programmers and people who have a basic programming knowledge. The language Xtend and a grammar that sets up a grouped framework guides the user through the process of creating calculations, transformations or input and output functions and thus combining the world of models with functionality. | ||
| + | Here is an example how to use it: | ||
| + | Let's say we already have some data in our database that must be enriched with external binary large data objects (BLOB). These objects shall be imported once and linked persistently to the appropriate data from our database. In this example the BLOB will be a jpeg-image. PDFs or Office-documents will work the same way as explained here. | ||
| + | |||
| + | |||
| + | ;1.Step | ||
| + | Add an attribute '''brandImage''' to the existing ''entity'': | ||
| + | |||
| + | <syntaxhighlight lang="java"> | ||
| + | entity Brand extends BaseUUID { | ||
| + | ... | ||
| + | var String bsin | ||
| + | var BlobMapping brandImage properties( key = "Blob" value = "2" ) | ||
| + | ... | ||
| + | index ByBsin { | ||
| + | bsin | ||
| + | } | ||
| + | } | ||
| + | </syntaxhighlight> | ||
| + | |||
| + | The type BlobMapping handles BLOBs in databases and the properties define the standard resolution which is used to display the BLOB if it is an image. If the mime type of the saved BLOB is an image, the image is automatically resized to different predefined resolutions and then stored together with its original resolution. This helps to speed up your application if the user interface uses one of the pre-rendered resolutions. If you want to want to use another resolution than predefined then you’ll need the commercial version of OS.bee. | ||
| + | |||
| + | |||
| + | ;2.Step | ||
| + | |||
| + | Create a new action function '''BrandImages''' in the ''FunctionLibrary'' DSL: | ||
| + | |||
| + | <syntaxhighlight lang="java"> | ||
| + | action BrandImages { | ||
| + | canExecute CanImport(IEclipseContext context) { | ||
| + | // we can press this button any time | ||
| + | return true | ||
| + | } | ||
| + | |||
| + | execute DoImport(IEclipseContext context) { | ||
| + | // create an instance of the dto service for the dto | ||
| + | // we want to change | ||
| + | val dtoService = DtoServiceAccess.getService(typeof(BrandDto)) | ||
| + | // to handle blobs we need the blob service from context | ||
| + | val blobService = context.get(typeof(IBlobService)) | ||
| + | // emit a get-all-entries query | ||
| + | var all = dtoService.find(new Query()) | ||
| + | // enter the lambda loop for each entry we found | ||
| + | all.forEach[ | ||
| + | // dump some hint to the console (don't do that in production) | ||
| + | System.out.println(it.bsin) | ||
| + | // init the file io stuff | ||
| + | var FileInputStream stream = null | ||
| + | var BufferedInputStream input = null | ||
| + | // something could fail (file not found etc.) so we use a | ||
| + | // try-catch construction that we are not | ||
| + | // thrown out of the loop on error | ||
| + | try{ | ||
| + | // from the bsin number synthesize a path where | ||
| + | // the input file is located and open a stream | ||
| + | stream = new FileInputStream("C:/samples/gs1/brand/"+it.bsin+".jpg") | ||
| + | // make a binary stream out of it | ||
| + | input = new BufferedInputStream(stream) | ||
| + | // with the binary stream and the appropriate mimetype and | ||
| + | // name we can feed the blob service | ||
| + | it.brandImage = blobService. | ||
| + | createBlobMapping(input, it.bsin, "image/jpeg") | ||
| + | // don't forget to close if all worked | ||
| + | input.close | ||
| + | stream.close | ||
| + | dtoService.update(it) | ||
| + | } catch (IOException e) { | ||
| + | // don't forget to close if something failed | ||
| + | // the question mark is a null-save construct to avoid | ||
| + | // null-pointer exceptions if either input or stream is null | ||
| + | input?.close | ||
| + | stream?.close | ||
| + | } | ||
| + | ] | ||
| + | // we don't care about small errors here | ||
| + | return true | ||
| + | } | ||
| + | } | ||
| + | </syntaxhighlight> | ||
| + | |||
| + | In case you got problems to resolve all the necessary elements in FunctionLibrary, '''<code>SHIFT+STRG+O</code>''' is your friend to import all necessary stuff. If this doesn't help, you must add the necessary dependency to the FunctionLibrary's manifest file and press '''<code>SHIFT+STRG+O</code>''' once again. | ||
| + | |||
| + | |||
| + | ;3.Step | ||
| + | |||
| + | Modify the toolbar of the existing ''dialog''. Add a new command '''importBrandImages''': | ||
| + | |||
| + | <syntaxhighlight lang="java"> | ||
| + | command importBrandImages describedBy "import brand images" functionalAction group BrandImages canExecute CanImport executeImmediate DoImport | ||
| + | </syntaxhighlight> | ||
| + | |||
| + | If you would like to uncouple the import process from the rest of your application then use alternatively "executeLater" to start the import process in an asynchronous way, thus unblocking the user interface from waiting for the end of execution. Asynchronous execution should always be used if the process takes more than 5 seconds to ensure a good user experience. You can also supply some feedback messages to the user if you are executing synchronously and your function returns true or false to reflect the result of execution. | ||
| + | |||
| + | Complement the new command '''importBrandImages''' to the ''toolbar'': | ||
| + | |||
| + | <syntaxhighlight lang="java"> | ||
| + | toolbar Brand describedBy "Toolbar for dialogs" items { | ||
| + | item newItem command newItem icon "dsnew" | ||
| + | spacer | ||
| + | item saveItem command saveItem icon "dssave" | ||
| + | item saveAndNew command saveAndNew icon "dssaveandnew" | ||
| + | item saveAsNew command saveAsNew icon "dssaveasnew" | ||
| + | spacer | ||
| + | item deleteItem command deleteItem icon "dsdelete" | ||
| + | item cancelItem command cancelItem icon "dscancel" | ||
| + | item databaseInfo command databaseInfo icon "dbinfo" | ||
| + | spacer | ||
| + | item importImages command importBrandImages icon "img" | ||
| + | state | ||
| + | } | ||
| + | </syntaxhighlight> | ||
| + | |||
| + | |||
| + | This is how it looks like at runtime after you have pressed the button and processed the BLOB import: | ||
| + | |||
| + | [[File:Osb_UI_runtime_browser_brand_button.png]] | ||
==Core Dev== | ==Core Dev== | ||
| Line 1,152: | Line 3,641: | ||
E.g. if you have Epson hardware, you must install the EPSON_JavaPOS_ADK_1143. After installing the appropriate drivers and programs , you can start "SetupPOS" and configure a POSPrinter, LineDisplay and CashDrawer, test their health with "CheckHealth". The path of the newly created configuration xml must be entered in the preferences file, then you can start OS.bee. | E.g. if you have Epson hardware, you must install the EPSON_JavaPOS_ADK_1143. After installing the appropriate drivers and programs , you can start "SetupPOS" and configure a POSPrinter, LineDisplay and CashDrawer, test their health with "CheckHealth". The path of the newly created configuration xml must be entered in the preferences file, then you can start OS.bee. | ||
There is a lot of configuration stuff in the preferences file which will be published step by step. Best way to edit is inside an Eclipse IDE under "OSBP Application Configuration". | There is a lot of configuration stuff in the preferences file which will be published step by step. Best way to edit is inside an Eclipse IDE under "OSBP Application Configuration". | ||
| + | |||
| + | |||
| + | ===Support for mysql8 and Microsoft sqlserver now available=== | ||
| + | |||
| + | The OS.bee Software Factory brings now the support for Microsoft SQL server and mySQL. | ||
| + | If you can't wait for the release use the daily build to use the new database drivers :) | ||
= Copyright Notice = | = Copyright Notice = | ||
{{Copyright Notice}} | {{Copyright Notice}} | ||
Latest revision as of 11:34, 10 January 2019
Contents
- 1 OS.bee Documentation for Designer
- 1.1 Get Started
- 1.1.1 Pitfalls with new Eclipse installations
- 1.1.2 Eclipse Installation / Installation SWF / New Project from GIT
- 1.1.3 cvs2app - question regarding ENUM types
- 1.1.4 Launch Application from Eclipse (very slow)
- 1.1.5 Structure of the documentation page
- 1.1.6 Setup Foodmart MySQL database and data--PART1
- 1.1.7 Setup Foodmart MySQL database and data--PART2
- 1.1.8 Setup Foodmart MySQL database and data--PART3
- 1.1.9 Working with the H2 DB
- 1.1.10 Performance tuning for MySQL databases
- 1.2 Modeling
- 1.2.1 Display of article description
- 1.2.2 Connecting different database products
- 1.2.3 Default Localization
- 1.2.4 CSVtoApp ... Column limitation?
- 1.2.5 Entering a number without keypad
- 1.2.6 Missing bundles after update and how to solve it
- 1.2.7 Creating CSV files as input for AppUpIn5Minutes with OS.bee
- 1.2.8 import declartion used in most DSL
- 1.2.9 Entity DSL (DomainKey DomainDescription)
- 1.2.10 assignment user -> position
- 1.2.11 I18N.properties (Reorganization of obsoleted values)
- 1.2.12 Display values from ENUMS in Table
- 1.2.13 References to images
- 1.2.14 Perspective with master/slave relationship
- 1.2.15 Perspective use border to show boundary for each sash
- 1.2.16 Datainterchange Export (does not overwrite existing file)
- 1.2.17 Logged in user as part of the data-record
- 1.2.18 bpmn2 file reference in blip-DSL
- 1.2.19 How to add the missing icon images to a new created ENUM combo box
- 1.2.20 table DSL (as grid) create new data records
- 1.2.21 DSL entity (Multiplicity of properties)
- 1.2.22 UI-Design
- 1.2.23 DSL Dialog: Autosuggestion for DomainKey or DomainDescritpion
- 1.2.24 DSL Table
- 1.2.25 datamart DSL (condition filtered) table does not refresh
- 1.2.26 DSL authorization (CRUD)
- 1.2.27 DSL Menu(UserFilter/SuperUser)
- 1.2.28 Printer Selection (Default Printer)
- 1.2.29 DSL Entity Enum with own images
- 1.2.30 How to synchronize views
- 1.2.31 How to get new features from your toolbar
- 1.2.32 Add user information to your CRUD operations
- 1.2.33 Designing dialogs using multiple columns
- 1.2.34 Grouping attributes on dialogs
- 1.2.35 How units of measurements are handled
- 1.2.36 How sliders can improve the user experience with your dialogs
- 1.2.37 New ways to supply icons for enum literals
- 1.2.38 Validation
- 1.2.39 Extended Validation
- 1.2.40 Reset cached data
- 1.2.41 ReportDSL: How to get a checkbox for a Boolean attribute
- 1.2.42 How to collect business data and presenting meaningful statistics with OS.bee - INTRODUCTION
- 1.2.43 How to collect business data and presenting meaningful statistics with OS.bee – PART1
- 1.2.44 How to collect business data and presenting meaningful statistics with OS.bee – PART2
- 1.2.45 How to collect business data and presenting meaningful statistics with OS.bee – PART3
- 1.2.46 How to collect business data and presenting meaningful statistics with OS.bee – PART4
- 1.2.47 Surrogate or natural keys in entity models?
- 1.2.48 Using "embedded" entities
- 1.2.49 Improve toolbar functionality
- 1.2.50 Fill a new DTO entry with default values
- 1.2.51 Prevent visibility or editability in general
- 1.2.52 Parameterized Report
- 1.2.53 How to manage generated numbers with OS.bee
- 1.2.54 Enter new data using a "sidekick"
- 1.2.55 Faster development on perspectives
- 1.2.56 How to filter references
- 1.2.57 Enumerations as converters
- 1.2.58 State-Machines, UI, REST Api and free programming
- 1.2.59 Execute something by pressing a toolbar button
- 1.3 Core Dev
- 1.3.1 New event for statemachines
- 1.3.2 Duplicate translations
- 1.3.3 Edit WelcomeScreen
- 1.3.4 Search
- 1.3.5 DataInterchange is externally configurable by admins
- 1.3.6 Statemachine (FSM) handles external displays
- 1.3.7 Database Support
- 1.3.8 Combo box handles now more complex objects
- 1.3.9 Enriching csv files to highlight complex information
- 1.3.10 Max File Size BlobMapping
- 1.3.11 How to show JavaScript compile errors building the Widgetset
- 1.4 Apps
- 1.1 Get Started
- 2 Copyright Notice
OS.bee Documentation for Designer
Here are frequently asked questions from designers which are not mentioned by other Documentation. In this Page, you could find the answer to your question.
Get Started
Pitfalls with new Eclipse installations
Be aware that when installing a new Eclipse environment to look at the preferences for DS Annotations and check the box "Generate descriptors from annotated sources" as OS.bee makes heavy use of automatically generated component descriptors in the OSGI-INF directory. It is unchecked by default for incomprehensible reasons.
Don't forget to set your target platform correctly as described in the installation guide.
Eclipse Installation / Installation SWF / New Project from GIT
Question:
Using Eclispe Neon, execution of Installation Software-Factory as described in the Installation notes, Connect to a GIT Archiv, After Building Workspace the application is not valid (see Screen-Shot) Try to clean the Project was not successful.
Answer:
The version of the installed Software Factory and the version needed for the project do not match.
Please install the appropriate Software Factory version.
cvs2app - question regarding ENUM types
Question:
cvs2app is mentioned in the documentation "App up in 5 minutes" and gives the possibility to create one app directly out of the csv file. One of the first steps is to create an entity, which is generated based on the information on the first line (which contains the column names). In consequence I have 2 questions regarding ENUMS:
- Is it possible to create an entity ENUM out the csv - FILE?
- Is it possible to use an existing ENUM entity during the creation of the app?
For example:
in the entity there is already a definition:
 enum type_ps {
            PROCESS_DESCRIPTION, ORGANISATIONAL
}
and the csvfile looks as follows:
ticket_type_number;ticket_type_description;ticket_type_ps_type
1;CRS handling;PROCESS_DESCRIPTION
2;Administrative;ORGANISATIONAL
3;Delivery package;ORGANISATIONAL
4;Software behaviour;PROCESS_DESCRIPTION
Answer:
Yes it is possible. When using the latest version (from feb 2018), it is possible to supply various meta-information to each column. One meta-info is the hint to the application builder that this column is meant to be a ENUM. By default it wouldn't be possible to guess that fact.
Launch Application from Eclipse (very slow)
Question:
When starting the Application from within the Eclipse it took very long time until the application is up. Are there some settings to be controlled?
Answer:
If you experience very slow performance with Eclipse itself as well as the application you launch from Eclipse it might be a good idea to check the virus scanner you have installed. Some virus scanners check all the files inside the Eclipse installation directory, the Eclipse workspace and the GIT repository which might lead to extreme slow performance. Ask your Administrator how to avoid this.
Structure of the documentation page
In the OS.bee Software Factory Documentation page, there are 3 Headlines used to structure the page:
- OS.bee DSL Documentation
- Other OS.bee-Specific Solutions
- OS.bee Third-Party Software Solutions
At the end of Chapter one there are some helpful hints to work with eclipse. To start with Eclipse and the SWF these hints could be very useful.
- One more hint: to Use STRG-Shift-O to organize the import inside the DSL.
Setup Foodmart MySQL database and data--PART1
Foodmart is a example application where all important modelling use-cases are used and where they can be tested. Foodmart data and entity-model was derived from the famous example of Mondrian Pentaho.
This is a short introduction about how to configure a MySQL database and import Foodmart-data.
First of all you have to install an MySQL Server. This introduction refers to version 5.7 of MySql for Windows.
So you have to select "Looking for previous GA versions?" and will get this screen:
Download the mysql-installer-community-version and follow the instructions of this installer. After successful installation you'll have a new service:
If not already running, start the MySQL57 service or reboot your machine.
Then you install MySQL Workbench. As we use an older version here you must select "Looking for previous GA versions?" and you'll get this screen:
Download and install the workbench. After successful installation, open the workbench and create a new connection by clicking the + symbol:
Create a new connection like this:
Store the password "FOODMART" in capitals in Vault:
Test the connection:
Your workbench should look like this afterwards:
After you clicked on Foodmart (which is the name of your connection here), the workbench opens with the navigator an you can check the server status:
Setup Foodmart MySQL database and data--PART2
After your Server ist setup, right click in the SCHEMAS area of the Navigator and create new schemas:
You create a schema named foodmart which is your database later on. Don't forget to select utf8 encoding like shown here:
Follow the steps:
Also create a bpm schema and follow the steps described before:
Now you can start the data import with Server -> Data Import:
Press "Start Import":
Now the database foodmart is filled with the appropriate data.
Setup Foodmart MySQL database and data--PART3
After the database foodmart is filled, there are some settings to change for the first start of OS.bee with foodmart data. In your IDE open Window->Preferences->OSBP Application Configuration:
Double check whether you selected the product in the configuration and NOT the workspace. Check the database name for the BPM settings to be BPM so it matches the MySQL database settings.
Adjust the JNDI Data Source settings so that bpm and mysql have the right parameters:
There are 4 different Persistence Units that must be configured for OS.bee:
- authentication
- blob
- bpm
- businessdata
They must look like this for MySQL:
For the first start you must force BPM to create new tables as we haven't already created them. DDL Generation must be set to create-or-extend-tables to do so.
If you are ready with this, press Apply and then OK. You must press Apply before OK as there is still a bug in eclipse, that doesn't save everything if just press OK. Then start the application the first time. It will not come up after creation of the BPM-tables. You stop the application after a while and re-enter the Preferences->Persistence Units and change the BPM settings for DDL Generation to none.
The foodmart application should work now with your own MySQL database.
Working with the H2 DB
As you might know, H2 is a simple but effective small-footprint database without any effort installing it. OS.bee comes with the needed bundles anyway. H2 can be defined as an in-memory database or as a file-based database. If configured as in-memory database the content will be lost as soon as the OS.bee application server is shut down.
- How to create a H2localFile data source
You can use H2localFile for all data sources but make sure to give each data source an individual database name. In this example we want to configure a data source called bpm in order to use it as database for BPM persistence.
- Switch to
Data Sourcesand fill the fields according to the following image:- The database name "~/db" forces the database file to be created in the Windows user's home directory where he has appropriate file creation rights to do this. Of course you can use any directory if you have ensured appropriate rights for this directory.
- User name and password can be chosen according to your own taste.
- The port is free to choose but should not collide with other definitions in your system. The port+1 also should be unused by other services as it will be used by an internal H2 web server as you will see later on.
- Done this, you must switch to
PersistenceUnitsand fill the fields for bpm according to the next image:- Make sure to have create-or-extend-tables selected for all persistence units. This will create all tables defined via EntityDSL and will keep them up-to-date as models evolve.
- Logging level can be set to OFF after everything works as expected.
- How to create a H2InMemory data source
- Use the following image to manage the data source settings.
- The only change is the database type. Although there is no physical file with in-memory databases, you have to have a name to identify the database as if it was lying in the user's home directory, if you want to access the in-memory database remotely later.
- Persistence unit settings are the same as above.
- How to inspect H2 database content
If you want to emit sql-statements against the database by yourself, you can use the web-server that was automatically started when using H2. The port is the given port in the data source + 1.
If you open a browser with localhost:<port>, in the example it is: localhost:9091, you will be prompted with this page:
Select Generic H2 (Server) and modify the JDBC URL according the the data source settings. Set the port and the database path for the H2LocalFile type.
Modify the JDBC URL according to the data source settings for the H2InMemory type:
- If the connection is successful for any setting, a new page will show up where the whole database model can be explored and sql statements against the database can be emitted.
Performance tuning for MySQL databases
This topic references the InnoDB version 8 implementation of MySQL. Most important: always use the latest version of MySQL. Versions before 8 are much slower.
- Some simple rules for the design phase in EntityDSL
- Always make an effort to hit an index with your where condition. Hit at least a reasonable quantity (<100) of entries matching with your index.
- Avoid calculations in your where condition as they are calculated for every row that must be selected (e.g. where a+b > 5).
- Do not fan out all possible combinations of indexes. Make one precise index that matches most of the time.
- Avoid repetitions of index segments like
- index 1 a
- index 2 a, b
- index 3 a, b, c
- etc.
- as MySQL will fail to take the best one. Even if you do not have "c" in your condition only create index 3.
- Datainterchange performance issues
If you make heavy use of the DatainterchangeDSL and your models use lookups to connect to other entities, be sure to use the so called second level cache. Here is an example extracted from the German DHL cargo address validation data:
As county, place and zip are selected for every row to be imported, it is useful to define a 2nd level cache of an appropriate size to hold all entries. Do not oversize the cache as this could result in a garbage collector (GC) exception from a memory full condition. Better a smaller cache than none or an exception during import.
The lookup to find the right district uses 4 values from the imported row. The best approach is to have all the requested fields in the index. For better performance and less problems while importing, it is good to allow duplicate keys here. External data sources are often not that unique as they should be.
The above described method converts given domain keys of the imported streets to surrogate key references via UUIDs.
- MySQL settings
The mysql server comes with a settings file in the hidden windows directory ProgramData. For standard installations you'll find under C:\ProgramData\MySQL Server 8.0 a file called my.ini. Here are changes to boost performance:
- Although it is not recommended by the comment above this setting, you should set
- innodb_flush_log_at_trx_commit=0
- If you can afford it, increase the buffer pool size. Set
- innodb_buffer_pool_size=1G
To make the changed settings to effective you must restart the MySQL80 service.
Modeling
Display of article description
Question:
I would like to match the article number to the name of the article on a dialog box (field is not editable). The grammar of the dialogue gives me little meaningful ways to specify fields. The "autowire" and "view" probably do not help here - the manual does not help me any further.
One more example to make it clearer: A GTIN is scanned - the GTIN appears in the GTIN field and the article description in the Label field, the unit of measure in the Unit of measure field
Answer:
I assume you mean the descriptor of a relation of cardinality many to one in a combo box. For the time being the entries in the combo box are identical with the one which is selected and therefore do not show more information as in the list. If the domainKey or domainDescription keyword at the owner entity of the many to one relationship decorates a certain attribute, this one will be the displayed value in the relationship-combo. As the displayed value is not important for the linking or unlinking of a relationship, but its underlying related datatype, you can also use a synthetic attribute as domainKey attribute. You could create a new attribute in the owner entity combining number and name. In the authorization DSL you could declare it invisible. Let it automatically be combined with a def statement in entity model.
In autobinding, there is no solution for this right now. In the ui dsl you can add bindings as desired. A solution could be the following: we introduce a modifyer (metaflag) to mark an entity attribute which is unexpessive (such as GTIN or item number or sku) without additional information. If the autobinding mechanism detects such an attribute it automatically adds the domainKey and/or domainDescription to the right of the unexpressive attribute. If the marked attribute itself is either a domainKey or domainDescription the respective missing part is added.
Please try the following solution for the number + description problem: create on the one side of a many to one relationship a domainKey attribute where you combine 2 or more attributed virtually. E.g. you name the attribute "productSearch". Then you create a method with the "def" keyword with a preceding annotation "@PostLoad". The effect is that whenever you load the domainKey, the system will call the annotated method and assign whatever you put inside the method to this domainKey attribute. Remember that attributes marked as domainKey or domainDescription will be shown in combo boxes as descriptors for the respective underlying DTO. An entity definition like:
entity ProductClass {
     persistenceUnit "businessdata"
     uuid String ^id
     domainKey String productSearch
     var String productSubcategory
     var String productCategory
     @PostLoad def void fillProductSearch() {
          productSearch = productCategory + " - " + productSubcategory
     }
}
This will lead to combo box entries that are combined of category and subcategory.
Connecting different database products
You can easily use different database products as far they are supported by JPA and you have the appropriate driver at hand. For every different product you must have a different JNDI definition in your product preferences and you must define a different persistence unit per JNDI data source. Therefore it is not possible to share common relationships between different database products as JPA won't allow to navigate over persistence unit boundaries. The only way to support those projects is to use an Application Server like WebLogic from Oracle or WebSphere by IBM. This is quite expensive for small installations.
Default Localization
Question:
The Default Localization should be German - how is it adjustable?
Answer:
Any application built with OS.bee first reads the localization properties of the browser the client is running on. This will be the default locale before a user logs in. Every user has its own user account that is serviced by the admin or the user itself when opening the user menu -> profile. A user's preferred locale can be setup in the dialog. After signing in, the locale of the client will be switched to the given one.
CSVtoApp ... Column limitation?
Question:
A CC article pool (article.bag) with all columns of the parameter table can be imported. All columns with content are displayed in Eclipse - but the Create App button does not work. Only when many columns (here from letter b) have been deleted does the button work and the entity is created. Is there a limit? And could the program give a meaningful message if it does not work?
Answer:
There is no known limit with the numbers of columns being imported. But there is a drawback with column names that collide with reserved keywords either with java, models like entity, datamart or datainterchange. So it must be avoided to use names like new, entity, column, attribute and other reserved keywords. AppUpIn5 (formerly known as CSV2APP) will crash without notice if you violate this and there is no possibility to avoid the crash because it is a problem with the underlying framework xtext.
Entering a number without keypad
Question:
I have a field for entering a number as e.g. Counted quantity. This quantity is not to be entered with the number keypad, but via a combo-box. How can I define this field so that the numbers 1 to 1000 are selectable?
Answer:
A strange use-case indeed. Why forcing a user to select from a combo-box of 999 entries? You could validate the user's input more comfortable by using a validation expression in Datatype or Entity DSL. You could use this kind of syntax
- in Datatype DSL:
datatype one2thousand jvmType java.lang.Integer asPrimitive minNumber(01) maxNumber(1000)
- in Entity DSL:
var int [minNumber(01) maxNumber(1000)] unitsPerCase
Missing bundles after update and how to solve it
Sometimes, some bundles seem to be missing in the installation after an update has been made. This might look like the following screenshot:
The solution is to check the target definition of the workspace and to update the target with the software from the same repository and the same date as the installation.
Creating CSV files as input for AppUpIn5Minutes with OS.bee
Question:
- Do you have data in a persistence layer as a database that you want to introduce into the OS.bee system?
- Using OS.bee as tool for it?
Answer:
Based on that task we will show it on the example to introduce POD data into our OS.bee system. Therefor several steps are required.
The POD data consist of plenty entities but we will focus our attention only on the entities Brand, Brandowner, Brandtype, Gtin and Pkgtype.
The result of this task is to have CSV files as input for the AppUpIn5Minutes Tutorial.
First step: data import
- In our case the data is available via a SQL file and we have to create first a persistence layer (in our case a MySql database) and put the data into it. Existing a database with data already this first step is obsolete.
1. The first step is to get the original data and to put them into a persistence layer
- The POD data is provided via the SQL file
- We will use MySql as persistence layer and will run this SQL file on the for this occasion created schema pod.
- Now all the corresponding tables are created and filled with the data in our MySql Server.
2.The next step is to prepare the OS.bee Application to be able read the data from the persistence layer
- Running this file on a MySql database all entities are free from a technical key. So due to the requirements of JPA on which our database communication is based a ID is to be added.
- So for each created table from the first step an entity has to be defined manually within an EntityDSL instance.[
- On the example of Brand it will be like this:
 entity Brand {
     persistenceUnit "businessdata"
     var int brandtypecd
     var String brandtype
     var String brandnm
     var String brandowner
     var String bsin
     uuid String id
     var String brandlink
 }
- As result a new but empty column ID will be added in the MySql table 'brand' once the OS.bee application will be started and database call for the entity was done.
- Existing relations between the entities we will consider corresponding foreign key columns have to also created manually. In our particular brand example the existing relations are from Brand to Brandowner and Brandtype and from Gtin to Brand and Packagetype.
- So the corresponding foreign key columns within the corresponding entity definitions have to be like this:
entity Brand {
    ...
    var String brandTypeId
    var String brandOwnerId
}

entity Gtin {
    ...
    var String brandId
    var String packageTypeId
}
- The easiest way to make a first call is to create a trigger view of all entities to export their data via datainterchange and starting an export as explained in the following steps.
- As result new but empty columns will be added once:
- the columns gtin in the MySql table PACKAGE_TYPE_ID and BRAND_ID
- the columns brand in the MySql table BRAND_OWNER_ID and BRAND_TYPE_ID.
- The OS.bee application will be started and database call for the entity was done.
Second step: UI requisites
3. Create a trigger view to export the data via datainterchange
- For the last step to export the structure and content of all the entities into CSV files for each of these CSV files one datainterchange definition in a DatainterchangeDSL instance is required. Therefor create respectively an entry like this:
interchange Brand merge file
CSV "C:/osbee/POD/POD_en/Brand.csv" delimiter ";" quoteCharacter """ skipLines 1 beans {
    entity Brand
}
- To make this options visible in the OS.bee application a perspective within a menu is required.
- So we create a trigger view providing all the datainterchange definitions like this:
perspective Trigger {
       sashContainer sash {
              part pod view dataInterchange datainterchanges
       }
}
- And this perspective we put into a menu like this:
entry Menu {
       entry Item {
               entry POD perspective Trigger
       }
}
- The result of the view on which an export action will be a database call and so a change on the tables on the MySql server is:
Third step: Data enhancements
4. The following step is to fill the empty UUID columns with data
- To be able to work properly with JPA and to use relations we decided to use UUIDs. So the first step is fill the empty column ID with UUIDs generated from the MySql database with the following command:
UPDATE YourTable set guid_column = (SELECT UUID());
- In case of our example brand, it will be:
UPDATE pod.brand SET ID = (SELECT UUID());
- After that the corresponding relations have to be transformed into UUID foreign keys. Therefor the existing weakly relations have to be used to make strong foreign key constraints. As first step we will fill the foreign key columns of the table gtin.
- The existing relation between Brand and Gtin is based on the attribute Bsin. So the creation of the corresponding foreign key column BRAND_ID have to be done like this:
DELETE FROM pod.gtin WHERE bsin IS NULL; UPDATE pod.gtin g SET brand_id = (SELECT id FROM pod.brand b WHERE g.BSIN = b.BSIN);
- And for the corresponding foreign key column PACKAGE_TYPE_ID like this:
UPDATE pod.gtin g SET package_type_id = (SELECT id FROM pod.pkg_type t WHERE g.PKG_TYPE_CD IS NOT NULL AND g.PKG_TYPE_CD = t.pkg_type_cd);
- The next relation between Brand and Brandtype is based on the attribute brandTypeCd. So the creation of the corresponding foreign key column BRAND_TYPE_ID have to be done like this:
UPDATE pod.brand b SET brand_type_id = (SELECT id FROM pod.brand_type bt WHERE b.BRAND_TYPE_CD IS NOT NULL AND b.BRAND_TYPE_CD = bt.BRAND_TYPE_CD);
- And finally as the relation between Brand and Brandowner is defined over a helper table brand_owner_bsin, the creation of the corresponding foreign key column BRAND_OWNER_ID have to be done like this:
UPDATE pod.brand b SET brand_owner_id=(SELECT id FROM pod.brand_owner bo WHERE bo.OWNER_CD IS NOT NULL AND bo.OWNER_CD=(SELECT owner_cd FROM pod.brand_owner_bsin bob WHERE b.BSIN = bob.BSIN));
Forth step: Export into CSV files
5. The final step is to export all the actual entity structure and their content into CSV files
- Now all the datainterchange entries in the trigger view have to be used to export the corresponding entity structure and their content into the corresponding CSV files.
- Simply push the export button as shown for Brandowner as follows:
- The corresponding CSV files output as shown here:
import declartion used in most DSL
Question:
Is there an easy way to handle the needed Import declaration? Do we have to begin with the Import declaration while creating a new model can we start with other main semantic Elements of the DSL?
Answer:
Yes - there is an easy way to create the import declarations. You don't have to begin with the declarations. You can use SHIFT-CTRL-O to update the import declarations at any time in a model instance or simply see them showing up during entering the model code. Just start writing your model code, use the built-in lookup functionality with CTRL-<SPACE> to find the available keywords or referable objects and get the imports added during typing. To check if everything is OK use SHIFT-CTRL-O to update the import statements.
Entity DSL (DomainKey DomainDescription)
Question:
What is the effect of using domainKey and domainDescription inside the application? The Documentation shows only the syntax.
Answer:
domainKey and domainDescription classify what describes the description or the key of the domain. As primary keys are always UUID or ID as integer and do not represent human understandable objects, one can use these two keywords. Technically, either the domainKey or the domainDescription leads to a suggestTextField in a dialog rendered via autobinding. SuggestTextField let the user type some letters and will popup a suggestion to be selected. Whenever a reference to an entity with a domainKey or domainDescription is rendered with a comboBox, the classified attribute is used to identify the relationship to the user. If the domain classification is not given, the relationship is not linkable via a comboBox as the system doesn't know which attribute to present to the user. This fact can be used with intent, whenever a relationship is not meant to be changed or seen by a user.
assignment user -> position
Question:
We defined an organisational structure using the DSL organization. While maintaining a user (dialog), the defined positions are not shown in the drop-down list. A dialog base on a predefined dto (org.eclipse.osbp.authentication.account.dtos.UserAccountDto) is used. Is there anything to consider?
organization portal Title "Organigramm Portal" {
             position Administrator alias "Administrator_1" {
                    role AdminIT
             }
             position projectleadinternal alias "Project Lead Internal" superiorPos Administrator {
             }
             position projectleadexternal alias "Project Lead External" superiorPos Administrator {
             }
             position projectmemberexternal alias "Project Member External" superiorPos projectleadexternal {
             }

       }
Answer:
The combo box only shows positions from the Organization DSL if the "Organization and Authorization" component was licensed. If this is not the fact, the default role Administrator is shown as every user has administrator rights without this component. This could happen if you installed OSBP instead of OS.Bee. Otherwise, the name of the organization has to be deposited in the eclipse Preferences --> OSBP Application Configuration --> Authentication, in field Organization ID:
I18N.properties (Reorganization of obsoleted values)
Question:
Each DSL has its own I18N.properties to translate the values. The property file includes values that are no longer used in the Modell-Description. (For example based on an addition correction of orthography)
The update of the properties seems to be one-way. Is there a function to reorganize the values (with the target to drop all obsoleted values)?
Answer:
No, there is no way to delete unused entries for security reasons. Translations to foreign languages are expensive. The modeler is responsible to delete obsoleted entries.
Display values from ENUMS in Table
Question:
We are using a perspective with the combination of table and dialog to maintain master data. The dialog contains combo-boxes to select values based on ENUMS. The selected value is displayed in the dialog, but is not displayed in the table. Is there a way to display the values of the selected ENUM in the table, with the objective to use the filter?
Answer:
This is not yet implemented but on schedule.
References to images
Question:
Using for example MENU.DSL Documentation:
package <package name>[{
expandedImage <expandedImage String>
Keyword expandedImage and collapsedImage is used to define the menu image when the menu expanded or collapsed. Where can we find the valid names of the Images to use in the String?
Answer:
The images can be selected by using hitting <CTRL>+<space> right behind the keyword. This will lead you to the image picker. Double-click on "Select icon...“ , then you can select the image from the image pool. The corresponding name will be added to the model. If you want to add own images to the pool follow How to add pictures.
Perspective with master/slave relationship
Question:
We created a perspective with a "master" table and 5 related "slave" tables. The target is to select one row in the master table and automatically filter the data rows in the slave tables related to the selected data. Where can we find information about the way to realize this goal?
Answer:
With "master" you probably mean an entity that has relative to the "slave" an one2many relationship. Views of their underlying tables will synchronize if they share a filter with the selection of another table. The filter must use the same entity as the entity of a table that selected a row. So every datamart of a "slave" must have a condition in a many2one join where the "one" side is the entity that should synchronize while selecting rows. In effect the selected row tries to change all filters to the same ID if the same entity is used. This applies to all open views in all open perspectives. In datamartDSL, using the keyword "filtered", the result in the application is a combo-box in the header of the table, which allows to select a value which is used as a filter of all tables of the perspective which have use the same condition; using the keyword “selected”, the result will be a list-box.
Perspective use border to show boundary for each sash
Question:
Is it possible to show border between each sash-container used in a perspective? From our point of view the arrangement is not pretty clear to the user. It could be helpful to get a clearer view to show (optional) real visible border between sash-container and even between parts. for example:
- green border between parts of a sash-container
- blue border between sash-container
Is this already possible?
Answer:
For the moment there are no plans to colorize borders by means of grammar keywords. It is possible by changing the CSS for the currently selected theme.
Datainterchange Export (does not overwrite existing file)
Question:
We defined an interchange for a specific entity. The created TriggerView is called in a perspective, which is called in the menu. We also used an adjusted dialog with a toolbar with the export command. When the defined target filesystem is empty, the export file was created. A second try to export the data does not create a new file. Is there something to consider to allow an "overwrite" of existing data?
Answer:
Datainterchange tries not to overwrite already exported files and appends a running number to the end of the filename. When it is not work, you have to debug. The Action-buttons of the created Trigger-View are accidently colored as disabled but they are not. This will be changed in the future.
If you think they are very pale (not easy to read). It is also possible to define the layout of the buttons.
Logged in user as part of the data-record
Question:
We want to create an entity, where the logged in user, who insert a record is referenced in each data-record that be created. Is there a way (function or something else) to handle this request?
Answer:
This request is already a ticket.
bpmn2 file reference in blip-DSL
Question:
There is no hint about where to save the *.bmpn2 files. So we created a subfolder in net.osbee.app.XXX.model.blip, which is named of “bpm”. Using the new subfolder we created a new jBPM Process Diagram. As the description during the creation we remove "defaultPackage." as Prefix for Process-ID: The model is simple (Start-Event / User-Task / End-Event) When we try to reference the bpm2 model inside the blip-dsl, the name could not be resolved. Is there something to take care about?
Answer:
You must right click the new folder “bpm” and when the mouse is over "Build Path", select "use as source folder". After this is done you should press STRG+SHIFT+O in the Blip DSL to "organize imports".
How to add the missing icon images to a new created ENUM combo box
Question:
Defining an ENUM at the entity DSL model instance, a corresponding combo box is created, but the corresponding icon image for each ENUM component is missing.
Answer:
For the solution have a look at How to add pictures. We would like to enforce the usage of icons in OS.bee. So if you use EnumComboBox without images, there will be a "missing icon" icon appears in the combo-box, it was introduced with intent to remind the designer that there is a missing icon. There is still a problem, in the case, for example there are 10 Enum values per Enum type and 10 Enum types are used in an entity, 100 image names must be generated and deposited. Even if all use the same picture. This takes a lot of effort and costs time - just writing the file names per picture. Some of the designer wants to use EnumComboBox without images. Although great user experience comes from great effort, for designers who want to hold on to the slipshod way we will introduce a setting in OS.bee preferences to avoid displaying icons at all when at least one of the entries of a combo box is missing. For a pretty user experience we must decide between text and icon per combo box.
table DSL (as grid) create new data records
Question:
Is it possible to create new data records while using a grid? Existing data records can be changed for defined attributes (editable prop) using a double-click on the data row What must be changed to allow the creation of data rows?
Answer:
This is not yet possible, but on schedule.
DSL entity (Multiplicity of properties)
Question:
We defined an entity for customer data, with the goal that some attributes must be entered during creation of new data-records. To use only the property seems not to be enough to prevent a data-record to be saved, without filling non-nullable attributes. What have to be done to reach the goal?
Code-example:
var int [1]customer_no
var String [1] customer_name
var boolean portalrequired
var String country
Snippet of documentation
Answer:
This is a very interesting question. So I will explain some important facts about binding and validation (formerly known as Plausi). As OS.bee implements the Model-View-Controller pattern, UI fields, business logic and data layer are strictly separated. The link between them is realized by a "bean binding" mechanism. This mechanism propagates changes between the MVC elements in every desired direction. There is a layer between this mechanism which is called bean validation. For every direction of binding a validation can be implemented to avoid or allow a certain change. Even conversions between values from model to presentation and vice-versa are implemented in the binding mechanism. There are some pre-defined validation rules available in the Datatype DSL. As we follow the domain concept to define things as close to the base of the DSL hierarchy as possible, this is the place to go for validations.
For your request, you must define a new datatype as following:
datatype StringNotNull jvmType java.lang.String isNotNull[severity=error]
You can apply a validation rule to every "non-primitive" jvmType (jvm = Java Virtual Machine): Double, Integer..., but not for double, integer... Validation rules are cumulative. The severity of the user response on violation of the rule is definable in 3 flavors:
- info
- warn
- error
Each of them stylable via CSS. The following validation rules are available right now:
- isNotNull
- isNull
- minMaxSize (applies to Strings)
- maxDecimal and minDecimal (applies to Double, Long and Integer - Float is not supported by OS.bee)
- regex (regular expression must be matched - for the advanced designer)
- isPast (applies to date)
- isFuture (applies to date)
► Examples:
datatype DoubleRange jvmType java.lang.Double maxDecimal (10.00) minDecimal (20.00)
datatype String5to8Chars jvmType java.lang.String minMaxSize(5,8)
As a last step you must use the newly created datatype in your entity to let the validation work. There is one additional validation accessible as keyword from the Entity DSL. If you want to enforce the uniqueness of an attribute value like "fullName" you can use the unique keyword in the entity.
► Example:
entity Employee extends BaseID {
	persistenceUnit "businessdata"
	domainKey unique String fullName
When you are about to save a newly created entry, during bean validation the database is accessed and it is verified, that the given attribute content is not already in the database. Else a validation error with severity error appears in the front-end.
UI-Design
Question:
Is it possible to design a Combo-box/List-box where I can sort the entries by myself? Like in eclipse > Configure Working Sets... Here I ‘m able to select Up / Down to sort the working sets.
In the moment I realize this in the entity with the field listPrio:
entity Title extends BaseUUID {
persistenceUnit "businessdata"
domainKey String
title var
int listPrio
}
Then I sort the entries by giving a value for listPrio. But this is not a good solution.
Answer:
Sorry, not for this time. Sounds useful. I will create a ticket for it.
DSL Dialog: Autosuggestion for DomainKey or DomainDescritpion
Question:
I develop an address management. In the Entity DSL, I have the fields:
domainKey String decription
var String firstname
var String lastname
If I create a user:
firstname: Hans
lastname: Maier
Is it possible to get for the field description automatically suggested the value: Hans-Maier? Like a kind of derived or Operations in Entitiy DSL, but only for suggestion.
Answer:
Yes. After the definition of all attributes, you have the possibility to define methods that can be called by JPA thru annotations.
domainKey String description
	...
	@PostLoad
	def void makeFullName() {
		description = firstName+"-"+lastName
	}
Remember that decription is completely transient. You could also use @PrePersist or @PreUpdate.
DSL Table
Question:
I have a Table with 100 address data.
Is there a possibility of multi-selection?
► Example of selection of 5 addresses:
- I want to delete in one step 5 addresses.
- I want to send to these 5 addresses the same email.
Answer:
Not for the OSBP version. If you have the BPM option, then the token for BPM can be built using a selectable table. The resulting workload could send emails or deletes against the data base in the following system task.
datamart DSL (condition filtered) table does not refresh
Question:
In a perspective we use organigram / table (user) / dialog (user). The table based on a datamart using the semantic element conditions. Not all position in the organization have assigned user. When a position with assigned user is selected the data rows of the table are filtered. When a position is selected (where no user is assigned) the table does not refresh. What can we change in the model to refresh the table even when there is no corresponding data?
Answer:
DSL authorization (CRUD)
Question:
We tried to authorize the CRUD operations for some position in different ways. All CRUD operations for a given entity "Customer"
Assumpiton:
- For each positon there i a user available
- Each position has an assigned rolte (organization)
- Both user uses the same perspecitve (table/dialog)
- The dialog uses a general toolbar with the necessary actions
Login with user assigned to Position Accounting, create a new datarow (new Customer) and save the data (o.k) Login with user assigned to Position ProjectIntern, select the new Customer in the table, activate delete Button (Row deleted not expected) Is there something to take care about we neglected?
Answer:
DSL Menu(UserFilter/SuperUser)
Question:
When a User marked as SuperUser logged in our Application and the Menu-Modell contains a definition for UserFilter. The Menu is no longer shown inside the application.
The generated Menu in the application looks like this:
If the UserFilter line is included and the application restarted, after login, the application looks like this: (User,Position, and Menu are not visible)
The entity UserAccount and UserAccountFilter have been consider in authorization-DSL with Value ANY assigned to the role used by the user with attribute SuperUser.
Answer:
Printer Selection (Default Printer)
Question:
The Combo-box (Client-Toolbar) for the print-service shows all Printers from the client operating system. The default printer of the operating system is not the preselected for the application. It is possible to define a print-service for each user within the dialog UserAccount? Is it possible for an administrator to select Print-Service for foreign user without having all print-services on his local operating system? Or is it possible to preselect the default print-service insinde the client?
Answer:
DSL Entity Enum with own images
Question:
We tried to create own images for Enum-Values following the document How to add Pictures hosted using URL:
► Example:
enum TypeDocument {
             PDF, DOCX      }
entity Customer {
persistenceUnit "businessdata"
domainKey String customerKey
id int no
var boolean portalrequired
           var String country
           var TypeDocument documenttyp }
Own Fragment Bundle
Question:
- There is no hint about image sizes, are there some restrictions?
- There is no preferred way to transfer the created images into the folder (We use Copy and Paste, are there other ways?)
The application started from within Eclipse, Create new data-record using a dialog, the created images are not shown inside the Combo-Box. Can you help me about what went wrong or what is missing?
Answer:
How to synchronize views
Synchronizing tables with dialogs is quite usual for OS.bee. If they share a common entity and they are placed on the same perspective, this is done automatically.
You can now even synchronize tables with reports or tables with tables. They must have an identifier column in common. If so, they are synchronized without the need of a common datamart condition. The receiving view must have the keyword "selectById" on it. Every table emits a selection events of all id columns in the datamart. Not only the id value of the root entity, but also relations emit its id value when displayed in a table and selected.
If you have a datamart of a table with entities related like A->B->C, the selection event emits the values of the selected row of A.id, B.id and C.id. If there is another view on the perspective which uses A, B, or C as root entity, it will automatically synchronized.
There are 2 prerequisites that must match that the receiving view will synchronize automatically:
- the relation of the source view that should work as synchronizing element for the target view must appear as opposite relation in the datamart of the target view.
- the target view's datamart must have at least one normal attribute to show in the associated view.
How to get new features from your toolbar
As you probably know, ActionDSL creates commands, tool items and toolbars. There are some new features that you could use to enhance the usability of your dialog designs. Besides the classic buttons to save, delete, restore or create new entries, there are two new possibilities:
- save and new
- save as new
save and new is quite simple: after saving the dialog will enter the new-entry-mode again and re-uses the previously selected sub-type of the underlying DTO if there was one. The normal save will stay in editing-mode after save was processed.
save as new allows to make copies of the currently selected entry. If there are no uniqueness validations on the dialog, the copy is exactly the same as the previous entry, except for the internally used ID field. If there is a need to create a lot of new entries which are similar to an already existing entry, this button will help reducing time to enter new entries.
How are these new buttons created?
- create 2 new commands in ActionDSL (you could use your own keybinding shortcut)
	command saveAndNew describedBy "save and new" keyBinding "CTRL ALT A" dialogAction SaveAndNew
	command saveAsNew describedBy "save as" keyBinding "CTRL ALT F" dialogAction SaveAsNew
- add the new commands to your toolbar which is used in your dialogs
	toolbar Dialog describedBy "Toolbar for dialogs" items {
                ...
		item saveAndNew command saveAndNew icon "dssaveandnew"
		item saveAsNew command saveAsNew icon "dssaveasnew"
                ...
	}
Add user information to your CRUD operations
Sometimes it is desired to have some information persisted concerning the user and the date when an entry was created or modified. This is how this is to be implemented: First you must add the necessary attributes to the entities where this information is needed. If you use a mapped superclass for all entities, it makes it very simple to add it to all entities at once. These attributes must be annotated with the appropriate tag so that the generators know what you want (supply metadata).
Here is an example if using mapped superclasses:
	mappedSuperclass BaseUUID {
		uuid String id
		version int version

		@CreateBy
		var String createUser
		@CreateAt
		var Timestamp createAt
		@UpdateBy
		var String updateUser
		@UpdateAt
		var Timestamp updateAt
	}
The same thing also works for dedicated entities as well. If the EntityDSL inferrer discovers one of the annoations @CreateBy, @CreateAt, @UpdateBy or @UpdateAt it checks the following attribute definition and if the datatype matches the annotation the JPA mechanism will enter the requested information into the new or modified record. So be careful with the datatype, the ...By annotation expect a String to follow, the ...At annotation a Date type.
- How to make it visible to the runtime-user?
You must supply a toolbar command in ActionDSL to enable the user to show the information:
command databaseInfo describedBy "database info" keyBinding "CTRL ALT I" userinterfaceAction Info
Then you must extend your dialog toolbar with the new command:
toolbar Dialog describedBy "Toolbar for dialogs" items {
        ...
	item databaseInfo command databaseInfo icon "dbinfo"
}
You will end up with this toolbar button:
If the user clicks this button or uses its shortcut, a popup window appears showing the requested info. As the user selects different entries and leaves the popup open, its content will refresh according to the underlying information.
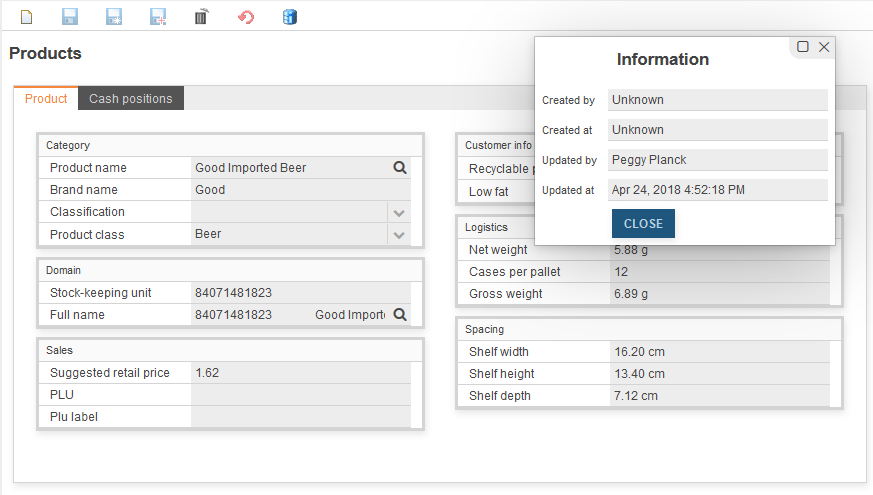
Designing dialogs using multiple columns
Generally there are two ways to define dialogs in OS.bee:
- using UI model manually
- using autobinding automatically
The advantage of using UI model is that you can create sophisticated nested layouts and use more than one DTO to bind from even if they don't have a relationship. The disadvantage is that you have to layout and bind manually. If DTO changes, you must also change the depending UI models.
The advantage of using autobinding is that you have nearly nothing to do if your dialog exactly follows the DTO description. A mechanism collects all available metadata from the underlying entities/DTO and tries to render a suitable dialog. The disadvantage is that you can't change layout nor the look.
Except for a new feature in DialogDSL. You can tell the dialog to render a multi-column layout. Just enter the keyword "numColumns" and a number in the dialog grammar.
dialog Products describedBy "Products" autobinding MproductDto toolbar Dialog numColumns 2
This will result in a 2-column layout like this:
This is how it looks with 3 columns:
Grouping attributes on dialogs
Sometimes there is the need to cluster fields on dialog to logical groups. Thus enforcing readability and better understanding of complex data entry forms (dialogs).
To enable the designer to do so, there is a new keyword "group" followed by an id in the grammar of EntityDSL. The layouting strategy logic of OS.bee finds common ids and collects the attributes together no matter in which order they appear in the entity. The group id cannot have blanks or special characters. The id is automatically added to the i18n properties of EntityDSL in order to be translatable.
Grouped and non-grouped attributes can appear mixed on a dialog. An example for the definition is here:
	entity Mproduct_class extends BaseID {
		persistenceUnit "businessdata"
		domainKey String product_subcategory group category
		var String product_category group category
		var String product_department group department
		var String product_family
		ref Mproduct[ * ]products opposite product_class asGrid
	}
The dialog is defined like this:
dialog Product_class describedBy "Product Class" autobinding Mproduct_classDto toolbar Dialog numColumns 1
The resulting dialog at runtime look like this:
As you can see the field "product family" is not grouped and the one-to-many relationship to products is rendered on a separated tabsheet because the keyword "asGrid" is used for the reference definition.
Here a more complex example for products with a 2-column layout:
entity Mproduct extends BaseID {
	persistenceUnit "businessdata"
	domainDescription String product_name		group category
	var String brand_name 			group category
	var String sku 				group domain
	domainKey String fullName 			group domain
	var double srp 				group sales
	var boolean recyclable_package 			group customerinfo
	var boolean low_fat 				group customerinfo
	var MassGRAMMetricCustomDecimal net_weight	group logistics
	var int units_per_case 				group logistics
	var int cases_per_pallet 			group logistics
	var MassGRAMMetricCustomDecimal gross_weight 	group logistics
	var LengthCMMetricCustomDecimal shelf_width 	group spacing
	var LengthCMMetricCustomDecimal shelf_height 	group spacing
	var LengthMetricCustomDecimal shelf_depth 		group spacing
	var ProductClassification classification		group category
	var PLUNumber plu 				group sales
	var String pluLabel 				group sales
	ref Mproduct_class product_class opposite products 	 group category
	ref Minventory_fact[ * ]inventories opposite product
	ref Msales_fact[ * ]sales opposite product
	ref CashPosition[ * ]cashPositions opposite product asGrid
	@PostLoad
	def void makeFullName() {
		fullName = sku+"\t"+product_name
	}

	index sku_index {
		sku
	}
	index plu_index {
		plu
	}
}
How units of measurements are handled
Often it comes to the situation that a certain value is bound to a unit of measurement. Lengths or masses are common examples. OS.bee supports units of measurement by using a framework called UOMo.
This dialog shows the usage of UOMo in the "Logistics" and "Spacing" group:
If you enter a big value into "Net Weight" for example, the logic will convert it to another unit in the same unit-family:
So there is some business-logic for uom implemented under the hood. When you look at the entity of this attribute, you'll find:
var MassGRAMMetricCustomDecimal net_weight group logistics
and in DatatypeDSL it look like this:
datatype MassGRAMMetricCustomDecimal jvmType java.lang.Double asPrimitive
	properties (
		key="functionConverter" value="net.osbee.sample.foodmart.functionlibraries.UomoGRAMMetricConverter"
	)
So what you can see is that the basic type is Double and a converter handles the uom stuff. Let's look at the FunctionLibraryDSL for this definition:
converter UomoGRAMMetricConverter {
	model-datatype Double presentation-datatype BaseAmount
	to-model {
		var localUnitFormat = LocalUnitFormatImpl.getInstance( presentationLocale );
		var baseUnit = localUnitFormat.format( MetricMassUnit.G ) var suffix =( presentationParams.get( 1 ) as String ) if( suffix === null ) {
			suffix = baseUnit
		}
		if( localUnitFormat.format( MetricMassUnit.KG ).equals( suffix ) ) {
			var amount = MetricMassUnit.amount( presentationValue, MetricMassUnit.KG ) return amount.to( MetricMassUnit.G ).value.doubleValue
		}
		else if( localUnitFormat.format( MetricMassUnit.MG ).equals( suffix ) ) {
			var amount = MetricMassUnit.amount( presentationValue, MetricMassUnit.MG ) return amount.to( MetricMassUnit.G ).value.doubleValue
		}
		else {
			return presentationValue
		}
	}
	to-presentation {
		var amount = MetricMassUnit.amount( modelValue, MetricMassUnit.G ) if( modelValue > 1000d ) {
			amount = amount.to( MetricMassUnit.KG )
		}
		else if( modelValue < 1d ) {
			amount = amount.to( MetricMassUnit.MG )
		}
		return amount as BaseAmount
	}
}
You discover for this function a logic separated in two parts:
- to-model
- to-presentation
As the function must provide a logic to convert database values to the UI (presentation), and after the user changed a value, back to the database (model), it has two parts. The 2. part is called the inverse function. Each part tries to find the most suitable unit for the given value. The base-unit is defined as metric gramm and all other values stay in the same family. As a result the value is stored in base-units.
While you play around with units of measurement you'll find out that you could easily build converters between families but also to convert from imperial unit systems to metric (SI=Système international d'unités ) and vice versa.
How sliders can improve the user experience with your dialogs
Sliders are well known to adjust analogue values in the world of audio.
If you want to use a similar technology to let your user adjust values in an analogue manner, you can use sliders. Just define a new datatype based on a numeric primitive type and supply it with the minimum and maximum values for the adjustable range.
datatype Slider_1000_2000 jvmType int
	properties(
			key="type" value="slider",
			key="min" value="1000",
			key="max" value="2000"
	)
Use the new datatype in an entity:
var Slider_1000_2000 slideDelay
The resulting dialog looks like this:
It looks kindof more convenient instead of entering a number between 1000 and 2000.
New ways to supply icons for enum literals
Icons are now automatically generated when the entity model is generated. In every location of entity models a folder "enums" will be created and one sub-folder for each type of enumeration. Every literal of the enum will create a png-file with size 1x1 white pixel. This makes it easy to supply a custom icon for every enum literal located near the definition. You just copy a 16x16 pxel sized png file over the generated one. There is no need to suppress icons if no icons are needed as they are invisible when generated 1x1 pixel sized.
After generation the folders look like:
After you have overridden the icons, the combo box looks like this:
IMPORTANT: you must modify your build.properties like described here.
Validation
If you deal with storing data for later usage, you'll be confronted with the fact that users or imports sometimes enter data that could be invalid for later processing. To avoid these problems you must validate data before it is stored. The necessity of a generic validation upon bean-data was detected in 2009 and the JSR303 was created. Built on this specification Apache created a framework to fullfil the specification BeanValidation.
OS.bee exploits this framework and grants access to some validation annotations by using a grammar extension in DatatypeDSL and EntityDSL. Therefore a kind of business logic is implemented by using validations. Naturally validation keywords are datatype specific and not all can be used everywhere.
The violation of a validation can be signalled to the user in 3 different levels of severity:
- INFO
- WARN
- ERROR
where only ERROR prevents data from saving to database.
The following validations per datatype can be used (either in DatatypeDSL or in EntityDSL):
- For all datatypes
- isNull invalid if value was set
- isNotNull invalid if value was never set
- Boolean
- isFalse invalid if value is true
- isTrue invalid if value is false
- Date/Time/Timestamp
- isPast invalid if date lies in the past in reference of today
- isFuture invalid if date lies in the future in reference of today
- Decimal (1.1, 1.12 ...)
- maxDecimal invalid if decimal exceeds the given value
- minDecimal invalid if decimal underruns the given value
- digits invalid if decimal has more digits or more fraction digits than the given 2 values
- regex invalid if the value does not match the given regular expression
- Numeric (1, 2, ...)
- maxNumber invalid if number exceeds the given value
- minNumber invalid if number underruns the given value
- minMaxSize invalid if number is not in the given range of 2 values
- regex invalid if the value does not match the given regular expression
- String
- regex invalid if the value does not match the given regular expression
The messages prompted to the user come in a localized form out of the Apache framework.
An example for a regular expression is this:
var String[ regex( "M|F" [severity=error]) ]gender
Here an example for a date validation:
datatype BirthDate dateType date isNotNull isPast[severity=error]
The violation of this rule looks like this:
If you point at the exclamation mark beside this field after closing the Validation report you will see:
For EntityDSL there is an extra keyword to validate if an entry is already in the database or not. You can use it if you want unique entries in a certain field.
domainKey unique String full_name
If there is a violation of this rule, the dialog looks like this:
This also works for normal fields that are not domainKeys.
Extended Validation
To enforce business rules can be a sophisticated task for traditional software projects. With OS.bee it is possible to create a DTO validation with the FunctionLibraryDSL with less effort. As DTO build up dialogs in autobinded mode, you get a dialog validator for free.
These are the steps to create one:
- create a validation group in the FunctionLibraryDSL and name it like the DTO that you want to validate followed by the token Validations:
validation MemployeeDtoValidations { ... }
- MemployeeDto would be the DTO to validate.
- create inside the named validation group methods that should be processed every time a save button on a dialog is pressed or validate is called from somewhere else:
validate highSalary(Object clazz, Map<String, Object> properties) { ... }
- In clazz the DTO to validate is given. You could access data that is related to this DTO to validate e.g. the max salary allowed like this:
var dto = clazz as MemployeeDto
if(dto.salary > dto.position.max_scale) { ... }
The properties map can be used to get some contextual information and services.
properties.get("viewcontext.service.provider.thirdparty")
gives access to the EclipseContext and therefore to a lot of services registrated there. Use the debugger to get more information.
var map = properties.get("viewcontext.services") as Map<String,Object>
var user = map.get("org.eclipse.osbp.ui.api.user.IUser") as IUser
gives access to the current user's data. To distinct the validation for a certain user role, you could use this code:
if(!user.roles.contains("Sales")) { ... }
Every validate method must return either null if there is no validation rule violated or a Status. The Status is created as following:
var status = Status.createStatus("", null, IStatus.Severity.ERROR, "salaryTooHigh", dto.salary)
where the first 2 parameters are optional and not explained here. The 3. parameter selects severity (here: error). The 4. parameter is the translation key for the properties file and the last parameter is an optional value that could be integrated into the translated message. Remember that all translation keys are decomposed into lowercase keys with underscores for compatibility reasons. So the key "salaryTooHigh" results in a key "salary_too_high". You could than create a translation like this:
{0} works as placeholder where the last parameter is inset. The appropriate message looks like this in the dialog:
So, the complete code for the business rule: "Salaries must be in a range defined by the employee's position record and can't be violated except for users with the role "Sales" who can exceed the upper limit but not below the lower limit." looks like this:
	validation MemployeeDtoValidations {
		validate highSalary(Object clazz, Map<String, Object> properties) {
			var dto = clazz as MemployeeDto
			if(dto.salary > dto.position.max_scale) {
				var map = properties.get("viewcontext.services") as Map<String,Object>
				var user = map.get("org.eclipse.osbp.ui.api.user.IUser") as IUser
				var IStatus status
				if(user.roles.contains("Sales")) {
					status = Status.createStatus("", null, IStatus.Severity.ERROR, "salaryTooHigh", dto.salary)
				}
				status.putProperty(IStatus.PROP_JAVAX_PROPERTY_PATH, "salary");
				return status
			}
			return null
		}
		validate lowSalary(Object clazz, Map<String, Object> properties) {
			var dto = clazz as MemployeeDto
			if(dto.salary < dto.position.min_scale) {
				var status = Status.createStatus("", null, IStatus.Severity.ERROR, "salaryTooLow", dto.salary)
				status.putProperty(IStatus.PROP_JAVAX_PROPERTY_PATH, "salary");
				return status
			}
			return null
		}
	}
Reset cached data
In order to provide a responsive and modifiable user interface, some data is cached while some data is stored to the database. In case you need to reset this data, there is a new keyword in MenuDSL to provide a small dialog where this can be done.
category Settings systemSettings
If you have done so, the resulting menu will look like this:
The tooltip will provide additional information about what can be reset here. For the moment there are 3 option:
- reset surface settings
- modifications done by the current user during runtime are stored and restored with the next usage of the application. Modifications comprise
- splitter positions in perspectives
- column order in tables
- column width in tables
- column hiding intables
- reset BI data
- the underlying framework for BI data is Mondrian that makes heavy use of caches for cube related data. Whenever data changes through the use of external tools, the cache will not be reset automatically. This can be done here.
- reset database
- the underlying framework JPA als makes use of caches. For the same reason as with Mondrian, its cache can be reset here.
Therefore, it is no longer needed to restart the application server if data was changed by SQLDeveloper or TOAD or similar tools, just press reset caches here. And, if you are unsatisfied with your private settings for the surface, reset it here to factory settings.
WARNING: If you press "reset database" or "reset BI", the reset comprises the whole application with all currently connected sessions and users. BI analytics and database access will react delayed until all caches are rebuilt.
ReportDSL: How to get a checkbox for a Boolean attribute
The common outputs for a boolean attribute are the strings "true" or "false". As you can see in the following report using the attribute:
	entity CashPosition ... {
        ...
        var boolean taxIncluded
        ...
   }
But enhancing the attribute with the property checkbox as shown here:
	entity CashPosition ... {
        ...
        var boolean taxIncluded properties ( key = "checkbox" value = "" )
        ...
   }
the report output for the same boolean attribute is like this:
How to collect business data and presenting meaningful statistics with OS.bee - INTRODUCTION
Before one can present and interpret information, there has to be a process of gathering and sorting data. Just as trees are the raw material from which paper is produced, so too, can data be viewed as the raw material from which information is obtained.
In fact, a good definition of data is "facts or figures from which conclusions can be drawn".
Data can take various forms, but are often numerical. As such, data can relate to an enormous variety of aspects, for example:
- the daily weight measurements of each individual in a region
- the number of movie rentals per month for each household
- the city's hourly temperature for a one-week period
Once data have been collected and processed, they are ready to be organized into information. Indeed, it is hard to imagine reasons for collecting data other than to provide information. This information leads to knowledge about issues, and helps individuals and groups make informed decisions.
Statistics represent a common method of presenting information. In general, statistics relate to numerical data, and can refer to the science of dealing with the numerical data itself. Above all, statistics aim to provide useful information by means of numbers.
Therefore, a good definition of statistics' is "a type of information obtained through mathematical operations on numerical data".
| Information | Statistics |
|---|---|
| the number of persons in a group in each weight category (20 to 25 kg, 26 to 30 kg, etc.) | the average weight of colleages in your company |
| the total number of households that did not rent a movie during the last month | the minimum number of rentals your household had to make to be in the top 5% of renters for the last month |
| the number of days during the week where the temperature went above 20°C | the minimum and maximum temperature observed each day of the week |
Business analysis is the term used to describe visualizing data in a multidimensional manner. Query and report data typically is presented in row after row of two-dimensional data. The first dimension is the headings for the data columns and the second dimension is the actual data listed below those column headings, called the measures. Business analysis allows the user to plot data in row and column coordinates to further understand the intersecting points. But more than 2 dimensions usually apply to business data. You could analyze data along coordinates as time, geography, classification, person, position and many more.
OS.bee is designed for Online analytical processing (OLAP) using a multidimensional data model, allowing for complex analytical and ad hoc queries with a rapid execution time. Typical applications of OLAP include business reporting for sales, marketing, management reporting, business process management (BPM), budgeting and forecasting, financial reporting and similar areas.
Study this excellent guide for a deeper understanding of cubes, dimensions, hierarchies and measures:Beginner's guide to OLAP .
How to collect business data and presenting meaningful statistics with OS.bee – PART1
The storage and retrieval containers
In a nutshell:
- we store data using entities and relationships
- we retrieve information using cubes and dimensions.
Storage with entities
The backbone of statistics is a container for quantitative facts. In this tutorial we want to create statistical data upon cash-register sales. We call the container for these facts SalesFact'. It inherits from BaseUUID therefore providing a primary key and some database information and saves data within the persistence unit businessdata:
entity SalesFact extends BaseUUID {
	persistenceUnit "businessdata"
	/* actual net revenue */
	var double sales
	/* net costs of the goods and costs for storage */
	var double costs
	/* quantity of goods sold */
	var double units
}
Leaving the container as is we could aggregate some measurements but we have no idea of when, where and what was sold. So we need additional information related to this event of sale. We call it a coordinate system for measures or just a dimension.
entity SalesFact extends BaseUUID {
	persistenceUnit "businessdata"
	/* actual net revenue */
	var double sales
	/* net costs of the goods and costs for storage */
	var double costs
	/* quantity of goods sold */
	var double units
	/* what product was sold */
	ref Mproduct product opposite salesFact
	/* when was it sold */
	ref MtimeByDay thattime opposite salesFact
	/* to whom it was sold */
	ref Mcustomer customer opposite salesFact
	/* was it sold during a promotional campaign */
	ref Mpromotion promotion opposite salesFact
	/* where was it sold */
	ref Mstore store opposite salesFact
	/* which slip positions were aggregated to this measure (one to many relationship) */
	ref CashPosition[ * ]cashPositions opposite salesFact
	/* which cash-register created the sale */
	ref CashRegister register opposite salesFact
}
Please don't forget to supply the opposite sides of the reference (relation) with the backward's references:
ref SalesFact[ * ]salesFact opposite product
...
ref SalesFact[ * ]salesFact opposite thattime
...
ref SalesFact[ * ]salesFact opposite customer
...
ref SalesFact[ * ]salesFact opposite promotion
...
ref SalesFact[ * ]salesFact opposite store
...
ref SalesFact[*] salesFact opposite register
...
ref SalesFact salesFact opposite cashPositions
Let's have a look at a very special container, the time. The date attribute is not enough. You must amend some additional information and therefore functionality so it becomes a usable dimension:
entity MtimeByDay extends BaseID {
	persistenceUnit "businessdata"
	var Date theDate
	var String theDay
	var String theMonth
	var String theYear
	var String theWeek
	var int dayOfMonth
	var int weekOfYear
	var int monthOfYear
	var String quarter
	ref SalesFact[ * ]salesFact opposite thattime
	@PrePersist
	def void onPersist() {
		var dt = new DateTime(theDate)
		theDay = dt.dayOfWeek().asText
		theWeek = dt.weekOfWeekyear().asText
		theMonth = dt.monthOfYear().asText
		theYear = dt.year().asText
		weekOfYear = dt.weekOfWeekyear().get
		dayOfMonth = dt.dayOfMonth().get
		monthOfYear = dt.monthOfYear().get
		quarter = 'Q'+((month_of_year/3)+01)
	}

	index byTheDate {
		theDate
	}
}
As you can see from the code, the given date theDate is used to calculate other values that are useful for retrieving aggregates of measures using a dimension like time with the level quarter or theYear. If we want to use a "Timeline" as dimension for statistics from OLAP, we also need to create an entry and a relation to the MtimeByDay entity.
How are these calculations invoked?
Due to the annotation @PrePersist at the method declaration of onPersist, JPA calls this method every time before a new entry in MtyimeByDay is inserted. Be careful inside these methods: if an exception is thrown due to sloppy programming (e.g. null pointer exception), nothing in the method will be evaluated. Here are the other entities we need later:
entity ProductClass extends BaseUUID {
	persistenceUnit "businessdata"
	domainKey String productSubcategory
	var String productCategory
	var String productDepartment
	var String productFamily
	ref Mproduct[ * ]products opposite productClass
}
entity Product extends BaseUUID {
	persistenceUnit "businessdata"
	domainKey String productName
	var String brandName
	var String sku
	var double srp
	var boolean recyclablePackage
	var boolean lowFat
	ref ProductClass productClass opposite products
	ref InventoryFact[ * ]inventories opposite product
	ref SalesFact[ * ]salesFact opposite product
	ref CashPosition[ * ]cashPositions opposite product
}
entity Customer extends BaseUUID {
	persistenceUnit "businessdata"
	var String maritalStatus
	var String yearlyIncome
	var String education
	ref SalesFact[ * ]salesFact opposite customer
	ref CashSlip[ * ]slips opposite customer
}
entity Promotion extends BaseUUID {
	persistenceUnit "businessdata"
	domainKey String promotion_name
	var String mediaType
	var double cost
	var Date startDate
	var Date endDate
	ref SalesFact[ * ]salesFact opposite promotion
}
entity Store extends BaseUUID {
	persistenceUnit "businessdata"
	domainKey String storeName
	var int storeNumber
	var String storeType
	var String storeCity
	var String storeStreetAddress
	var String storeState
	var String storePostalCode
	var String storeCountry
	var String storeManager
	var String storePhone
	var String storeFax
	ref InventoryFact[ * ]inventories opposite store
	ref SalesFact[ * ]salesFact opposite store
	ref CashRegister[ * ]registers opposite store
}
entity InventoryFact extends BaseUUID {
	persistenceUnit "businessdata"
	var int unitsOrdered
	var int unitsShipped
	var int supplyTime
	var double storeInvoice
	ref Product product opposite inventories
	ref TimeByDay thattime opposite inventories
	ref Store store opposite inventories
}
entity CashRegister extends BaseUUID {
	persistenceUnit "businessdata"
	domainKey unique String num
	var unique String ip
	var unique String location
	var Date currentDay
	ref CashSlip[*]slips opposite register
	ref Store store opposite registers
	ref SalesFact[*] salesFact opposite register
}
entity CashSlip extends BaseUUID {
	persistenceUnit "businessdata"
	var Date currentDay
	var Timestamp now
	var String cashier
	var Price total
	@ GeneratedValue var long serial
	var boolean payed
	var boolean posted
	ref CashPosition[ * ]positions opposite slip
	ref Customer customer opposite slips
	ref CashRegister register opposite slips
}

entity CashPosition extends BaseUUID {
	persistenceUnit "businessdata"
	var Timestamp now
	var double quantity
	var Price price
	var Price amount
	ref CashSlip slip opposite positions
	ref Product product opposite cashPositions
	ref SalesFact salesFact opposite cashPositions
}
The mapped superclass from which all entities inherit is this:
mappedSuperclass BaseUUID {
	uuid String id
	version int version
}
How to collect business data and presenting meaningful statistics with OS.bee – PART2
Retrieval with MDX
The framework used to retrieve OLAP data is Mondrian from Pentaho. You'll find a complete documentation with this link. The language to retrieve multi-dimensional data was originally defined by Microsoft and an introduction to the MDX languge can be found there. For the moment not all features of Mondrian are implemented yet. E.g. among others: properties of levels, inline tables, functional dependency and other optimizations, and virtual cubes.
Dimensions
These dimensions presuppose that you already defined the appropriate entities and data inside.
At what point in time was the sale?
In Cube DSL I define the time dimension as following:
dimension TheTime typeTime {
	hierarchy hasAll allMemberName "All Times" {
		entity TimeByDay {
			level Year column theYear uniqueMembers levelType TimeYears
			level Month column monthOfYear levelType TimeMonths
			level Day column dayOfMonth levelType TimeDays
		}
	}
	hierarchy Quarterly hasAll allMemberName "All Times" {
		entity TimeByDay {
			level Year column theYear uniqueMembers levelType TimeYears
			level Quarter column quarter levelType TimeQuarters
			level Month column monthOfYear levelType TimeMonths
			level Day column dayOfMonth levelType TimeDays
		}
	}
	hierarchy Weekly hasAll allMemberName "All Times" {
		entity TimeByDay {
			level Year column theYear uniqueMembers levelType TimeYears
			level Week column weekOfYear levelType TimeWeeks
			level Day column dayOfMonth levelType TimeDays
		}
	}
}
The time dimension consists of several hierarchies. The reason for this is that weeks don't align to month boundaries. Therefore there is no real hierachical structure in this combination. The solution to this is to seperate the dimension in several hierarchies. If a hierarchy has no name by its own, the name is identical to the dimension's name. It is not necessary to define hierarchies but they are very common for many business cases.
Each hierarchy consists of one or more levels of aggregation. The levels should be sorted from the most general to the most specific. Levels have relationships with one another. A day has 24 hours, an hour has 60 minutes, and a minute has 60 seconds. When the levels are organized in order to represent their relationship with one another, a hierarchy is formed. If a measure is stored by using the time in seconds, the cube is able to return all aggregates of this measure per minute, per hour and day. It is not possible to synthesize the more specific level though. This is true for all dimensions, hierarchies and their levels. Levels link to attributes of entities. Best for performance is a so called "star schema" where all levels are united into one entity. The other way is a "snowflake schema" where levels are to be evaluated by navigation through may-to-one relationships. For Mondrian, there is only one level up allowed.
Special for all time related dimensions is that the levels must be classified with an extra keyword to describe the type (TimeYears, TimeMonths, TimeDays, etc.).
Where was the sale?
The dimension for Store looks like this:
dimension Store {
	hierarchy hasAll allMemberName "All Stores" {
		entity Store {
			level StoreCountry column storeCountry uniqueMembers
			level StoreState column storeState uniqueMembers
			level StoreCity column storeCity
			level StoreName column storeName uniqueMembers
		}
	}
}
Best practice for levels is to provide the keyword hasAll together with the allMembername. Doing so will enable you to leave the dimension completely by using the allMember aggregate or to use the Children (Mondrian) function by using the detailed keyword in Datamart DSL. The uniqueMembers attribute is used to optimize SQL generation. If you know that the values of a given level column in the dimension table are unique across all the other values in that column across the parent levels, then set uniqueMembers="true", otherwise, set to "false". For example, a time dimension like [Year].[Month] will have uniqueMembers="false" at the Month level, as the same month appears in different years. On the other hand, if you had a [Product Class].[Product Name] hierarchy, and you were sure that [Product Name] was unique, then you can set uniqueMembers="true". If you are not sure, then always set uniqueMembers="false". At the top level, this will always be uniqueMembers="true", as there is no parent level.
What was the sale about?
Here is the Product dimension:
dimension Product {
	hierarchy hasAll allMemberName "All Products" {
		entity Product {
			level ProductName column productName uniqueMembers
			entity ProductClass {
				over productClass
				level ProductFamily column productFamily uniqueMembers
				level ProductDepartment column productDepartment
				level ProductCategory column productCategory
				level ProductSubcategory column productSubcategory
			}
		}
	}
}
Was the sale inside a promotional period?
And the Promotions dimension:
dimension Promotions {
	hierarchy hasAll allMemberName "All Promotions" {
		entity Promotion {
			level PromotionName column promotionName uniqueMembers
		}
	}
}
Who was the customer of this sale?
At last the Customers dimensions:
dimension Customers {
	hierarchy hasAll allMemberName "All Customers" {
		entity Customer {
			level Country column country uniqueMembers
			level StateProvince column stateProvince uniqueMembers
			level City column city
		}
	}
}
dimension EducationLevel {
	hierarchy hasAll allMemberName "All Grades" {
		entity Customer {
			level EducationLevel column education uniqueMembers
		}
	}
}
dimension MaritalStatus {
	hierarchy hasAll allMemberName "All Marital Status" {
		entity Customer {
			level MaritalStatus column maritalStatus uniqueMembers
		}
	}
}
dimension YearlyIncome {
	hierarchy hasAll allMemberName "All Incomes" {
		entity Customer {
			level YearlyIncome column yearlyIncome uniqueMembers
		}
	}
}
With the last dimensions: "Education Level, Marital Status and Yearly Income" you can classify the sale in detail and draw conclusions what group of costumers is the most likely to buy a certain product class.
How to collect business data and presenting meaningful statistics with OS.bee – PART3
Putting data inside the storage entities
As mentioned in a previous entry, I cannot supply necessary data for all entities that will be referenced to build up dimensions. Also, it is assumed that you have some valid inventory-facts data and sales in your cash-register entities.
In this entry I explain how to collect and enrich data from multiple sources and to insert them using the batch-writing mechanism from JPA. It is vital to your application's OLAP performance to concentrate statistical data to a single entity per topic and cube. The resulting code can be executed manually or in a timer-scheduled manner.
First of all you must define a new action in your FunctionLibrary DSL file. In this case we want to create a button on the cashregister dialog that, once pressed, will post all sales in the statistical entity and change the current cash-register day to today. For every action class 2 methods must be defined:
- canExecute
- this function is invoked by OS.bee to decide the state of the toolbar button: active (method returns true) or disabled (method returns false).
- execute
- this method holds the code that shall be executed when the enabled button is pressed.
action CashNewDay {
	canExecute canChangeDay( IEclipseContext context ) {
		return true
	}
	execute doNewDay( IEclipseContext context ) {
   }
Be sure to have IEclipseContext as parameter for both methods, as we will need them later on.
How to collect business data and presenting meaningful statistics with OS.bee – PART4
Use MDX to generate statistics
If you reach this part, all needed containers have been defined and filled with data in order to enable business analysis as described in this part. Retrieval of data is defined with Datamart DSL. Datamart DSL eases the way you can define queries and mdx statements.
Let's say you have the following requirement:
show aggregated sales and costs in a table and a diagram of the top 10 products in sales amount by selecting a month and one or many product categories
How would you solve the requirement with sql? This wouldn't be easy. With MDX you can use powerful aggregators that will help you to solve the requirement with just a few words. The correct syntax would be (the part inside [ ] shows where the selected values have to be inserted):
select Non Empty{[Measures].[StoreSales],[Measures].[StoreCost]} on columns,
           Non Empty TOPCOUNT([Product].[ProductCategory],10,[Measures].[StoreSales])
           on rows from Sales where ([TheTime].[Month])
The parameter [TheTime].[Month] for example must be replaced by [1997].[3]. This syntactical element is called a slicer because it makes a slice through the cube only showing filtered aspects according to that slice.
With the help of Datamart DSL, the model code looks like this:
datamart SalesTop10ProductTime using cube Sales nonempty {
	axis columns {
		measure StoreSales
		measure StoreCost
	}
	axis rows {
		topcount( 10 ) of hierarchy Product level ProductCategory selected detailed over measure StoreSales
	}
	slicer hierarchy TheTime level Month filtered
}
The model contains more keywords than the real MDX but for the sake of simplyfication. And the DSL guides through all possible keywords and references avoiding the error prone process of formulating a correct MDX statement. You can try to enter a MDX statement directly into OS.bee. You can press STRG-ALT+M if a part has the current focus. A dialog pops up with a prepared and valid MDX statement to test connectivity and you can experiment with MDX here.
If you want to show the result of the datamart result in a table, you can enter the following model phrase in Table DSL:
table SalesTop10ProductTime describedBy "salesTop10Product" as readOnly filtering rowHeader indexed
using datamart SalesTop10ProductTime
The table renders like this:
Let's make a diagram out of these results using Chart DSL. The model phrase looks like this:
chart SalesTop10ProductTime describedBy "salesTop10Product" as bar
    animated shaded using datamart SalesTop10ProductTime {
	axis columns renders linear
	axis rows renders category shortLabel angle 90
	legend inside toggle replot fast
	tooltip north-west inside
}
The keyword angle rotates tick labels by the given value in degrees.
This is how the chart will looks like:
Another requirement against the same cube could sound like this:
Show aggregated sales and costs in a table and a diagram splitted by sales regions and product departments by selecting a month. Some selectable product departments must be excepted from displaying. The exception list must be long enough to see all product departments.
The new requirement requires a multi-dimensional view on information. The datamart model looks similar than the example before except for a new axis representing the extra dimension and the exception filter:
datamart SalesByProductDepartmentRegionTime showFilterCaptions numberOfMultiSelectionRows 30 using cube Sales {
	axis columns {
		measure StoreSales
		measure StoreCost
	}
	axis rows {
		hierarchy Product level ProductDepartment except ProductDepartment
	}
	axis pages {
		hierarchy Geography level Region
	}
	slicer hierarchy TheTime level Month filtered
}
Axes with increasing dimension are named like this: columns, rows, pages, chapters and sections. For the moment, the number of dimensions to be displayed simultaneously is limited to 5. The keyword showFilterCaptions displays a label for the selector additionally to the tooltip, whereas numberOfMultiSelectionRows followed by a number widens the list to the number of entries given.
The table's model phrase looks like this:
table SalesByProductDepartmentRegionTime describedBy "salesByProductDepartment" as readOnly filtering rowHeader indexed using datamart SalesByProductDepartmentRegionTime
The indexed keyword adds a column to show the original sorting from the cube.
The chart's model phrase is this:
chart SalesByProductDepartmentRegionTime describedBy "salesByProductDepartment" as bar
    animated swapped using datamart SalesByProductDepartmentRegionTime {
	axis columns renders linear
	axis rows renders category shortLabel
	legend inside toggle replot fast
	tooltip north-west inside
}
The keyword shortLabel helps to keep the chart clear: it suppresses the long description of dimension level and only shows the last level instead of all supplemental levels above. But there could be reasons to show the fully qualified level-name at the category axis. The keyword swapped swaps the x-axis with the y-axis. By clicking on an entry from the legend, you can toggle the data series. This is enabled by toggle.
As you can see, all "Food" departments are removed from the chart.
Surrogate or natural keys in entity models?
Nearly every day in my work I'm confronted with the question:
Wouldn't it be better to use the natural key (domain key) than a synthetical UUID (GUID) or a generated number?'
I found this excellent article that explains in detail the pros and cons: Surrogate or natural key: How to make the right decision
- The superiority of surrogate keys compared to natural keys is a much debated issue among database developers. ZDNet provides tips on when and why which type of key should be preferred.
- by Susan Harkins on May 19, 2011, 4:00 pm
According to relational database theory, a correctly normalized table must have a primary key. However, database developers are arguing over whether surrogate keys or natural keys are better. Data contains a natural key. A surrogate key is a meaningless value that is usually generated by the system. Some developers use both types of keys, depending on the application and data, while others strictly adhere to a key type.
The following tips mostly prefer surrogate keys (as the author does), but there should be no stiffening on a key type. It is best to be practical, reasonable and realistic and to use the key that suits you best. However, every developer should keep in mind that he chooses to make a long-term choice, which affects others as well.
- A primary key must be unique
- A primary key uniquely identifies each entry in a table and links the entries to other data stored in other tables. A natural key may require multiple fields to create a unique identity for each entry. A surrogate key is already unique.
- The primary key should be as compact as possible
- In this case, compact means that not too many fields should be required to uniquely identify each entry. To obtain reliable data, multiple fields may be required. Developers who think natural keys are better often point out that using a primary key with multiple fields is no more difficult than working with a single-field primary key. In fact, it can be quite simple at times, but it can also make you desperate.
- A primary key should be compact and contain as few fields as possible. A natural key may require many fields. A surrogate key requires only one field.
- There can be natural keys with only one field
- Sometimes data has a primary key with only one field. Company codes, part numbers, seminar numbersand ISO standardized articles are examples of this. In these cases, adding a surrogate key may seem superfluous, but you should weigh your final decision carefully. Even if the data seems stable for the moment, appearances can be deceptive. Data and rules change (see point 4).
- Primary key values should be stable
- A primary key must be stable. The value of a primary key should not be changed. Unfortunately, data is not stable. In addition, natural data is subject to business rules and other influences beyond the control of the developer. Developers know and accept that.
- A surrogate key is a meaningless value without any relationship to the data, so there is no reason to ever change it. So when you're forced to change the value of a surrogate key, it means something has been wronged.
- Know the value of the primary key to create the entry
- The value of a primary key can never be zero. This means knowing the value of the primary key to create an entry. Should an entry be created before the value of the primary key is known? In theory, the answer to this is no. However, practice sometimes forces one to do so.
- The system creates surrogate key values when a new entry is created so that the value of the primary key exists as soon as the entry exists.
- No duplicate entries are allowed
- A normalized table can not contain duplicate entries. Although this is possible from a mechanical point of view, it contradicts relational theory. Also, a primary key can not contain duplicate values, with a unique index preventing duplicate values. These two rules complement each other and are often cited as arguments for natural keys. The proponents of natural keys point out that a surrogate key allows for duplicate entries. If you want to use a surrogate primary key, just apply an index to the corresponding fields and the problem is solved.
- Users want to see the primary key
- There is a misunderstanding about the user's need to know the value of the primary key. There is no reason, theoretical or otherwise, for users to see the primary key value of an entry. In fact, users do not even need to know that such a value exists. It is active in the background and has no meaning to the user as he enters and updates this data, runs reports, and so on. There is no need to map the primary key value to the entry itself. Once you've got rid of the idea that users need the primary key value, you're more open to using a surrogate key.
- Surrogate keys add an unnecessary field
- Using a surrogate key requires an extra field, which some consider a waste of space. Ultimately, everything needed to uniquely identify the entry and associate it with data in other tables already exists in the entry. So why add an extra column of data to accomplish what the data alone can do?
- The cost of a self-generating value field is minimal and requires no maintenance. Taken alone, this is not a sufficient reason for recommending a natural key, but it is a good argument.
- Do not systems make mistakes?
- Not everyone trusts system-generated values. Systems can make mistakes. This basically never happens, but it is theoretically possible. On the other hand, a system susceptible to this type of disturbance can also have problems of natural value. To be clear, the best way to protect a complete database, not just the primary key values, is to make regular backups of it. Natural data is also no more reliable than a system-generated value.
- Some circumstances seem to require a natural key
- The only reason a natural key might be required is for integrated system entries. In other words, sometimes applications that share similar tables create new entries independently. If you do not make any arrangements, the two databases will probably generate the same values. A natural key in this case would prevent any duplicate primary key values.
- There are simple tricks to use a surrogate key here. Each system can be given a different starting value, but even that can cause problems. GUIDs work, but often affect performance. Another alternative would be a combined field from the system-generated field of the entry and a source code that is used only when connecting the databases. There are other possibilities, although a natural key seems to be the most reasonable option in this situation.
After reading this article you probably wouldn't ask me again, would you? You would, I know it.
Using "embedded" entities
Embeddables are an option to use composition when implementing your entities. They enable you to define a reusable set of attributes. In contrast to association mappings, the embeddable becomes part of the entity and has no persistent identity on its own. In other words it works as if you would literally copy all the fields into the entity that contains embedded object.
Sometimes you have a huge table with several columns. However some columns are logically tied to each other. When you don't want to create an object with all the fields, you create an embedded Address bean. This way you logically group address columns into an object instead of having equally huge entity with a flat list of fields.
Using embedded objects is considered a good practice, especially when strong 1-1 relationship is discovered.
You'll mostly want to use them to reduce duplication or separating concerns. Value objects such as date range, values linked to units of measurement, names (first, middle and last-name) or address are the primary use case for this feature.
The advantage of embedded beans over one-to-one relationsships is higher performance on loading.
Embedded beans used by multiple entities:
The same entity can use the embedded bean for multiple use:
You can even have a relationship inside an embedded bean:
In OS.bee there is no need to specify the embeddable annotation as described in JPA documents. As soon as you use bean keyword it is clear that you mean an embeddable object. If you use it inside an entity, the "embedded" annotation is inserted behind the scenes. Also the annotation AttributeOverrides is used automatically for embeddable beans embedded multiple times under different names. These are entities from the FoodMart example:
bean Address onTab {
	var String country
	var String stateProvince
	var String postalCode
	var String city
	var String street
	var String number
	var String phone
	var String fax
}
As a default, embedded beans are rendered in a group just like the other groups too. The title of the group is the name of the bean. If you supply the keyword onTab in the definition of the bean, it is rendered on a separate tab just like references using the keyword asGrid.
bean Bank {
	var String bankName
	var String iban
	var String bic
}
entity Company extends BaseUUID {
	persistenceUnit "businessdata"
	domainKey String companyName
	var BlobMapping signingImage group images
	var BlobMapping companyImage group images
	var Slider_1000_2000 slideDelay group images
	var Address delivery
	var Address invoice
	var Bank bank1
	var Bank bank2
	ref Department[*] departments opposite company asTable
	ref AdvertisingSlide[*] slides opposite company asTable
	ref Store[*] stores opposite company asTable
}
As you can see above, Company has two addresses: one for deliveries and one to send the invoices to. Company has two bank accounts too: bank1 and bank2. The way to access the iban field of bank2 would be:
company.bank2.iban = "123456789"
This is how the dialog for company looks like using the above definition:
The delivery tab:
The invoice tab:
This is how the entity looks in a database as table:
Improve toolbar functionality
Two new features are available to enhance the guidance of users with toolbars:
- insert a spacer between toolbar items
- useful to put some buttons together to one functional group
- insert a dialog's state indicators groupinsert a dialog's state indicators group
- shows the current state of the related dialog
If you create an Action DSL model like this:
toolbar Dialog describedBy "Toolbar for dialogs" items {
	item newItem command newItem icon "dsnew"
	spacer
	item saveItem command saveItem icon "dssave"
	item saveAndNew command saveAndNew icon "dssaveandnew"
	item saveAsNew command saveAsNew icon "dssaveasnew"
	spacer
	item deleteItem command deleteItem icon "dsdelete"
	item cancelItem command cancelItem icon "dscancel"
	item databaseInfo command databaseInfo icon "dbinfo"
	spacer
	state
}
The model will result in this:
If you add a new entry and violate a constraint it looks like:
Fill a new DTO entry with default values
As implementation of ticket #797, a new feature is available for the Dialog DSL.
Dialog DSL has a new keyword initialization to point to an initialization function in FunctionLibrary DSL. This class/method will be executed each time the new entry button is pressed. The method is designated to put some values into the given dto object.
Why is this new feature situated at dialog level and not at entity/DTO level?
Because it is more flexible there. You can define different dialogs based on the same DTO/Entity but each of them behaving differently. The context where the initialization was called can be taken into account to calculate different default values.
Here is an example:
In the FunctionLibrary DSL there is a new group keyword called initialization where all methods to provide default values to DTOs can be collected. Let's say we want, every time the new entry button is pressed, the field fullname be preset to New Employee and the hire date be set to today. As minimum wage we assume 5000 bucks. So the initialization method must look like this:
initialization Initializations {
	initialize initEmployee( Object clazz, Map < String, Object > properties ) {
		var dto = clazz as EmployeeDto
		dto.fullName = "New Employee"
		dto.salary = 5000
		dto.hireDate = DateTime.now.toDate
		return true
	}
}
The method must return true if it was successful. The method can return false as well if an operation failed and you want signal the failure to the user.
Important: Never call a class class inside FunctionLibrary as you must avoid using reserved words of Java, use clazz instead.
If we reference this definition in Dialog DSL, we must type a model phrase like this:
dialog Employee autobinding EmployeeDto toolbar Employee initialization Initializations.initEmployee
As you can see, we arrange the group name and the method name with a dot in between.
That's all. The dialog, if the new entry button was pressed, looks like this:
Prevent visibility or editability in general
That visibility and editability is controllable by the Authorization-DSL is well known. New is the feature to supply keywords at Entity DSL - level to control these properties upfront. Even if an authorization tells another thing, these fields won't change.
- hidden
- will make the field for this attribute invisible to all renderer* (dialog, table, report, etc.)
- readOnly
- will make the field for this attribute not editable on dialogs
(* a software or hardware process that generates a visual image from a model.)
Here is an example:
Let's say that our employee is only activatable or deactivatable through a process and not by humans using this dialog. The day of dismissal comes from an external software program by interface and cannot be changed here. So we would modify the entity model like this:
var hidden Boolean active group business
var readOnly Date endDate group business
The newly rendered dialog would look like this:
As you can see, the active checkbox is missing and end date can no longer be manipulated from here.
Parameterized Report
Resolving the ticket #912 a new kind of report dsl model definition is available now:
	report <ReportID> {
		rendering pdf parametrized
	}
This parameterized report only requires the 'rendering' option and the new keyword parametrized as its report definition (the rpt-design file) will not be generated by the ReportDSL as the already existing reports but it requires an already existing "handmade" report design as rpt-design file.
Furthermore, it does not use a datamart as data source, so no datamart definition is necessary.
This report only works with an existing report design based on a JDBC connection as data source and with a parameterized SQL command to collect the required data. And this report design file must have as file name the defined 'ReportID' in the report dsl model instance.
In addition, it must be stored in the rptdesign directory of the report models bundle and within the sub-directory structure that the defined package in the report dsl model instance indicates.
With a parameterized report defined as this:
package org.eclipse.osbp.my1stapp.model.reports {
	report BirtParametrizedPersonsBirthdate {
		rendering pdf parametrized
	}
}
located in the wizard created MY1APP application a corresponding rpt-design file named BirtParametrizedPersonsBirthdate.rptdesign has to be created in /org.eclipse.osbp.my1stapp.model.report/rptdesign/org/eclipse/osbp/my1stapp/model/reports/BirtParametrizedPersonsBirthdate.rptdesign.
The corresponding example of a defined JDBC data source to a MYSQL database and the parameterized SQL command in a report design could be like this:
    <data-sources>
        <oda-data-source extensionID="org.eclipse.birt.report.data.oda.jdbc" name="cxdb" id="493">
            <property name="odaDriverClass">com.mysql.jdbc.Driver</property>
            <property name="odaURL">jdbc:mysql://localhost:3306/my1stapp</property>
            <property name="odaUser">root</property>
            <encrypted-property name="odaPassword" encryptionID="base64">bXlzcWw=</encrypted-property>
        </oda-data-source>
    </data-sources>
    <data-sets>
        <oda-data-set extensionID="org.eclipse.birt.report.data.oda.jdbc.JdbcSelectDataSet" name="DataSet_Person" id="3">
            <list-property name="parameters">
                <structure>
                    <property name="name">param_1</property>
                    <property name="paramName">PersonLastName</property>
                    <property name="dataType">string</property>
                    <property name="position">1</property>
                    <property name="isInput">true</property>
                    <property name="isOutput">false</property>
                </structure>
                 <structure>
                    <property name="name">param_2</property>
                    <property name="paramName">BirthdateFromDate</property>
                    <property name="dataType">date</property>
                    <property name="position">2</property>
                    <property name="isInput">true</property>
                    <property name="isOutput">false</property>
                </structure>
                <structure>
                    <property name="name">param_3</property>
                    <property name="paramName">BirthdateToDate</property>
                    <property name="dataType">date</property>
                    <property name="position">3</property>
                    <property name="isInput">true</property>
                    <property name="isOutput">false</property>
                </structure>
            </list-property>
            <structure name="cachedMetaData">
                <list-property name="resultSet">
                    <structure>
                        <property name="position">1</property>
                        <property name="name">first_name</property>
                        <property name="dataType">string</property>
                        <property name="nativeDataType">1</property>
                    </structure>
                    <structure>
                        <property name="position">2</property>
                        <property name="name">last_name</property>
                        <property name="dataType">string</property>
                        <property name="nativeDataType">1</property>
                    </structure>
                    <structure>
                        <property name="position">3</property>
                        <property name="name">birthdate</property>
                        <property name="dataType">date</property>
                        <property name="nativeDataType">91</property>
                    </structure>
                </list-property>
            </structure>
            <property name="dataSource">cxdb</property>
            <list-property name="resultSet">
                <structure>
                    <property name="position">1</property>
                    <property name="name">first_name</property>
                    <property name="nativeName">first_name</property>
                    <property name="dataType">string</property>
                    <property name="nativeDataType">1</property>
                </structure>
                <structure>
                    <property name="position">2</property>
                    <property name="name">last_name</property>
                    <property name="nativeName">last_name</property>
                    <property name="dataType">string</property>
                    <property name="nativeDataType">1</property>
                </structure>
                <structure>
                    <property name="position">3</property>
                    <property name="name">birthdate</property>
                    <property name="nativeName">birthdate</property>
                    <property name="dataType">date</property>
                    <property name="nativeDataType">91</property>
                </structure>
            </list-property>
            <xml-property name="queryText"><![CDATA[select first_name,last_name,birthdate from Person where (last_name = ?) and (birthdate between ? and ?)]]></xml-property>
        </oda-data-set>
    </data-sets>
As this report design works with 3 parameters (PersonLastName - datatype string, BirthdateFromDate - datatype date, BirthdateToDate - datatype date) as input these have to be provided. Therefore first of all a ideview within a ui dsl model instance has to be defined with the required ui elements for the 3 required input parameters.
So the new ideview in a ui dsl model instance could be like this:
ideview BirtParametrizedPersonsBirthdate {
	datasource person:PersonDto
	datasource birthdateFrom:Date
	datasource birthdateTo:Date
	horizontalLayout HL {
		form VL {
			combo Person {
				type PersonDto
				captionField lastName useBeanService
			}
			datefield BirthdateFrom
			datefield BirthdateTo
		}
	}
	bind person <-- [this.HL.VL.Person].selection
	bind birthdateFrom <-- [this.HL.VL.BirthdateFrom].value
	bind birthdateTo <-- [this.HL.VL.BirthdateTo].value
}
In this view 3 data container (person, birthdateFrom, birthdateTo) are defined to caught the required data that has to provided to the report. Besides, it defined layouts to structure the view and within the layouts 3 ui components as interaction interface with the user who provides the input data for the request to the parameterized report. At least the 3 ui elements are binded to the 3 data container from where the corresponding data can be fetched.
To get this data a new functional action with an execute command specially adapted to the corresponding ideview and report has to be defined in a functional dsl model instance. That command has to get the data from the ui elements and provide them as parameters to the corresponding report via event dispatcher.
That new functional action with its corresponding execute command in a functionlibrary dsl model instance could be like this:
	action ParametrizedReports {
		execute sendPersonsBirthdate (IEclipseContext context) {
			var viewContext = context.get(typeof(IViewContext))
			var eventDispatcher = context.get(typeof(IEventDispatcher))
			var person = viewContext.getBean("person") as PersonDto
			var birthdateFrom = viewContext.getBean("birthdateFrom")
			var birthdateTo = viewContext.getBean("birthdateTo")
			var parameterPerson = new Parameter("PersonLastName", person.lastName, "Person")
			var parameterBirthdateFrom = new Parameter("BirthdateFromDate", birthdateFrom, "Birthdate from")
			var parameterBirthdateTo = new Parameter("BirthdateToDate", birthdateTo, "Birthdate to")
		    var parameterList = <Parameter>newArrayList()
		    parameterList.add(parameterPerson)
		    parameterList.add(parameterBirthdateFrom)
		    parameterList.add(parameterBirthdateTo)
		    var evnt = new EventDispatcherEvent(EventDispatcherCommand.ACTION, "org.eclipse.osbp.my1stapp.model.reports.BirtParametrizedPersonsBirthdateReport", "org.eclipse.osbp.my1stapp.model.functionlibraries.ParametrizedReports.sendPersonsBirthdate");
		    evnt.addItem(EventDispatcherDataTag.OBJECT, parameterList)
		    eventDispatcher.sendEvent(evnt)
		    return false
		}
	}
The 3 data container (person, birthdateFrom, birthdateTo) defined in the ideview are used to get the required data for the report. That data is used to create a parameter list with the 3 required report parameters (PersonLastName, BirthdateFromDate, BirthdateToDate) and to sent them within an event dispatcher event. This event must have EventDispatcherCommand.ACTION as event dispatcher command tag, the full qualified name of the receiving report (org.eclipse.osbp.my1stapp.model.reports.BirtParametrizedPersonsBirthdateReport) for this event and the full qualified name of the sending execute action (org.eclipse.osbp.my1stapp.model.functionlibraries.ParametrizedReports.sendPersonsBirthdate). So the corresponding receiving report can get this parameters, execute its SQL command and show the result as a BIRT report.
But to be able to execute that command in an action dsl model instance a command using that corresponding functional action and a corresponding toolbar using that command has to be defined.
That new command and toolbar in a action dsl model instance could be like this:
	command sendParametrizedPersonsBirthdateReport functionalAction group ParametrizedReports canExecute canSend executeImmediate sendPersonsBirthdate
    toolbar ParametrizedPersonsBirthdateReport describedBy "Toolbar to send a parametrized report of persons within a range of birthdates" items {
		item sendReport command sendParametrizedPersonsBirthdateReport icon "para_report"
	}
The command refers to the above mentioned functional action group ParametrizedReports and the immediate call of the execute command sendPersonsBirthdate. And the toolbar keeps the command.
Now we have defined a parameterized report (ReportDSL), an ideview for the input fields (UiDSL), a functional action to provide the parameters (FuntionLibraryDSL) and a toolbar keeping a command to start the parameter sending event (ActionDSL).
After all, all these individual components have to be put together into one unit.
So first, the toolbar and the ideview are brought together within a dialog defined in a dialog dsl model instance like this:
dialog BirtParametrizedPersonsBirthdate view BirtParametrizedPersonsBirthdate parametrized toolbar ParametrizedPersonsBirthdateReport
That dialog and the corresponding receiving report are put together in one perspective like this:
     perspective BirtParametrizedPersonsBirthdate iconURI "para_report" {
    	sashContainer BirtParametrizedPersonsBirthdateContainer orientation horizontal {
    		part BirtParametrizedPersonsBirthdateDialog view dialog BirtParametrizedPersonsBirthdate
    		part BirtParametrizedPersonsBirthdateReport view report BirtParametrizedPersonsBirthdate
    	}
    }
And finally that perspective defined as menu entry like this:
entry BirtParametrizedPersonsBirthdate perspective BirtParametrizedPersonsBirthdate
So the result could be like this:
How to manage generated numbers with OS.bee
Generated numbers can be implemented by using annotations in the entity model. A complete definition consists of 3 components:
- the attribute of an entity, which contains a numeric value
- one annotation containing the strategy (Generated Value) for the generation of the value
- one annotation containing the generator itself (TableGenerator).
Example in the entity DSL:
		@ TableGenerator ( name="GEN_ID",
				   initialValue=500,
				   table="NUMBERRANGETABLE",
				   pkColumnName="keycolumn",
				   valueColumnName="valuecolumn",
				   allocationSize=01)
		@ GeneratedValue ( strategy=TABLE,
				   generator="GEN_ID")
		var Long idNumber
In this example we have a numeric attribute called idNumber, which will contain the number out of a specified number range.
@ GeneratedValue The user has to place an annotation called @ GeneratedValue exactly in the line before the attribute definition. This annotation contains the strategy, in which way the system should generate a number range – there are the posssibilities TABLE (which is in the example), SEQUENCE, IDENTITY and AUTO. The second information contains the name of the generator , which must be given in the option generator. If the user has chosen TABLE there must be an additional annotation called @ TableGenerator (In case of a strategy – definition SEQUENCE there must be inserted a @SequenceGenerator. IDENTITY has been not used until now).
@ TableGenerator This section defines the way of generating the number range. initialValue contains the starting value, which will be taken at first to fill the attribute idNumber. In our case it contains the value 500. AllocationSize=01 (simply 1 leads to an errormessage) defines how many values are taken at once. AllocationSize 1 increments the attribute idNumber for each row. In this examle the recent number is stored in a table in the database named by the option table. The column names are given in pkColumnName and valueColumnName. The example leads to a new table named numberrangeTable, which contains the attributes keyColumn as the primary key, which contains the string GEN_ID and the valueColumn, which contains the recent value.
Of course it is possible to create a dialogue or a table based on corresponding dto in order to display the values in this table.
	entity numberrangeTable {
		persistenceUnit "businessdata"
		uuid String keycolumn
		var String keyname
		var Long valuecolumn
		@PrePersist
		@PreSave
		@PostLoad
		def void calculations () {
			keyname = keycolumn
		}
	}
Enter new data using a "sidekick"
Sometimes, if large amounts of data must be entered into the database, a problem arises: you need an owner (the one side of a one-to-many-relationship) which is not yet in the database. Best case you already have the possibility to use a dialog on the current perspective without the need to open another perspective. But this could not be the case. The advanced modeler can now solve this problem and allow a sidekick option in the entity model (EntityDSL).
This is a dialog on a perspective to enter data for stores. Every store has to be linked to a region and a company. This is done using the appropriate combo-boxes that make up the relationship.
The current entity model looks like this:
entity Store extends BaseID {
	persistenceUnit "businessdata"
	domainKey String storeName		group basic
	var int storeNumber			group basic
	var String storeType			group type
	var String storeCity			group address
	var String storeStreetAddress   	group address
	var String storeState			group address
	var String storePostalCode		group address
	var String storeCountry			group address
	var String storeManager			group basic
	var String storePhone			group basic
	var String storeFax			group basic
	var Date firstOpenedDate		group type
	var Date lastRemodelDate		group type
	var int storeSqft			group type
	var int grocerySqft			group type
	var double frozenSqft			group type
	var double meatSqft			group type
	var boolean coffeeBar			group type
	var boolean videoStore			group type
	var boolean saladBar			group type
	var boolean preparedFood		group type
	var boolean florist			group type
	ref Region region opposite stores 	group address
	ref cascadeMergePersist Warehouse[ * ]warehouses opposite store asGrid
	ref Employee [ * ]  employees opposite store asTable
	ref ReserveEmployee[ * ]reserveEmployees opposite store
	ref InventoryFact[ * ]inventories opposite store
	ref ExpenseFact[ * ]expenses opposite store
	ref SalesFact[ * ]sales opposite store
	ref CashRegister[ * ]registers opposite store asGrid
	ref Company company opposite stores 	group basic
}
If you add the sideKick keyword near the relationship definition ref the modified model lines looks like this:
	ref Region region opposite stores sideKick 	group address
	ref Company company opposite stores sideKick 	group basic
The rendering will change and supply extra buttons to perform the sidekick action for this relationships.
Presumed, you already defined an autobinded dialog for company and region, you can enter new data or even change existing.
Dialog model:
	dialog Company describedBy "Company" autobinding CompanyDto toolbar Dialog numColumns 1
	dialog Region describedBy "Region" autobinding RegionDto toolbar Dialog numColumns 1
The rendering engine will look for suitable dialogs and display them if the button is pressed.
If you use the suggest button at the domain-key field, you can load existing data into the sidekick-dialog or just enter new data. If new data is ready to persist, press the update button.
Sidekick-dialogs pop up in modal mode. So you must first close the dialog before you can reach other elements on the current perspective. The company sidekick button looks similar and is a clone of the dialog already present on the current perspective.
Faster development on perspectives
Perspectives in OS.bee arrange screen areas by assigning sash containers, part stacks and parts to the visible area. It is somehow difficult to imagine the resulting layout and it takes some time to see the changes. You had to restart the application server.
Here are good news: perspectives can now be reloaded without restarting the server. The drop-down menu designer shows a new menu-item called reload perspectives:
Whenever you change one or more perspective layouts, open them and open the user menu. Click on Reload perspectives. Under the hood, the current perspective model is unloaded from the Xtext resource set and all opened perspectives are closed. After that all perspectives are opened again automatically. As they render the new model is loaded and displayed.
How to filter references
- What are references in general
References in the EntityDSL are transformed to relationships at the database layer. It is easy to work with relationships through the use of references in OS.bee. References enable the designer to build trees of relationships between entities. OS.bee uses references defined in 2 ways. One way defines the ownership of another entity like in is member of. The other way defines the membership like in is owner of. Therefore references build up associations that describes the function of that relationship. This is called degree of relationshipor cardinality. Common cardinalities are one-to-one, one-to-many and many-to-many. The cardinality of many-to-one is just the opposite view of a one-to-many relationship.
- References in the UI
When a reference many-to-one is used in EntityDSL, the UI-renderer creates a combo-box to enable the user to select one owner of this relationship. The referenced owner must have either a domainKey or a domainDescription definition at any string-typed attribute. This attribute is displayed as significant selectable attribute of the owner relationship. If the current user does not have link/unlink grants to this relationship, a read-only text field is displayed.
When a reference one-to-many" is used and you use the keyword asGrid a collection of members will be displayed on a tab of the current dialog.
This was not much effort to gain this complex UI, was it?
- Filter references
Sometimes it is necessary to have multiple references to the same target entity showing different aspects of the owners. Think about units of measurement where you only want allow a subset of all members. For this purpose you can add an additional filter to the reference. The filter must refer to an enum attribute in the target entity.
The syntax may be like this:
The target entity could be defined like this:
In the UI you are then forced to pick owners of this type "piece only:
Enumerations as converters
From time to time it happens, that you connect to a database where some distinct values are encoded as strings. Normally enumerations are encoded/decoded to/from database by their ordinal number, or if any by an integer, or by its exact literal.
Now there is a new feature: encoding/decoding by kind of a string lookup list.
Let's say we have gender and marital status encoded as letters. This is what the syntax in EntityDSL would look like:
enum MaritalStatus {
	MARRIED = "M",
	SINGLE = "S",
	DEVORCED = "D"
}

enum Gender {
	Female = "F",
	Male = "M",
	Indifferent = "I"
}
You are using this enumerations with your employee entity like this:
entity Employee extends BaseUUID {
	...
	var MaritalStatus maritalStatus group personal
	var Gender gender group personal
	...
}
Together with the icons you have supplied for the enums:
...and with the translations you supplied for every language your application supports:
...the user interface looks like this in french language:
State-Machines, UI, REST Api and free programming
Working with OS.bee means creating software applications with much less effort than ever before. To prove this claim, I show the steps to implement a browser-based UI for access control with a REST web service for checking loyalty cards using a so called finite-state-machine. The whole thing will need approximately 360 lines of code, some of them just commenting the code. Impressive enough? To create the glue-code that cannot be generated using models, OS.bee uses Xtend allowing "free programming". As Xtend is closely integrated, all model-generated artifacts can be accessed as they are stored inside JVM. Xtend tries to get the best of Java, but reduce syntactic noise and add new features to allow for shorter and better readable code. So everybody who knows Java is able to program using Xtend. If you like lambda-expressions is even better.
- Entity model
Assumed you have a company and a store entity already, we need for the previously described application an entity model that looks like this:
entity Company extends BaseUUID {
   ...
	var BlobMapping welcomeImage group images
	ref Store[ * ]stores opposite company asTable
   ...
}
entity Store extends BaseID {
   ...
	/* the web service credentials */
	var String entranceHost group webservice
	var int entrancePort group webservice
   ...
   /* a store has many gates */
	ref EntranceGate[ * ]gates opposite store asGrid
   ...
}
/* this record is small and should be fast - we use 2.level caching here */
cacheable entity EntranceGate extends BaseUUID {
	persistenceUnit "businessdata"
	domainKey String num
	/* ip-address should be unique system-wide */
	var unique String ip
	var String location
	/* a store has many gates */
	ref Store store opposite gates
	/* a gate has many protocol records - this should be a strong association, so we can persist protocol updating its gate */
	ref cascadeMergePersist EntranceProtocol[ * ]protocols opposite gate
	/* some indices for fast retrieval */
	unique index gateIpIndex {
		ip
	}
	unique index gateNumIndex {
		num
	}
}
entity EntranceProtocol extends BaseUUID {
	persistenceUnit "businessdata"
	/* the point in time of the access */
	var Date entry
	/* who was it */
	var int customerId
	/* with which card id */
	var long cardId
	/* the response of the web service */
	var String message
	/* a gate has many protocol records */
	ref EntranceGate gate opposite protocols
	/* some indices for fast retrieval */
	index ByDate {
		entry
	}
	index ByCustomerId {
		customerId
	}
	index ByCardId {
		cardId
	}
}
- DTO model
In order to consume REST responses, it is a good idea to have some container (classes or types) to map the response to. These could be nested types. Here is an example for a certain web service that has a json-like response like this:
{'customer': {'customer_id': 10000, 'blocked': 1}, 'credit': {'amount': 0, 'customer_id': 10000, 'control_credit': 0}, 'response': 0, 'card': {'in_use': 0, 'card_id': 5000000000001, 'blocked': 1}}
dto WSCustomerDto {
	var int customer_id
	var int blocked
}
dto WSCreditDto {
	var double amount
	var int customer_id
	var int control_credit
}
dto WSResponseDto {
	var int response
}
dto WSCardDto {
	var int in_use
	var long card_id
	var int blocked
}
dto WSCustomerStatusDto {
	ref WSCustomerDto customer
	ref WSCreditDto credit
	ref WSResponseDto response
	ref WSCardDto card
}
Hint: names of manually created DTO must end with "Dto".
- Statemachine model
For a basic understanding you must know that state transitions are triggered by events and lead to some action on entry and/or exit of its state. Actions interact with controls. These can be data objects (DTO), schedulers, fields, buttons, layouts and peripheral devices. Data objects, fields and layouts are usually bound to one or more UI components (e.g. table, textfield, horizontallayout). Tables can be bound to collections from data objects, the other components are bound by properties like value, visibility, style and much more. Transitions are guarded by code written in Xtext in the FunctionLibrary DSL. All used text fragments are localized through the I18N-Properties of this bundle.
The model is self-explanating:
statemachine Entrance describedBy "Entrance" initialState IDLE initialEvent onStartUp
events {
	event onStartUp
	event onCheckCard
	event onIsPassed
	event onGateOpened
	event onGateClosed
	event onGateOpenError
	event onGateCloseError
	event onGatePassed
	event onErrorResume
}
controls {
	scheduler Schedulers {
		scheduler toStart delay 100 send onStartUp
		scheduler toErrorResume delay 3000 send onErrorResume
		scheduler toGateTimeout delay 5000 send onGatePassed
	}
	fields UIfields {
		layout buttons
		field info type String
		field cardId type String
	}
	keypad Buttons event trigger {
		button passGate event onIsPassed
		button gateIsOpen event onGateOpened
		button gateOpenError event onGateOpenError
		button gateIsClosed event onGateClosed
		button gateCloseError event onGateCloseError
	}
	dataProvider Data {
		dto gateDto type EntranceGateDto
	}
}
states {
	state IDLE {
		triggers {
			trigger onStartUp guards {
				guard Entrance.hasGate onFail caption "master data" description "wrong ip" type error
			}
			actions transition WELCOME
		}
	}
	state WELCOME {
		entryActions {
			invisible buttons
			visible info
			visible cardId
			invisible passGate
			clear cardId
			set "welcome" @ info
		}
		keystroke @ cardId
		functionalKeystroke enterKey sends onCheckCard
		triggers {
			trigger onCheckCard actions {
				transition OPEN_GATE guard Entrance.checkCustomer {
					clear cardId
					invisible cardId
					set "opening gate" @ info
					// open the gate here
				}
			}
		}
	}
	state OPEN_GATE {
		// wait for feedback event that gate is open
		entryActions {
			visible buttons
			invisible Buttons
			visible gateOpenError
			visible gateIsOpen
		}
		triggers {
			trigger onGateOpened actions transition GATE_OPEN
			trigger onGateOpenError actions {
				set "gate open error - try again" @ info
				schedule toErrorResume
			}
			trigger onErrorResume actions transition WELCOME
		}
	}
	state GATE_OPEN {
		entryActions {
			set "pass gate" @ info
			visible buttons
			invisible Buttons
			visible passGate
			schedule toGateTimeout
		}
		triggers {
			trigger onIsPassed actions transition CLOSE_GATE
		}
	}
	state CLOSE_GATE {
		entryActions {
			set "gate closes" @ info
			visible buttons
			invisible Buttons
			visible gateCloseError
			visible gateIsClosed
			// close gate now
		}
		triggers {
			trigger onGateClosed actions transition WELCOME
			trigger onGateCloseError actions {
				set "gate close error - try again" @ info
				schedule toErrorResume
			}
			trigger onErrorResume actions transition WELCOME
		}
	}
}
- FunctionLibrary model
The "free coding" in Xtend for a statemachine is prefixed with "statemachine" and looks like this:
statemachine Entrance {
	/**
	 * guard to initially position the gate record if any and put it in-memory.
	 */
	guard hasGate( IStateMachine stateMachine ) {
		// is EntranceGateDto already in memory?
		if( stateMachine.get( "gateDto" ) === null ) {
			// find EntranceGateDto by the browser's ip
			stateMachine.find( "gateDto", "ip", stateMachine.hostName )
		}
		// get the in-memory instance from stateMachine
		var entranceGate = stateMachine.get( "gateDto" ) as EntranceGateDto
		// if the ip could not be found in record - return false
		if( entranceGate === null ) {
			return false
		}
		return true
	}
	/**
	 * guard to prevent entrance if either customer or card are blocked and protocols the try.
	 * returns true if entrance is granted.
	 */
	guard checkCustomer( IStateMachine stateMachine ) {
		// get the in-memory instance of EntranceGateDto from stateMachine
		var entranceGate = stateMachine.get( "gateDto" ) as EntranceGateDto
		// supply all rest parameters - the first one is a fake parameter carrying the python-program-name
		var paras = <String,String>newHashMap
		paras.put("ws_getCustomerStatus", null)
		// all parameters must be Strings
		paras.put("card_id", stateMachine.get("cardId") as String)
		// override the default parameter separator to slash and emit the get command using the host and port settings from the gate owning store
		var response = HttpClient.httpGet(entranceGate.store.entranceHost, entranceGate.store.entrancePort, "/cgi-osbee/cxsblht", paras, '/')
		// create an instance of the magic object-mapper from jackson fastxml
		var mapper = new ObjectMapper
		// try to reflect the response in the WSCustomerStatusDto structure
		var customerStatusDto = mapper.readValue(response, WSCustomerStatusDto)
		// write a protocol entry of this try of entrance
		return protocolEntrance(stateMachine, entranceGate, customerStatusDto, response)
	}

	/**
	 * function to create a protocol record and check relevant flags.
	 * returns true if entrance is granted.
	 */
	function protocolEntrance(IStateMachine stateMachine, EntranceGateDto entranceGate, WSCustomerStatusDto customerStatusDto, String response) returns Boolean {
		// create a new protocol entry
		var proto = new EntranceProtocolDto
		// link with the gate instance
		proto.gate = entranceGate
		// supply all fields
		proto.customerId = customerStatusDto.customer.customer_id
		proto.cardId = customerStatusDto.card.card_id
		proto.message = response
		// get the dto-service from context
		var dtoService = DtoServiceAccess.getService(typeof(EntranceGateDto))
		// update the gate with the new member
		dtoService.update(entranceGate)
		// return true if both customer and card are unblocked
		return customerStatusDto.customer.blocked==0 && customerStatusDto.card.blocked==0
	}
}
As you can see the REST Api is called statically using HttpClient. There are methods for GET, PUT and POST commands.
- UI model
From a technical point of view UI is a node that combines different models to a system using JavaFX binding mechanisms. Mostly DTODSL and StatemachineDSL create objects that must be bound in a certain way. Take a look at the model:
/**
 * ui for the entrance application
 */
ideview Entrance {
// get the entrance state-machine
	datasource statemachine:Entrance
	// get the scheduler control objects and bind the state-machine
	datasource scheduler:Schedulers
	bind statemachine --> scheduler.statemachine
	// get the data control objects and bind the state-machine
	datasource data:Data
	bind statemachine --> data.statemachine
	// get the field control objects and bind the state-machine
	datasource uifields:UIfields
	bind statemachine --> uifields.statemachine
	// get the buttons control objects and bind the state-machine
	datasource buttons:Buttons
	bind statemachine --> buttons.statemachine
	// create a dto instance and bind the data controller
	datasource gateDto:EntranceGateDto
	bind data.gateDto <--> gateDto
	// create a blob-to-image converter
	datasource img:BlobConverter
	verticalLayout(styles "os-entrance-welcome") welcome {
		horizontalLayout images {
		// create an image component into the images layout
			image welcomeImage
			// bind the blob-to-image converter. input is a BlobMapping attribute.
			bind img.input <-- gateDto.store.company.welcomeImage
			// bind output to the image-resource property
			bind [this.welcomeImage].resource <-- img.output
		}
		horizontalLayout text {
			textfield(styles "os-span-v-double os-span-h-double") info align middle-center
			// bind the field "info" to the textfield component's property "value"
			bind [this.info].value <-- uifields.info
			// bind the field property "enabled" of "info" to the textfield component's property "visible"
			bind [this.info].visible <-- uifields.infoEnabled
		}
		horizontalLayout inputOuter {
			verticalLayout inputInner {
				textfield(styles "os-span-v-double os-span-h-double") cardId align middle-center
				// simulate the gate's events by buttons - arrange buttons in a grid by 3 columns
				gridlayout(columns= 3 styles "os-button-v-double os-font-flex") buttons {
				// create buttons - the above visible style controls sizes and layouts
					button gateIsOpen
					button gateOpenError
					button gateIsClosed
					button gateCloseError
					button passGate
					// bind the click-event of the button component to the button controller
					bind [this.gateIsOpen].onClick --> buttons.gateIsOpen
					// bind the visibility of the button component to the button controller
					bind [this.gateIsOpen].visible <-- buttons.gateIsOpenEnabled
					bind [this.gateOpenError].onClick --> buttons.gateOpenError
					bind [this.gateOpenError].visible <-- buttons.gateOpenErrorEnabled
					bind [this.gateIsClosed].onClick --> buttons.gateIsClosed
					bind [this.gateIsClosed].visible <-- buttons.gateIsClosedEnabled
					bind [this.gateCloseError].onClick --> buttons.gateCloseError
					bind [this.gateCloseError].visible <-- buttons.gateCloseErrorEnabled
					bind [this.passGate].onClick --> buttons.passGate
					bind [this.passGate].visible <-- buttons.passGateEnabled
				}
				bind [this.buttons].visible <-- uifields.buttonsEnabled
				// bind the cardId bi-directional so we can set values from the state-machine and get values from the user
				bind [this.cardId].value <--> uifields.cardId
				bind [this.cardId].visible <-- uifields.cardIdEnabled
			}
		}
	}
}
- Master data UI
At this point all important models are created to form a browser-based access control system. What still lacks is an interface to create all the necessary master data. It is assumpted that you already have a dialog for company and store, so these will be extended automatically. What we need is a dialog for the EntranceGate entity, the browser-frontend and a report to print the protocol. The whole thing must be assembled in a perspective and inserted in the menu.
- Dialog model
dialog Entrance view Entrance stateful
dialog EntranceGate autobinding EntranceGateDto toolbar Dialog numColumns 1
Create a definition for the stateful browser-frontend "Entrance" and a master data dialog for "EntranceGate".
- Datamart model
For the report we need a new datamart like this:
datamart EntranceProtocol using entity EntranceProtocol
- Report model
The protocol report:
report EntranceProtocol {
	rendering pdf datamart EntranceProtocol pagetemplate A4Portrait media small
	template {
		header {
			showOnFirst height 14
			label "Protocol"
		}
		detail {
			table style bootstrap {
				details style defaultrow {
					attribute entry style ^date
					attribute customerId
					attribute message
				}
			}
		}
	}
}
- Perspective model
Let's assemble all parts in a nifty UI structure:
perspective EntranceMasterData iconURI "welcome" {
	sashContainer outer orientation vertical {
		sashContainer upper spaceVolume "70" orientation horizontal {
			sashContainer topLeft orientation vertical {
				part CompanyTable spaceVolume "20" view readOnlyTable Company
				part CompanyDialog spaceVolume "70" view dialog Company
			}
			sashContainer webservice orientation vertical {
				part StoreGrid view readOnlyTable Store spaceVolume "20"
				part StoreDialog view dialog Store spaceVolume "70"
			}
		}
		sashContainer store orientation horizontal spaceVolume "30" {
			partStack gate spaceVolume "40" {
				part EntranceGateDialog view dialog EntranceGate
				part EntranceProtocol view report EntranceProtocol
			}
		}
	}
}
- How does it look like at runtime?
The browser-frontend in the "welcome"-state:
Give it a try - OS.bee really makes it easier for you to develop.
Execute something by pressing a toolbar button
People often ask me how it is possible to create a complete application without programming and just using models. The answer is: sometimes you can't do it without some kind of programming and without basic programming knowledge about. The good news is: there is an expression language embedded in the OSBP model environment. The DSL is called Function Library and offers a wide range of possibilities to programmers and people who have a basic programming knowledge. The language Xtend and a grammar that sets up a grouped framework guides the user through the process of creating calculations, transformations or input and output functions and thus combining the world of models with functionality. Here is an example how to use it: Let's say we already have some data in our database that must be enriched with external binary large data objects (BLOB). These objects shall be imported once and linked persistently to the appropriate data from our database. In this example the BLOB will be a jpeg-image. PDFs or Office-documents will work the same way as explained here.
- 1.Step
Add an attribute brandImage to the existing entity:
entity Brand extends BaseUUID {
    ...
	var String bsin
	var BlobMapping brandImage properties( key = "Blob" value = "2" )
    ...
	index ByBsin {
		bsin
	}
}
The type BlobMapping handles BLOBs in databases and the properties define the standard resolution which is used to display the BLOB if it is an image. If the mime type of the saved BLOB is an image, the image is automatically resized to different predefined resolutions and then stored together with its original resolution. This helps to speed up your application if the user interface uses one of the pre-rendered resolutions. If you want to want to use another resolution than predefined then you’ll need the commercial version of OS.bee.
- 2.Step
Create a new action function BrandImages in the FunctionLibrary DSL:
action BrandImages {
	canExecute CanImport(IEclipseContext context) {
		// we can press this button any time
		return true
	}

	execute DoImport(IEclipseContext context) {
		// create an instance of the dto service for the dto
       // we want to change
		val dtoService = DtoServiceAccess.getService(typeof(BrandDto))
		// to handle blobs we need the blob service from context
		val blobService = context.get(typeof(IBlobService))
		// emit a get-all-entries query
		var all = dtoService.find(new Query())
		// enter the lambda loop for each entry we found
		all.forEach[
			// dump some hint to the console (don't do that in production)
			System.out.println(it.bsin)
			// init the file io stuff
			var FileInputStream stream = null
			var BufferedInputStream input = null
			// something could fail (file not found etc.) so we use a
          // try-catch construction that we are not
          // thrown out of the loop on error
			try{
				// from the bsin number synthesize a path where
              // the input file is located and open a stream
				stream = new FileInputStream("C:/samples/gs1/brand/"+it.bsin+".jpg")
				// make a binary stream out of it
				input = new BufferedInputStream(stream)
				// with the binary stream and the appropriate mimetype and
              // name we can feed the blob service
				it.brandImage = blobService.
                      createBlobMapping(input, it.bsin, "image/jpeg")
				// don't forget to close if all worked
				input.close
				stream.close
				dtoService.update(it)
			} catch (IOException e) {
				// don't forget to close if something failed
				// the question mark is a null-save construct to avoid
              // null-pointer exceptions if either input or stream is null
				input?.close
				stream?.close
			}
		]
		// we don't care about small errors here
		return true
	}
}
In case you got problems to resolve all the necessary elements in FunctionLibrary, SHIFT+STRG+O is your friend to import all necessary stuff. If this doesn't help, you must add the necessary dependency to the FunctionLibrary's manifest file and press SHIFT+STRG+O once again.
- 3.Step
Modify the toolbar of the existing dialog. Add a new command importBrandImages:
command importBrandImages describedBy "import brand images" functionalAction group BrandImages canExecute CanImport executeImmediate DoImport
If you would like to uncouple the import process from the rest of your application then use alternatively "executeLater" to start the import process in an asynchronous way, thus unblocking the user interface from waiting for the end of execution. Asynchronous execution should always be used if the process takes more than 5 seconds to ensure a good user experience. You can also supply some feedback messages to the user if you are executing synchronously and your function returns true or false to reflect the result of execution.
Complement the new command importBrandImages to the toolbar:
toolbar Brand describedBy "Toolbar for dialogs" items {
	item newItem command newItem icon "dsnew"
	spacer
	item saveItem command saveItem icon "dssave"
	item saveAndNew command saveAndNew icon "dssaveandnew"
	item saveAsNew command saveAsNew icon "dssaveasnew"
	spacer
	item deleteItem command deleteItem icon "dsdelete"
	item cancelItem command cancelItem icon "dscancel"
	item databaseInfo command databaseInfo icon "dbinfo"
	spacer
	item importImages command importBrandImages icon "img"
	state
}
This is how it looks like at runtime after you have pressed the button and processed the BLOB import:
Core Dev
New event for statemachines
Statemachines working in combination with UI model can exploit a new feature of the component SuggestText. The SuggestText-component will send an event "onSelection" as soon as the user picked an entry of the popup list. FiledName must be a field definition of the controls section of the statemachine model. The first letter of the name is capitalized to meet the camel Case naming convention. E.g. the field "foo" which is bound to a SuggestText component will emit the event "onFooSelection". Using this event in a statemachine can trigger an action after a user selection of a SuggestText-popup-entry for further processing.
Duplicate translations
Each DSL and some other bundles come with a set of dedicated I18N property files, containing translatable items and the preset amount of target language translations. Each language has its own key-value pairs. The keys are derived from element-ids or other designated translatable strings inside a DSL grammar. All bundles of a product's target platform are scanned for those property files at startup of runtime and translations are cached inside the DSLMetadataService for fast access. By the way, DSLMetadataService also holds the models of all DSL for reference at runtime. Occasionally it happens that the same key is used in different models but with or without valid translation for each target language. There is no need to translate the same key over and over again. Since today there is a method to detect the best translation for each language using the Levenshtein Distance Algorithm. The idea is that the more distant a value is from its key, the better is the translation. On startup, the translation cache is filled with those translations that are most distant from the key. In other words: correct translations that compete against defaults or sloppy translations will make it to the cache, thus increasing the quality of the displayed translation. Additionally there is a new console output indicating duplicates in bundles as error information and surviving translations per language and key as debug information.
Edit WelcomeScreen
As for today it is possible to edit the WelcomeScreen and save the new content permanently in the Preferences of your product.
This is how it works:
Start the application and stay at the Welcome Screen.
With the right-mouse button while holding down the STRG+ALT keys, click 5 times at the top-left area of the Welcome Screen. The sensitive area is 50px in square.
A rich text editor will appear instead of the static screen. Use the tools of the editor and if you are ready, do the 5 times click stuff again to save it and switch back to static mode.
If you want to display images from the in-build themes, you must enter the following path preceding the filename: VAADIN/themes//image/logo_osbee.png for example. It is the currently selected startup theme e.g. osbp.
Here is a list of in-build images you could try (The images are taken from pixabay.com):
2M1AXEU9Q2.jpg
app-loading.jpg
binary-797263_1920.jpg
binary-797274_1920.jpg
bkgnd1.jpg
cpu-564789_1920.jpg
grid-684983_1920.jpg
grid-871475_1920.jpg
key.png
logo_osbee.png
padlock.png
personal-95715_1920.jpg
rain-455120_640.jpg
statistics-706383_1920.jpg
Top_view.jpg
U68NITW3EI.jpg
U68NITW3EI_s.jpg
If you need to restore the original WelcomeScreen just delete the tag welcomeScreen from your preferences file.
Search
When you think about searching and retrieving data, two use cases will come into your mind:
- find an entry of an entity to edit its properties
- find an entity to establish a reference.
For both cases there is a new feature dealing with filters and search views. If you want to pick an entry and don't know exactly its name, you filter all of your entries by means of filtering. There are two types of filters implemented:
- Compare filters (using keyword “filter”)
- Range filters (using keyword “range”)
Compare filters can match an attribute by a set of comparison operators:
- equal
- unequal
- greater
- greater equal
- less
- less equal
- like (you could use the following wildcards:
- % matches any number of arbitrary letters
- $ matches exactly one arbitrary letter).
Range filters expose two fields (from...until) where the inclusive borders of the range can be applied. You can supply filter metadata at the entity model by using the keywords "filter" and "range" like this:
domainKey String fullName
var String firstName
var filter String lastName
var range BirthDate birthDate
var range double salary
this means that "lastName" will have a compare filter, where "birthDate" and "salary" will have a range filter. In addition to this filters on direct attributes it is also possible to walk along the reference tree and add so called nested attributes for filtering. How deep the tree is iterated can be defined in the metadata by using keyword “filterDepth” like this:
ref filterDepth 01 Position position opposite employees
And in the Position entity:
var filter String payType
The keyword “filterDepth” limits the depth of iteration, in the example to 1 iteration. The resulting search view is automatically generated and looks like this:
The filtering can be accessed by the filter button right to the combo-box dropdown-button or you can place a search-view inside a perspective by using this syntax:
part EmployeeSearch spaceVolume "60" view search in MemployeeDto depth 3 filterColumns 1
In the perspective you can override the depth metadata from entity and tell the layouter either to arrange all filtering attributes in 1 column or 2 with the keyword “filterColumns”.
DataInterchange is externally configurable by admins
The latest version of DataInterchange implements a new feature. Whenever the model is saved, not only the java classes and the smooks configuration is written, but also a file to modify the import and export paths is written out. The file is interpreted using the Properties xml import and export method and looks like this:
<?xml version="1.0" encoding="UTF-8" standalone="no"?>
<!DOCTYPE properties SYSTEM "http://java.sun.com/dtd/properties.dtd">
<properties>
<comment>dataInterchange file URLs</comment>
<entry key="EmployeesDepartment-import">C:/myimports/employeesdepartment.xml</entry>
<entry key="EmployeesDepartment-export">C:/myexports/employeesdepartment.xml</entry>
</properties>
By default, this file is named like the title in the dataInterchange package and extended by "Config" and has the extension "xml".
package net.osbee.sample.foodmart.datainterchanges title "DataInterchange" {
leads to the filename:
DataInterchangeConfig.xml
and is stored platform independently in the current user's home directory under the subdirectory ".osbee".
An administrator must receive this configuration file with the application, modify it and place it somewhere on the application server. The path to this configuration file must be given in the product's preferences (org.eclipse.osbp.production.prefs):
datainterchange/datainterchangeConfiguration=c\:\\DataInterchangeConfig.xml
The path value obviously depends on your operating system.
In the Eclipse IDE the setting looks like this:
Statemachine (FSM) handles external displays
The latest development for the Statemachine DSL (Finite State-Machine) covers the synchronization of external (slave) browsers to a main (master) browser connected to an OS.bee server. The requirement was mainly inspired by the need of a customer display for the OS.bee POS application OS.pos. In this context it is required parts of the main screen's data which is shared on the slave browser working as a display.
Multiple displays can be connected to a master just by using a pattern on the address line of the slave-browser:
http://{server host-name}/osbpdisplay/#{host-name of the master}-{DisplayName as defined in the ui model}
► e.g.:
http://dv999.compex.de:8081/osbpdisplay/#dv888.compex.de-CustomerDisplay
The FSM supports some new keywords to do so:
-
display <DisplayName> using <DTOName>
-
dto <DTOAlias> type <DTOName> attach <DisplayName>
-
displayText text "some text" @<DisplayName> to <DTOAttribute>
The references of a DTO that is attached to a display are always synchronized across all connected displays. Single fields must be synchronized by displayText.
► e.g.:
dto cashslip type CashSlipDto attach CustomerDisplay
display CustomerDisplay using CustomerDisplayDto
displayText text "locked" @CustomerDisplay to message
► Attention: the formerly used keyword displayText was related to lineDisplays and is now reused for displays. That means for an update to this version, all displayText keywords must be changed to lineDisplayText.
The referenced DTO must be the rootType of the Display definition in the ui model:
display Customer {
	rootType CustomerDisplayDto
	datasource main:CustomerDisplayDto
	verticalLayout left {
		textfield(i18n noCaption readonly) message
		table(i18n noCaption) slip {
			type CashPositionDto
			columns {
				column quantity
				column product.sku
				column product.product_name
				column price
				column amount
			}
			sort {
				column now asc
			}
		}
		align fill-left
		bind [this.message].value <--> main.message
		bind [this.slip].collection <--> main.slip.positions
	}
}
Database Support
Which database systems are supported by the OS.BEE Factory Software? The OS.BEE Software Factory currently supports 4 different database management systems:
The corresponding settings have to be inserted into the product configuration of your application.
Within your Eclipse workspace, open the preferences by clicking to the menu “Window -> Preferences -> OSBP Application Configuration” and choosing first the right product configuration file – the configuration file pointing to your application project (e.g. org.example.yourprojectname.application/.metadata/.plugins/org.eclipse.core.runtime/.settings/org.eclipse.osbp.production.prefs).
Afterwards you can go on to the “Data Source” subsection and enter the information needed for the database you would like to use.
For instance, if you are using an Oracle database as persistence layer for your application, you will set up all the information of the database connection into a JNDI Data Source, in which you will choose the database, its fully classified driver class name and the remaining information such as server name, port and account credentials as shown below.
Similarly you may create further data source instances if needed by duplicating or editing existing ones like shown below for MySQL and H2 In-Memory.
After setting the data sources you would like to use inside your application, all you need to do at last is to specify in each persistence unit instances which data source to use, as shown below.
The persistence units are used on the entity level to identify where certain data are located, in this case in which database. This also gives you the flexibility of storing and retrieving data from multiple data sources. For instance, user credentials (persistence unit: authentication) and other business related data (persistence unit: businessdata) would be stored in an Oracle database whereas business process management (persistence unit: BPM) related data would be stored in a MySQL database due to some organizational decisions… Further information on how data are persisted, can be found in the Entity DSL documentation page.
You may also have a look on the OS.bee Software Factory documentation pages.
Combo box handles now more complex objects
Question:
How to define a combo box that holds an object composed of an id and a label and display only the object label on screen but persist the object id?
Answer:
Until now the type of the object that holds the combo box was also the type for its selection. So it was only possible to persist the type that holds the combo box. The enhancement done on the combo box is that an additional model selection type ("modelSelectionType") can be defined. So the combo box definition can have two different types, one for the objects that the combo box holds in its collection ("type") and another for the information that has to be persisted for the selected object ("modelSelectionType") within the combo box. Due to this change using an object A composed with the attributes id and label from type String a combo box can hold the object A as the type for the container but the type String for the selected item as for example its id. The model to presentation conversion from the container type to the selection type (object A to String) has to be done by an individual converter (as these) implementing YConverter. Example using as type for the collection VaaclipseUiTheme (JavaDoc) and displaying on screen the VaaclipseUiTheme label but persisting its id:
YComboBox yCombo = (YComboBox) ExtensionModelFactory.eINSTANCE.createYComboBox();
yCombo.setUseBeanService(false);
yCombo.setCaptionProperty("label");
yCombo.setType(VaaclipseUiTheme.class);
yCombo.setTypeQualifiedName(VaaclipseUiTheme.class.getCanonicalName());
yCombo.setModelSelectionType(String.class);
yCombo.setModelSelectionTypeQualifiedName(String.class.getCanonicalName());
yCombo.getCollection().addAll(getThemes());
YConverter conv = YConverterFactory.eINSTANCE.createYVaaclipseUiThemeToStringConverter();
yCombo.setConverter(conv);
For more information how to use our combo box have a look on: YComboBox (JavaDoc)
Enriching csv files to highlight complex information
Although it is possible to read and import data from csv files with the help of csv reader tools, the reading process doesn’t consider possible existing relations between the data contained in those files. What is missing here is the possibility to enrich those file with the metadata information needed to highlight the presence of relations between the flat data contained in a bundle of different csv files; thus, giving users the means to set up information over complex structures. With the CSV2App module of the OS.bee Software Factory, you are now able to set additional metadata information into a csv file, by enriching its column definitions. This allows users to define a set of configurations, which will be used to create more complex entity structures, and so forth more complex applications (entities, tables, actions, menus, dialogs…). You can get more information here. You may also have a look on the OS.bee Software Factory documentation pages.
Max File Size BlobMapping
Question:
What is the biggest file size allowed to be imported/uploaded into an OS.bee (created) Software?
Answer:
Some information about the OS.bee BlobMapping data type can be found here. Some information about the database systems currently supported by the OS.bee Software Factory can be found here. You may also have a look on the OS.bee Software Factory documentation pages.
How to show JavaScript compile errors building the Widgetset
Due to a bug in the vaadin-maven-plugin a system property needs to be specified invoking the guid. For normal the -strict option in the pom should do it. But <strict>true</strict> leads to an error, that -failOnError is not a supported option.
Just call the widgetset build by:
mvn clean verify - Dgwt.compiler.strict=true
Then the build will break if errors during the widget set compilation occur. And the console will show the error problems. There is also a similar option -struct. This will break the build even if warnings occur.
Apps
Launch my1app - error
Question:
Following is the error when launching my1app :
java.lang.RuntimeException: Error initializing storage. at org.eclipse.osgi.internal.framework.EquinoxContainer.(EquinoxContainer.java:77) at org.eclipse.osgi.launch.Equinox.(Equinox.java:31) at org.eclipse.core.runtime.adaptor.EclipseStarter.startup(EclipseStarter.java:295) at org.eclipse.core.runtime.adaptor.EclipseStarter.run(EclipseStarter.java:231) at sun.reflect.NativeMethodAccessorImpl.invoke0(Native Method) at sun.reflect.NativeMethodAccessorImpl.invoke(NativeMethodAccessorImpl.java:62) at sun.reflect.DelegatingMethodAccessorImpl.invoke(DelegatingMethodAccessorImpl.java:43) at java.lang.reflect.Method.invoke(Method.java:498) at org.eclipse.equinox.launcher.Main.invokeFramework(Main.java:648) at org.eclipse.equinox.launcher.Main.basicRun(Main.java:603) at org.eclipse.equinox.launcher.Main.run(Main.java:1465) at org.eclipse.equinox.launcher.Main.main(Main.java:1438) Caused by: java.io.EOFException at java.io.DataInputStream.readInt(DataInputStream.java:392) at org.eclipse.osgi.container.ModuleDatabase$Persistence.readWire(ModuleDatabase.java:1168) at org.eclipse.osgi.container.ModuleDatabase$Persistence.load(ModuleDatabase.java:1028) at org.eclipse.osgi.container.ModuleDatabase.load(ModuleDatabase.java:879) at org.eclipse.osgi.storage.Storage.(Storage.java:145) at org.eclipse.osgi.storage.Storage.createStorage(Storage.java:85) at org.eclipse.osgi.internal.framework.EquinoxContainer.(EquinoxContainer.java:75) ... 11 more An error has occurred. See the log file null.
Answer:
This is kind of OSGi initialization error. Just stop all applications running, restart Eclipse and try again.
Launch my1app - error
Question:
Following is the error when launching my1app :
org.hibernate.tool.hbm2ddl.SchemaExport - HHH000389:unsuccessful : alter table…
Answer:
Just in case you see this error message in the console during the start of your application it might be caused by a missing setting in the Eclipse IDE preferences. Please check the DS annotations setting as mentioned in the installation documentation. After you activate the generation of DS annotations, you have to rebuild the project. Then it starts properly.
Launching an app on OSX results in an endless wait after login
Question:
Launching an app on OSX results in an endless wait after login.
Answer:
If you experience an application hang after the login in an application launch from the Eclipse IDE on OSX, it might have the reason in the automatically created launch configuration. The checkbox "use -XstartOnFirstThread ..." should not be marked. Remove the mark, relaunch the application and it will work.
Update build.properties to make use of new feature
The OS.bee Softwarefactory now creates default icon files in a folder named "enums" in the bundle containing entity model files. It is neccessary to add this folder to the build.properties file of the bundle, otherwise the icons are not available in the final application. A sample build.properties file looks like:
source.. = src/,\
          src-gen/
bin.includes = META-INF/,\
               .,\
               .settings/,\
               OSGI-INF/,\
               i18n/,\
               enums/
How do i get the OS.POS-App started
Question:
There are three steps in the description download = ok extract = ok configure = ???
Answer:
Concerning the configuration of the connected peripheral units, there is a short answer: all peripheral units that can be connected have to follow the JavaPOS specification. There is a configuration file in xml format that has to be edited by programs of the peripheral hardware vendor. E.g. if you have Epson hardware, you must install the EPSON_JavaPOS_ADK_1143. After installing the appropriate drivers and programs , you can start "SetupPOS" and configure a POSPrinter, LineDisplay and CashDrawer, test their health with "CheckHealth". The path of the newly created configuration xml must be entered in the preferences file, then you can start OS.bee. There is a lot of configuration stuff in the preferences file which will be published step by step. Best way to edit is inside an Eclipse IDE under "OSBP Application Configuration".
Support for mysql8 and Microsoft sqlserver now available
The OS.bee Software Factory brings now the support for Microsoft SQL server and mySQL. If you can't wait for the release use the daily build to use the new database drivers :)
Copyright Notice
All rights are reserved by Compex Systemhaus GmbH. In particular, duplications, translations, microfilming, saving and processing in electronic systems are protected by copyright. Use of this manual is only authorized with the permission of Compex Systemhaus GmbH. Infringements of the law shall be punished in accordance with civil and penal laws. We have taken utmost care in putting together texts and images. Nevertheless, the possibility of errors cannot be completely ruled out. The Figures and information in this manual are only given as approximations unless expressly indicated as binding. Amendments to the manual due to amendments to the standard software remain reserved. Please note that the latest amendments to the manual can be accessed through our helpdesk at any time. The contractually agreed regulations of the licensing and maintenance of the standard software shall apply with regard to liability for any errors in the documentation. Guarantees, particularly guarantees of quality or durability can only be assumed for the manual insofar as its quality or durability are expressly stipulated as guaranteed. If you would like to make a suggestion, the Compex Team would be very pleased to hear from you.
(c) 2016-2025 Compex Systemhaus GmbH
